Video summary
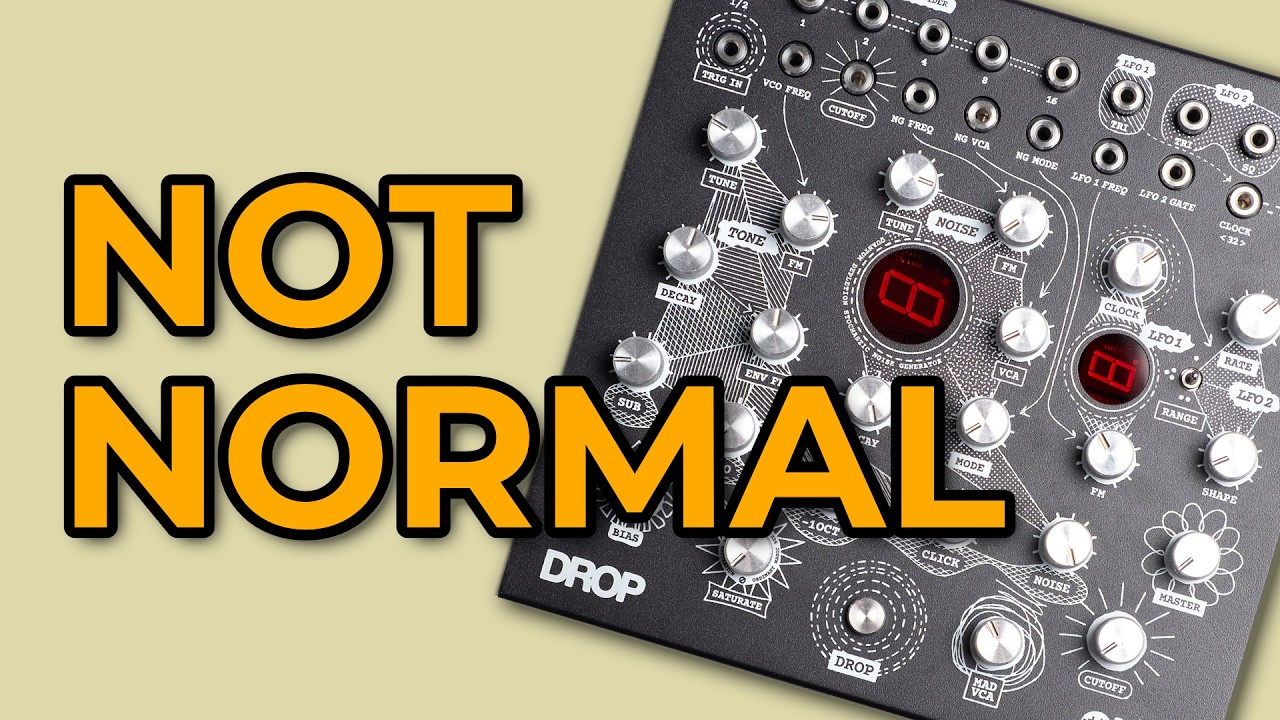
The video introduces the Drop, an aggressive and unconventional groove box from Mad Sound Factory that was featured at Superbooth. Unlike traditional drum machines, the Drop features a unique sound generation architecture split into two main sections: a tone section and a noise generator. The tone section offers an analog-style kick, tom, and snare synthesis with interactive controls for pitch sweeps, envelopes, and FM modulation. Users can mix different waveforms, including a tight pulse, a hollow square wave, and a rounded sub-oscillator, while adding percussive clicks to shape the transient response of the sound.
Beyond its tonal capabilities, the Drop boasts a highly versatile noise generator that serves as a second voice for the instrument. This section includes dedicated controls for tuning, decay, and a VCA that can be modulated independently to create droning textures or rhythmic patterns. A standout feature is the mode knob, which alters how the noise is derived within the circuit, offering various sonic characteristics ranging from hollow scoops to digital tones and clappy sounds. Additionally, a dedicated "Mad VCA" introduces feedback loops that simultaneously soften and harden the noise, creating complex, evolving textures that are difficult to replicate with standard Eurorack modules.
A significant portion of the video is dedicated to explaining how to integrate this banana jack-based instrument with Eurorack systems, addressing the critical issue of common ground references. Since banana jacks lack a shared ground like TS cables, the presenter demonstrates using an interface box to link the Drop's ground output to the sleeves of all connecting cables, ensuring stable voltage communication. Once connected, the Drop can be sequenced externally using devices like the Korg SQ-1, allowing for pitch and gate sequencing that unlocks complex rhythmic possibilities. The video also explores advanced techniques such as modulating the internal clock with LFOs, using logic gates like XOR to combine clock divisors without destructive interference, and resetting the clock divider to create unquantized, human-like grooves.
Ultimately, while the Drop's internal clock dividers have some limitations when combined directly due to their destructive nature, these can be overcome by incorporating external logic or sequencing gear. The presenter concludes that the instrument shines best when used as part of a wider system rather than in isolation, praising its heavy, raw sound and quirky rhythms. Although there are minor criticisms regarding the clock divider combinations and the difficulty of managing unquantized LFOs, the Drop is presented as a powerful tool for those who appreciate non-standard gear. The video ends with demonstrations of triggering the machine via audio transients, contact mics, and even video playback, highlighting its tactile nature and potential for creative experimentation before offering suggestions for future improvements in a hypothetical version two.
Read the full video transcript
[music]
>> Hello, Oscillate Sync here.
At Superbooth 2 years ago, as I was
walking the halls, I felt a hand on my
shoulder and a voice said, "Oscillate
Sync, let me show you my groove box."
Now, whatever gets conjured in your mind
when you hear the phrase groove box is
probably not the drop from Mad Sound
Factory.
But after a few minutes of patching and
turning knobs, I had it generating
extremely aggressive gabber and
naturally I was hooked and named it one
of my synths of the show.
>> [music]
>> In this video, we'll get to know Drop,
how it works, how it sounds, how it
plays with others, including a
discussion of how to get banana jacks
and Euroracks to talk.
>> [music]
>> As the video is long because, of course
it is, it's on my channel, I've added
chapter markers throughout and scattered
in some small no-talking demos, both
with Drop as a solo instrument and in
ensemble with other instruments.
>> [music]
>> In the interest of transparency, Mad
Sound Factory sent me the Drop to make a
video about for free and I get to keep
the instrument. But as I said, this is
one of my favorite instruments from
Superbooth, so I am happy to be showing
it on the channel regardless.
Let's dive in.
>> [music]
>> So, I don't want to labor over the sort
of on-paper technical specs of Drop
because it's definitely an instrument
that we want to get to know through
playing and patching. But before we get
to that playing and patching, it's
probably worth at least establishing a
baseline of what we have from a sound
generation perspective.
So, there are basically two different
sound generation aspects to Drop.
And um
what you hear at the moment is what's
going on on the left-hand side, the tone
section,
which is kind of like an analog-style
drum synth kick drum synth tom drum
synth type architecture
with a couple of twists.
So, um we've got two tune control.
Doesn't sound like it goes super high,
but that's because we're currently
sitting to sort of the lower range of
the the oscillator.
>> [music]
>> We have an FM control that's just an
attenuverter or attenuator rather for
the
patch point here, so we're not hearing
anything there.
Obviously, you can hear that we have an
envelope on the sound. That's the decay
control controlling that.
Goes right down to clicks.
>> [music]
[music]
>> Goes nice and long at the other side.
You can probably also hear that we've
got that classic pitch sweep at the
start of the sound.
>> [music]
>> That you get on a lot of drum synths.
That's controlled by the envelope FM
knob here.
Or rather I said it's controlled by
this, but actually these two controls
are super interactive.
>> [music]
>> The other thing that it's interactive
with
>> [music]
>> is how often we're getting triggers. So
>> [music]
>> So it's it's not kind of like we're
setting fully. So if you send
faster triggers in, you get a different
tonal shift. And that's a great way to
get sort of dynamic performance stuff
happening in the tone section when you
are sequencing it.
>> [music]
>> So what we're actually hearing at the
moment is the sub oscillator of the
tone, which is actually two octaves
down.
The actual sound of this section is on
the VCO knob.
Which is actually a really tight
kind of
wiry sounding
pulse sound.
But we have a uh one octave down version
of that on the minus one octave.
Which is like a really clean
>> [music]
>> hollow uh square wave.
>> [music]
>> Very cool.
Uh and then we have the sub that we've
been hearing.
Which is kind of a more rounded square
wave.
I personally think of the sub as like
the main sound and then I use these
controls to introduce overtones. So, if
I want a bit more
>> [music]
>> body to the sound,
I'll probably mix in the one octave
down.
>> [music]
>> We've still got that weight from the
sub, but we've got a bit more of that
sort of mid-range body.
>> [music]
[music]
>> Yeah. And then the uh the sort of the
plain VCO sound
brings that sort of wiry
upper mid kind of
>> [clears throat]
>> snotty attack.
>> [music]
>> And we can kind of combine those
different sounds
>> [music]
>> to fine-tune
the kind of sound that we're after.
>> [music]
>> We also have a dedicated click control,
which adds that sort of
percussive click to the sound.
>> [music]
>> That sort of transient at the front
of the sound.
>> [music]
[music]
>> Which really kind of rounds off what we
are listening to.
>> [music]
[music]
>> So turning down the tone controls here,
we can turn up the noise control, noise
being the other way that we can generate
sound on the drop.
>> [sighs]
>> So I really like this noise generator
and I kind of wish I had could have it
in kind of a stand-alone format in your
rack.
It's really cool sounds that you get
from it. So um up at the top we have a
tune control for the noise.
So it's an
analog noise generator
deriving
the noise somehow.
And what we're doing with the tune
control I think is just sort of changing
the sample rate of whatever's being
sampled to get that pseudo random
You can hear it when it's down at the
lowest.
>> [music]
>> That's sort
>> [sighs]
>> You can kind of hear the sample rate.
It's really cool sort of hollow
scoop sounds in the middle there. Nice.
Um we've got an FM control which like on
the tone is just an attenuator for the
FM input.
We have a VCA control here
which allows us just to turn on the
noise.
So, we can have it sort of droning.
You can also hear that
there is an effect on the level as the
tone.
>> [sighs]
>> So, we can just have it droning, but
moreover we can control the VCA through
the patch point which allows us to
decouple
the sound from the main trigger if we
want to.
>> [sighs]
>> Uh, we have a decay control. You can
hear that we've got a
envelope on the noise.
And that's a separate decay to the tone,
so we can have
the noise be shorter if we're going to
use the two together.
Or longer.
This actually still interacts with the
envelope FM as well, interestingly.
>> [gasps]
[sighs]
>> So, all of the decay controls, all the
envelope controls are kind of
interactive.
>> [sighs]
>> Where this instrument gets really
interesting with this noise generator
and why I want it as a standalone module
is this mode knob. So,
this changes how the noise is being
derived within the circuit. I don't know
the technical details exactly, but this
has a massive impact on not only the
>> [sighs and gasps]
>> general sound of the noise,
but also what the tune control does as
well. So, let's just have a little cycle
through this and
um, you might notice the display here is
changing as I turn this knob. So, this
tells us which noise mode we're in as it
goes round.
And that's really useful because we have
a patch point for the noise
mode, which is one of the key things in
Drop in terms of getting movement in the
patterns. So, let's just have a listen
to
um mode one was what we just on.
So, here's mode two.
>> [sighs]
>> Right?
How cool?
What's going on there?
Who knows? Sounds good, though.
Uh next mode.
>> [screaming]
[screaming]
>> This is kind of the
to my ears, it's the most sort of
normal noise generator.
And here we basically have
a tonal
noise.
>> [music]
>> Remember, we can be modulating that with
the FM control and CV.
>> [laughter]
>> Back over to slightly more sort of
clappy noise.
I like this modulation in there, though.
A pretty cool digital sound down at the
bottom there.
Yeah.
Nice.
And finally, we got this mode here.
>> [screaming]
[groaning]
>> Again, we kind of got those sort of
tonal elements in here, which seem to be
very interactive with the
the decay portion.
>> [groaning]
>> Linked to the VCA, so I think if we
bring the VCA up, we can hear
that there are
>> [music]
>> different nuances in there. It even kind
of gets
locked in.
It finds places of stability.
Kind of almost feels like there's like a
low-pass gate on the VCA.
Yeah, I'd love this as a standalone
module just for noise.
I don't know, perhaps people don't get
as excited about noise generators as me,
but I think that's really cool.
Um on top of all of those sort of tonal
shaping options, we also have this
control here, the mad VCA.
So, this interacts with the noise.
And
it sort of does some sort of feedback
stuff.
Which both makes the noise sort of
harder
and softer at the same time. It's
so
soft there.
And it's also
really interactive with what happens on
the tune control.
Like it's
on especially on these pure noise ones,
it's like a whole different sound.
It's also sort of clappy one.
So that's a clappy one, isn't it?
Kind of shortens the sound, like it
kills the decay.
YEAH.
JUST [laughter]
GIVE ME
THIS IN ITS OWN MODULE.
ALTHOUGH I suspect it's deriving signals
from other parts of the circuit, which
means that you couldn't really
[laughter]
quite have it do the same thing in its
own module.
Yeah. Okay. So I've nerded out about a
noise generator for long enough now.
Let's start actually patching stuff up.
>> [laughter]
[laughter]
[music]
>> So I've patched up a little patch here,
um and we'll break down everything
that's going on in the patch bay in
terms of what's making it play itself
uh in a moment, but um
first I want to talk about the other
tonal shaping options that we have on
the drop. Uh and I want to do it with a
kind of a patch running cuz they kind of
make more sense in that sort of context
of something more complex rather than
just individual hits.
>> [music]
>> We'll start over here on the right where
we have a master low-pass filter across
the output.
Uh it's resonant. Uh the range isn't
like massive, so we don't go down to
like killing the sound altogether, uh
but it's useful in in most ranges. I
tend to find that like the
the lower half is more sort of character
things, and then on the upper half you
kind of have the more neutral-sounding
stuff, but you can really pick out some
some sort of plucky resonances in there.
So, let's just have a quick sweep of it
to to hear what it can do.
>> [music]
[music]
>> We've kind of got that sort of snotty
resonance there.
Especially in the
>> [music]
>> the attacky part of the the tone.
Really picking out the click there.
Sort of slightly pinging that resonance.
>> [music]
[music]
>> And definitely more open, obviously, all
the way up there.
I tend to like it a little bit dialed
back.
>> [music]
>> It just feels like it emphasizes the low
end a bit.
>> [music]
>> Yeah.
I'll just leave it there for the moment.
>> [music]
>> So, on the left-hand side here, we have
a saturation circuit with two controls.
We have a bias control, which is going
to push the signal either higher or
lower into the clipping. And because
it's a symmetrical, that's going to have
a different effect on the tone. And then
we have a saturate knob, which is kind
of our gain, if you like. The bias has
an effect even with the saturate all the
way down to the bottom.
So, um
what you'll hear as I turn it further to
the left, things become kind of softer
and rounder.
And things get more clipped and almost
sounding almost like a compressor
uh
when we turn it further up. Listen to
what it does to the noise in particular
when we [music] get to the higher
section here. So, let's go to the bottom
here.
Kind of softer.
>> [music]
>> Start to get a bit more sort of attack
to the sound.
>> [music]
>> You can hear how it's sort of clipping
down on the tone there. Almost like it's
tightening the pulse width.
>> [music]
>> It's also pushing the noise back.
>> [music]
>> What's that's going to interact with?
>> [music]
>> Yeah, the other parts of the tone as
well.
Like
the sort of neutral bit as far as I'm
concerned it's kind of in this
section from about
sort of 10:00 to 2:00
just a taste.
>> [music]
>> So, the saturate knob
is going to give us more and more gain.
So, let's give that a bit of a tweak and
play it off with the bias as well.
>> [music]
>> Immediately we get that sort of
>> [music]
>> warmer sound.
Voice knob is even more sort of
obvious at this sort of lower gain
setting here.
>> [music]
>> You can really feel how it pushes that
noise back.
>> [music]
>> And emphasize the attack.
Let's bring more gain.
>> [music]
[music]
>> We've got that sort of twonk on the kick
now.
>> [music]
>> Probably to lower the decay.
>> [music]
[music]
>> More envelope of hammer.
Yeah.
>> [music]
>> Push it harder.
Now it's proper distortion.
>> [music]
>> Bring the decay back up.
>> [music]
[music]
>> Proper destruction there.
I certainly like this point from like
9:00 to 12:00 it's like
all useful.
>> [music]
>> It's all just general warm up.
>> [music]
>> I'm going to buy a stance to relax
things a little bit.
>> [music]
>> Or click it up to four.
It's a really cool circuit.
>> [music]
>> So, yeah. That's the uh
saturation and the cut off as well.
So, um
let's break down what's going on
up in the patch day.
If you're using the drop solo and you're
not just tapping the drop button to
trigger it, you're probably going to be
making use of the internal clock and the
clock divider outputs along the top
here.
Um before I use a patch cable, I will
point out that you can
just finger patch because the connectors
are metallic for a reason, but I need to
use my hands to do other things in this
video, so I'm going to use a patch
cable.
Um
there we go.
>> [music]
>> So, um the first thing I'll point out
that uh
we have this
>> [music]
>> segmented display here, and this is
actually showing you the status of the
different clock divider outputs. On the
far right here, you can see the eighth
output, which is
going at the rate that we can hear. And
if I move across to the
fourth quarter output, I suppose, uh the
one on the bottom right shows us
that clock divider's output. So, you get
a visual indication of what's going on
here.
Uh
I'm going to get back to the eighth
though.
So, here we can hear the drop is
triggering itself
>> [music]
>> with eight notes of the clock, which is,
you know,
it's a beat. And actually, just a four
to the floor or eight to the floor, I
guess, here is still a useful thing to
be able to do. But, we probably want to
think about how we can get something
more interesting happening with the
sequencing.
So, one of the things that we can do
on drop is we can combine the different
>> [music]
>> Let's go with the 16th and the quarter
note.
We can combine the different clock
divide outputs to get different
patterns.
Now, you might have assumed because I
was using the 16th here that we would be
hearing more beats than we are
currently hearing.
The reason that we're not is because of
the trigger looking for a transient
which is going up to a particular
voltage.
Now, if we think about what's happening
on the quarter note output which we can
see on
>> [music]
>> this bottom one here.
When that is high,
the 16th notes which are being pinged
>> [music]
>> faster
are not going to be creating a transient
because the voltage is already high.
So, what we're hearing is essentially
the one quarter note and the 16th which
happen to line up.
And then we're hearing the 16th note
which is happening sort of instantly in
there as well.
So, in a way this is kind of destructive
sequencing when we combine these
different inputs.
Uh there is
something we can do externally where we
can make something more of these clock
dividers which I will look at a little
bit later in the video.
So, that's one way that we can get
different
>> [music]
>> um
patterns. I'm going back to my eighth, I
think.
>> [music]
>> So, the next thing I want to show you in
terms of getting different patterns is
that we do have an FM control for the
clock. This is going to affect the clock
rate.
So, we can modulate this with something
to get different patterns.
Now we have a second uh LFO here LFO 2
here so we could actually just
take the triangle output of LFO 2 put it
into the
>> [music]
>> put it into the input of the FM and find
a rate where
>> [music]
>> some
>> [music]
>> combination
which does something interesting.
>> [music]
[music]
>> So we can get different grooves that
way.
Uh and of course this is going to be
affecting the different parts of the
clock divider
differently, right?
>> [music]
>> So again if we now combine
>> [music]
>> we can get something interesting
happening there. We could do the square
output instead.
Not so much.
>> [music]
>> Uh or we could rather than
doing something with the LFO, we could
actually use one of the clock divider
outputs to modulate the clock.
>> [music]
>> Uh let's try the half notes.
>> [music]
[music]
>> And that's going to become a lot more
sort of cohesive because the modulation
of the clock is actually being defined
by the clock itself.
>> [music]
[music]
>> So modulating the clock that's one thing
we can do to eke out some different
um
>> [music]
>> some different rhythms there. But,
there's some other things we can do as
well even just internally.
>> [music]
>> Now, I mentioned that we had this second
LFO.
Um we can use the second LFO as uh
as a clock essentially. And we combine
the inputs to the trigger.
I should say um that the general
received wisdom in Eurorack would be
that we shouldn't be combining different
outputs into a single input just by um
multing them. It's absolutely fine to do
on Drop.
So, let's take the square output of LFO
2 and bring it into the trigger input
here.
>> [music]
>> And see if we can find a relationship
between the
>> [music]
[music]
>> We get these kind of loops
>> [music]
>> with these sort of rhythmic
interactions that we wouldn't
necessarily come up with ourselves.
>> [music]
>> And because this is unquantized, this
might be a little bit tricky to then
integrate with
another piece of gear, but certainly
from the perspective of
uh
sampling or making loops,
you get these grooves that just would
not occur in other places.
The shape knob on the second LFO is
essentially the pulse width on the
square output.
So, this will also
>> [music]
>> completely change what we're doing
with our beat.
>> [music]
[music]
>> Go fast on.
>> [music]
[music]
>> Now, one thing that we have on drop,
which is quite interesting for LFO 2, is
a gate control for it.
Which just allows us to turn the LFO on
and off. So, we can actually take one of
our
clock dividers in here.
>> [music]
>> And because now we're turning the LFO 2
on and off at a sort of defined rhythm,
>> [music]
>> the less sort of quantized stuff
is now being sort of
encapsulated into something quantized.
>> [music]
>> Try
holding it steady.
>> [music]
>> So, by using the LFO 2 gate, we can take
something unquantized and fit it more
into something that's quantized [music]
to the clock.
And again, just changing the shape,
it's going to make quite a big
difference
>> [music]
>> to the grooves that we find.
>> [music]
[music]
>> And that's holding it high so long that
we're not getting anything.
>> [music]
>> And we have a
>> [music]
>> production to change the rate here, so
we can be much faster on the slow
setting, but we can also go to audio
rate.
And
trigger it so fast that we're getting
>> [groaning]
[music]
>> It's all trails.
>> [music]
[music]
>> Yeah.
>> [music]
[music]
>> So, the last way that we can get at
different rhythms in here is also if
we're working standalone going to use
the second LFO.
I'm just going to unpack some stuff
here.
>> [music]
>> Back to our eighth notes.
So, the clock input here
is essentially
>> [music]
>> at the moment normal to what the clock
is doing, which is LFO 1 also.
>> [music]
>> Now, if I plug something in here
then well
if this isn't plugged in then we're
going to get nothing.
We could plug
LFO 2 in and now LFO 2 is the clock
instead, which might be useful in some
cases.
But, the interesting thing with some of
the inputs on Drop is if we don't plug
in all the way,
>> [music]
>> what you end up getting is a combination
of what was normaled
and then what you plug in. So, at the
moment we've got nothing plugged in
and we're just hearing the original
clock. Now, if I plug in LFO 2 here,
what we're going to hear is the
combination of the internal clock
and LFO 2.
>> [music]
>> Now, at the moment it sounds pretty sort
of straightforward, but if you look at
the
>> [music]
>> clock divider output here, we can see
that there are some things which are
doing quite interesting little moves.
So, perhaps if we instead combine the
quarter note and the 16th notes,
>> [music]
>> and then find
>> [music]
>> some relationship between
>> [music]
>> the different inputs.
>> [music]
[music]
>> How about
>> [music]
>> Cool.
Then maybe we could take the
quarter note output and bring it into
the noise generator VCA and have that.
>> [music]
[music]
>> And then perhaps we can take the
>> [music]
>> Uh let's take the
eighth notes.
Run that into the noise gate FM.
Turn the noise generator's FM.
>> [music]
[music]
>> Got some delay.
>> [music]
[music]
>> Maybe take the triangle output.
>> [music]
>> It's still kind of our tone, bring it
into the
cutoff.
>> [music]
[music]
>> Maybe take the half notes.
>> [music]
>> We're going to get into the VCO
frequency.
>> [music]
[music]
>> Hey, I should mention touching the drop
will stop the trigger input receiving
triggers.
So, you can use this to drop things out.
Now, the clock is still running, which
is why we're still hearing the
noise DCA happening.
>> [music]
>> Maybe we can take
the whole note and use that to modulate
the
noise mode.
>> [music]
[music]
>> So, there is one other way that we can
modulate what's going on with the clock
divider as well.
Which I'll just unpatch some stuff
before we get to uh
using
the drop with
shush with other things.
So, the one other way that we can affect
the patterns that we're getting.
Can I just come back to my eighth notes
here with the trigger?
>> [music]
>> Um actually, let's use the
>> [music]
>> quarter notes and the 16th notes
together, perhaps.
So, one of the things that we have here
is a reset for the clock divider. And
when this gets a signal, it's going to
reset where the clock divider is at. So,
we can
again use our second LFO
>> [music]
>> in square mode and patch it into the
reset.
>> [music]
>> And now, the clock divider is going to
be reset
basically at the rate of
>> [music]
[music]
>> this LFO.
>> [music]
>> Because there's a slight phase
difference because of the different
rates they're unquantized, we're getting
these different
>> [music]
>> little phrases.
And as with when we were using LFO 2
before, changing the rate,
>> [music]
>> changing the shape.
>> [music]
>> So, one other thing with the reset here
is that while
the input is high, it also stops the
clock divider moving at all.
You see that this little
dot here.
>> [music]
>> So, with the shape skinny, we're only
really resetting it, but if the shape is
>> [music]
[music]
>> So, there's a quite a few different sort
of grooves we can get just by messing
with the reset.
>> [groaning]
>> Yeah.
Couple of the things we can do with some
of the modulation sources that are here.
If we just come back to the FM synth.
>> [music]
[music]
>> Uh using the
LFO 2 at an audio rate into the
VCO frequency FM.
Kind of get this
FM tones.
But we're already having a lot of time,
so what we could do is
gate.
>> [music]
[music]
>> Okay, that's uh easy with something else
as well.
>> [music]
[music]
>> So, we're going to look at integrating
the drop with other equipment. We're
going to start with the Korg SQ-1.
Before we get into that, we do need to
address how we integrate banana jack
type synthesizers with, to be fair, most
other things. In this case, the SQ-1,
which is Eurorack compatible. In
Eurorack, we tend to use this kind of
cable. This is a TS, tip sleeve, uh mini
jack cable.
And inside this cable, there are two
wires, generally speaking. Uh the first
wire is going to connect to the tip of
the connectors here.
That's where we send our control
voltage, our audio, the thing that we
want to actually transmit along the
cable.
And the other wire is going to connect
to the sleeves, and that's where we can
share a common electrical ground between
the two inputs or outputs.
Banana jacks, on the other hand,
only really have one wire.
It's the wire that connects to the
connector.
So, what the difference fundamentally
between these two systems is is that
we're not sharing a common ground on
every connection when it comes to a
banana jack synth.
When you're working inside an individual
instrument, the fact that we're not
transmitting that sort of common ground
doesn't really matter because if the
instrument's designed properly, that
common ground will be shared within the
circuitry anyway.
But, as soon as you want to use multiple
different instruments, even multiple
different banana jack instruments,
you need to be able to have that common
ground reference.
If you think about voltage as sort of
the distance from the ground,
so if I say that I'm 5' 11" and ask you
how high up my head is,
well, it depends where I'm standing.
I could be 5' 11" at sea level and 5'
11" at the top of Everest, and the
height of the top of my head
is going to be different because we're
talking about different ground.
So, we do need a way to share the
ground. Now, in Eurorack, that's not a
problem because we have the sleeve of
the cable.
In banana jack synths,
uh generally speaking, you'll have a
dedicated ground output which you'll
need to link together between the two
different instruments. There's one here
and there's one just around the back on
the top here.
In
>> [snorts]
>> Eurorack, we don't have that dedicated
ground connection because we don't need
it cuz we tend to use those TS mini
jacks. To deal with that problem of
sharing the ground, you can approach it
a few different ways. I mean,
fundamentally, what you're trying to do
is uh take that ground connection from
the banana jack instrument and just
connect it to the sleeve of every cable
that you're going to interface with in
the Eurorack world. You can do that with
a special cable or
you can get a little interface box like
this one. And what this does essentially
is it takes the ground connection here
and it just puts it across the sleeve of
every single one of these mini jack
outputs, and then it connects the input
to the tip of each of them, which allows
you to
uh maintain that common ground across
the sleeve, but then move the voltage
into different uh instruments. The other
thing that we should talk about are the
voltage standards. So, in Eurorack,
we're talking about a 10-V peak-to-peak,
generally speaking. So, -5 to +5 for
bipolar signals and 0 to 10 or 8. Um
10's fine usually most cases
uh for um unipolar.
Um so, as long as the voltage standards
aren't massively different uh between
the banana jack instrument and the
Eurorack world, you can just use an
interface box like this. Check the
manual to be sure. Drop um works um
mostly uh within that range. It does go
up to 11
on some of the inputs, but I don't think
any of the outputs throw out anything
that high. So, perfectly safe to
interface between those two worlds.
So, I've taken the ground connection
from the back of Drop and brought it
into the interface box.
And now we can start patching these
things together. So, I guess probably
the most obvious thing to do would be to
take one of the gate signals,
bring it into
here.
And then we can take that gate signal
out into the trigger.
And now we can
>> [music]
>> sequence it using
>> [music]
>> the SQ-1. We can
>> [music]
>> sort of build different um
types of musical [music] ideas that we
couldn't really do with the plain clock
dividers in such a controlled way.
>> [music]
>> We could also
try and do some pitch sequencing as
well. So, we could take the CV out here,
>> [music]
>> bring it in here,
take that into the VCO frequency.
>> [music]
[music]
>> Now we're not working at volts per
octave here, so we have to be a little
bit creative with what we're doing.
>> [music]
[music]
>> That's kind of cool.
>> [music]
>> Yeah.
>> [music]
>> We could also take
let's take [music]
the gate on
the B channel
>> [music]
>> and bring that over into the
VCA for the noise.
>> [music]
>> Let's just just
>> [music]
[music]
>> Cool.
And then we could
>> [music]
>> I think we need to
Okay, well, that's long enough.
>> [music]
>> And we could sequence the
mode
for that channel as well.
>> [music]
[music]
>> That's fun.
>> [music]
>> And we could also
still make use of
the clock divider for doing other
modulation stuff.
>> [music]
>> So, we could
bring this into the clock input.
>> [music]
>> And use the sync out
>> [music]
>> here.
>> [music]
>> Now, we still have something that is
synchronized to [music] our sequencer
coming out of the clock inputs.
>> [music]
[music]
>> Let's go for delay.
>> [music]
[music]
>> And because we are using a different
clock source, we now have
>> [music]
>> free access to use the
clock LFO one output to modulate
something.
>> [music]
[music]
>> slide in there.
>> [music]
[music]
>> Can you hear how that
double hit gives us a lot more attack?
>> [music]
>> Cuz that interaction
with the envelope
FM.
>> [music]
[music]
>> Yeah, so just sort of
>> [music]
>> standard
sequencing as a way to
>> [music]
>> unlock different rhythms can be good
fun.
>> [music]
[music]
>> Yeah.
>> [music]
>> So just tearing down that patch cuz it
all became a little bit too much fun.
Um, I just want to show you something
else that we can do with the SQ-1 or
another sequencer. So we've seen how we
trigger a sequence
using an external sequencer of course.
What we can also do is drive the clock
divider with an external sequencer as
well.
So by doing this we're sending an
irregular but still tempo synced signal
into
the clock divider which gives us access
to different
rhythms or any speed up because of
course we're dividing down.
>> [music]
>> And we can still now make use of that
sort of
combining of clock signals to get
different patterns.
>> [music]
>> To get those sort of interactive grooves
now tempo synced to whatever
the sequencer is synced to
but not running at that constant clock
if that makes sense.
>> [music]
>> Yeah, and it gives us access to
different kind of vibes that we wouldn't
get by just clocking it straight.
>> [music]
[music]
>> And still we have both of the LFOs freed
up to do unquantized stuff, or we can
take them
using the clock divider, which is now
10%
So, if you wanted to do some
like
FM of our main sound.
>> [music]
[music]
>> One uh I think it's it's fair to say
limitation of the clock divider setup as
a way of sequencing things
as I identified earlier is if we combine
together two of the outputs so there's
the 16th
>> [music]
>> and there's the quarter as well.
They kind of destructively come together
where the quarter note will override the
16th for the period of time that the
quarter note is high.
I think it's getting through.
So that limits the types of rhythms that
you can generate with the clock dividers
alone. Obviously we can do other things
with resetting the clock divider,
bringing in additional clock signals,
all that kind of stuff.
But if we want to get more from the
clock dividers on their own, one thing
that we can do is make use of logic
gates and in particular I think XOR
gates work really well
here. What XOR gates will do is be high
where one or the other of the inputs is
high, but if both of them go high, then
the output will go low, which
essentially allows the 16th notes in
this example to punch through the
quarter notes.
So um
I've sent some of the clock clock
divider outputs into the um converter
box here. We've also got the trigger
here and let's bring together
the gray, which is the 16ths,
and the
green one there, which is the quarter
note, I think.
And let's send that back out to the
trigger input and see what we get.
>> [music]
>> You can hear now how those 16th notes
are punching through
the held quarter note
and and they're punching through sort of
offbeat so you get this sort of cool
offbeat groove.
>> [music]
[music]
>> Grab a few more cables.
Um maybe rather than
just bring those together, we could send
that one into other XOR gate
>> [music]
>> and bring the what is it half notes
into the other side of that one.
>> [music]
>> You can hear how we get much more
complex rhythms than we were able to get
by just combining the clock divider
outputs and even more so if you can get
some delay.
>> [music]
[music]
>> If we change which clock inputs are
going there
>> [music]
[music]
>> we get other
patterns really quickly by combining
them via an XOR.
>> [music]
[music]
>> And if we were using the LFOs to its
fullest potential, we could start
involving the binary counter, which is
another clock divider really, the ring,
the
shift registers to get other things on,
but just as an example of how to get
much more complex
that patterns from the clock dividers
using logic gates. XOR gates work really
well. So, just as a reminder, if I take
all of these out,
and we combine what was it? 16,
8, and 2.
That's what we get doing it the
traditional way.
I think the 16th again eaten all
together actually. I don't think we hear
them at all.
Yeah, 16ths are irrelevant in this
setup. So, yeah, XOR gates
are a great way to just generally, not
just on drop, but if you have a clock
divider, but if you want to make more
complex patterns, then XOR gates
might be just the friend that you need.
The question we need to ask ourselves
here is would this be an Oscillator Sink
video if we didn't make drop drone for a
bit? The answer would be no, so let's do
that right now.
I've got um
LFO 2 here, square wave output, and it's
running at audio rate. And I bring it in
to the trigger input and start to bring
up
the different elements of the sound
and get different timbres out.
Uh the click's really interesting here
because it's a really, really tight,
tight
pulse, so it's quite
aggressive.
It's also I don't think related to the
tuning of
>> [music]
>> the actual oscillator, so it's
kind of
an independent overtone.
>> [music]
>> Uh at the moment, changing the
rate of
the trigger here is not going to make
that much different because the decay is
basically staying open, so we're just
kind of hearing the oscillator. But, if
we turn the decay down,
the shape and rate
is going to have a much bigger impact.
>> [music]
>> And if we just want to have that pure
sound, [music] we turn the decay up a
bit.
Let's give it some delay.
>> [music]
[music]
>> We also have the noise, of course, as
well. Um so, I've got
the clock running really fast here. If
we bring that into the noise generator
VCA, and just turn up the noise here,
>> [music]
>> You can probably even extract
like maybe
that's half speed clock from
LFO 1 and 8 FM.
>> [screaming]
>> Yeah, so
yeah, you can definitely set it up to
try and it's pretty interesting trying
instrument um
if you do.
We've looked at triggering the drop
using sort of electronic instrument
signals, so gates and triggers, but
actually anything which provides a
transient can trigger the trigger input
including other music, outputs from drum
machines, that kind of thing. So I've
got my phone plugged in here um with a
video ready to play. So if I hit play on
the video,
uh Drop's going to trigger along with
video.
>> [music]
[music]
>> Yep.
If I get a copyright strike for that,
I'm going to lose my mind.
>> [music]
>> Taking the idea of external triggering
to its logical conclusion, anything
which generates a transient can be used
to trigger Drop. So we could use a drum
trigger or in this case a contact mic
going into the trigger input in order to
trigger.
>> [music]
>> Um because this uh contact mic
constantly has a spring inside of it.
When I hit it really hard, you kind of
get a double trigger, which is where we
get that sort of bigger jump on the
envelope FM, which is cool. And, you
know, I can patch some other stuff in.
Yeah, it's really fun to use it that
way. And yeah, anything you use in a
contact mic becomes a
a drum and we start hitting it. Yeah, so
get right into the physical nature of
Drop using a contact mic.
Uh it feels a lot more
tactile than using
the issue drop button.
For sure.
>> [music]
>> The phrase this instrument won't be for
everyone has become a catchphrase on
this channel, which is only natural as
I've been strongly favoring instruments
which issue the norms of mainstream
gear. And it's no surprise that the Drop
falls into this category. But as with
most instruments of this type, for those
who connect with it, it will be a real
strong connection.
I love its heavy, raw sound and quirky
rhythms.
If I was to level a criticism at Drop,
it would be that if you do want to use
it as a standalone in a more
conventional setting, the clock dividers
and their destructive combination can
feel a little limiting.
While the injection of the unquantized
LFOs can be hard to wrangle.
As I showed in this video, some external
gear such as logic gates or external
sequencing can really open that world
up. And honestly, I think approaching
Drop as part of a wider system is the
best way to use it.
>> [music]
>> If I had wishes for a Drop version 2, it
would be for an option to output
triggers rather than gates on the clock
divider, or two trigger inputs with an
XOR logic gate between them, and some
odd clock divider outputs. I would
happily sacrifice the slowest divisions
to get a 1/3 and 1/5 divider, for
example.
Anyway, I hope you enjoyed the video. If
you did, as always, a like, subscribe,
and even a tap on the bell is massively
appreciated.
>> [music]
>> Other than that,
until next time.
Take care.
Bye-bye.
>> [music]
[music]