Video summary
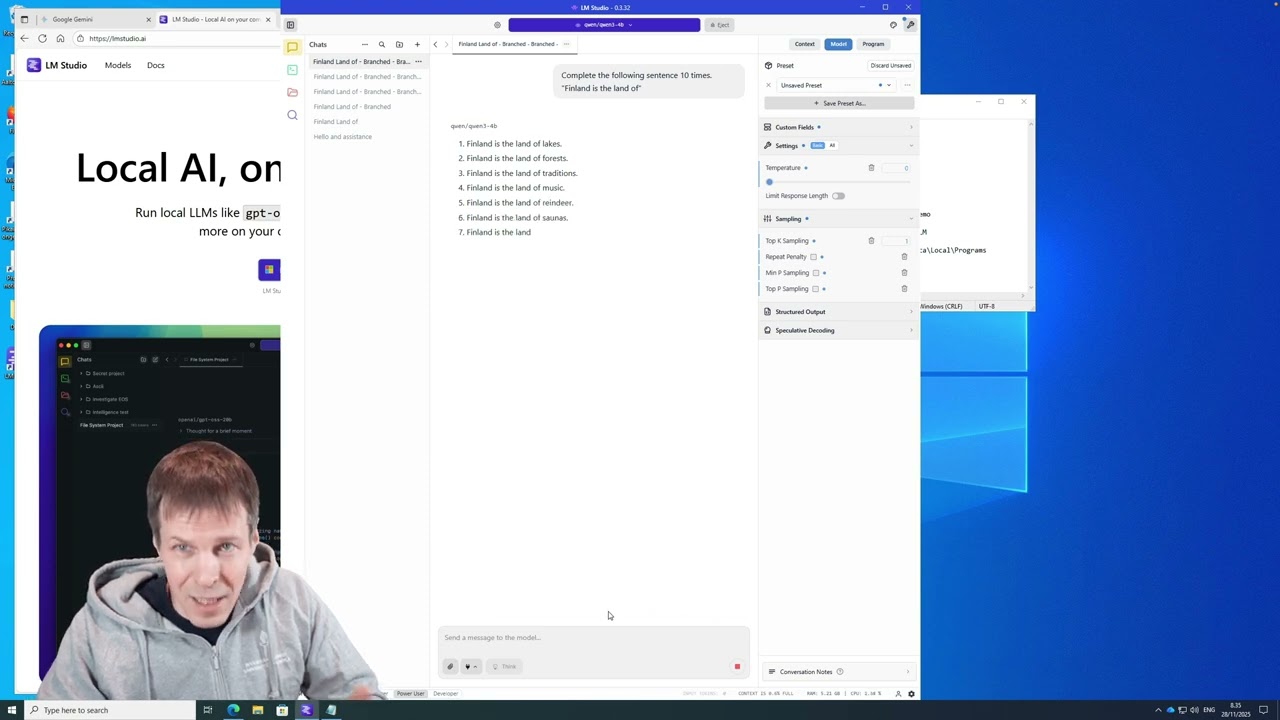
The video demonstrates how to construct a local, AI-powered data analysis environment on Windows, specifically addressing the challenges faced by users without administrative privileges or powerful hardware. The presenter begins by installing LM Studio to run large language models locally, emphasizing the importance of selecting smaller, quantized models that fit within limited memory constraints to prevent system crashes. Once a model is loaded, the tutorial explores how adjusting parameters like temperature and top-k sampling affects the creativity and coherence of the AI's responses, illustrating that while higher randomness increases variety, excessive values can cause the model to lose logical consistency. The presenter also launches LM Studio's server mode to enable remote access from other applications, setting the stage for integration with coding tools.
A significant portion of the guide focuses on installing Node.js and the Gemini CLI without admin rights, which requires manually copying files into a user directory and configuring the system path variables. Since the computer has strict security policies, standard installation methods fail, necessitating manual intervention to bypass execution restrictions. The presenter leverages an AI assistant running in the terminal to troubleshoot these errors step-by-step, effectively using the AI as an IT support tool to resolve permission issues and configure environment paths. This iterative process of copying files, adjusting paths, and regenerating commands ensures that the necessary software is accessible within the user's home folder without requiring system-wide changes.
The final stage involves setting up a modern coding environment using Positron, a Visual Studio Code-based editor designed for data science with support for R and Python. The presenter installs these languages locally and configures Positron to recognize the custom installations rather than defaulting to system versions. To demonstrate the fully functional setup, the AI is tasked with writing and running a simple snake game, followed by a regression analysis in R and a script that connects to the local LM Studio instance. This workflow highlights how users can perform sensitive data analysis entirely on their own machines, avoiding privacy risks associated with sending data to external cloud services like Google or OpenAI, while accepting the trade-off of slower processing speeds on less powerful hardware.
Read the full video transcript
In this screencast, I'll show you how to
set up an AI powered data analysis
environment on Windows. I normally use a
Mac, so there might be some weirdness
here when I try to navigate myself
around Windows using a Mac keyboard and
a Windows computer. This is also a
remote desktop connection, so not my
real computer. So, it might be that I
accidentally hit Mac keyboard shortcuts
and do something with my own computer
instead of this remote accessed
computer. So the computer that we have
is a pretty basic uh desktop computer.
So there's 16 gigs of memory and there
is no uh GPU to speak of. So we will be
running a large language model locally
with with the CPU that's probably going
to be very slow. Uh but that is
something that a lot of people would
have to deal with if they run to run
this locally. But if you do data
analysis then the speed mightn't
actually matter that much. For example,
if you classify survey responses that
you have in your Excel sheet using a
model that runs on your local computer,
you can just leave it running overnight.
So, uh if it takes a minute to respond,
then uh it might not be such a big deal.
So, and I'm also using Gemini here
because uh we we need to do some things
in PowerShell to to set up things. And
the reason why we need to do it in shell
instead of just point and click is that
I don't have an administrative right to
this computer. So this is like uh the
worst case scenario for installing
anything. It's a shared computer uh
fairly tight security policy and no
admin rights. So I will have to install
everything in my home directory. And uh
if you have admin rights to your
computer when you install this and you
want to install uh things uh for all the
users which is a lot simpler. I'll uh
explain the differences as we go. And
the overall plan is is here in notepad.
Um so we're going to install first LM
Studio then we're going to install
model. We're going to test a few
settings and then we install NodeJS. So
this is the hardest part because it's we
need to install it using PowerShell and
and just copying the files into the
right place because uh install it with
the installer would require
administrative rights which I don't
have. Then uh the rest should be fairly
easy Gemini we install in node then we
test it then we install the position uh
data science editor that's for R and
Python coding. Uh it's like a more
modern version of R Studio built on
Visual Studio Code. Uh then we install R
and then we install Python and we we
test a few things and I marked here uh
install location because I need to
install NodeJS manually. Just copy the
files. So I'll mark where I put them
here in my notes. So let's get started.
And we don't need to know the details of
the computer anymore. So let's just go
to install studio
and now because I don't have admin
rights I will just install it for myself
and now I will make note of this install
path because I wrote the NodeJS in the
same place. It can go anywhere in the
computer, but I think it's it's nice to
just have everything in one place. So,
that's where I install all the programs.
So, we're going to install it. It's now
installed and we run it.
So, now that we have LM Studio
installed, the next step is to install a
model. And you install models from the
search.
And
what I recommend is to pick here uh have
this only include staff picks that fit
on my device. This to be on because it
may ensures that you only load models or
download models that actually work on
your computer. And this is important
because if you try to load a model
that's too large, it either fails to
load or it can try to load and then it
crashes your computer or makes your
computer like completely unresponsive
because it starts to use a hard drive to
extend the memory which is really slow.
Um, we're going to take a model from the
Quen 3 family
and we will go for something small
because this computer is is not very
powerful and also because the internet
connection is pretty slow. And let's see
what we have. And I want to have this uh
let's see non-thinking model. We want to
have a hybrid model instead of a of a
non-thinking. So uh Quen 3 4B this is uh
a hybrid model. So we can uh enable and
disable thinking. So if you want to
learn how these models work and play
around then uh this uh hybrid model will
be useful.
So we're going to download it and if you
want to have a smaller variant of the
model you can pick the variant here. So
there are different uh quantizations and
quantization basically means that it's
uh the the model weights the matrices
the numbers are stored with less
precision. So if you have less precision
then the quality is a bit weaker but
then again it it runs a bit faster and
it fits uh into smaller space. We'll
take the one that is recommended. If the
only reason why you would ever want to
pick something that is not recommended
is if you have a a very very small
memory in your computer like if you have
something like 8 GB and you are running
something else be except uh in addition
to LM Studio then you might go for even
more smaller model like you might go for
1.7B and then here there is uh this this
uh this model is even more aggressively
quanticized. So it is uh like uh 30 to
40% smaller than the default model. But
we'll go for the 4 billion parameter
model because I think that's going to
work pretty well on this computer at
least on a reasonable speed and uh we'll
start the download. All right, the model
is now downloaded and we will just click
on using chat. So that starts loading
the model and what we'll do now we'll
we'll test the model and um then we'll
adjust some settings and just see if we
can break the model. So, we're going to
create a new chat and uh let's switch
thinking off because I want to just see
how it works. So, let's do hi and let's
see it responds.
Okay. And uh
we're going to start a new chat and just
play around with the settings a bit. So,
we go new chat and let's do this uh
small exercise of of checking how the
temperature affects the response. So,
all right. So, let's see the default
settings what it does
and it's it's okay speed. So, I think
this is uh about the size of the model
that this this computer can handle. I
could go for the 8 billion parameter
model, but it would probably be
substantially slower. If I wanted to do
like offline data analysis where I code
data or like zero responses on my
computer, then the speed wouldn't matter
because I would be able to just run it
overnight. Okay, so this is uh what it
does. And if we want to make it a bit
more creative, we [clears throat] can
adjust the temperature to increase the
randomness of the response. So, we're
going to take uh
disable these. And this top case
sampling means how many different tokens
it considers when it picks the token
that it produces next. So, we're going
to put it to 50. And then let's increase
temperature to uh let's go 1
1.5 and and see. And we're going to
branch the discussion
and regenerate response. So, now it
should be a lot more creative.
But still still stay coherent.
Hard work and creativity. Okay, I like
that. Uh so so this is uh it's not much
different. Let's let's ramp it up and
we're going to branch again. So we're
going to set temperature to three. So so
larger number is more randomness and top
k means how many different tokens it
considers. So let's go uh with
temperature three.
We can now we can see a bit more
creativity like vibrant national
independence traditions.
sound a culture of blueberries a modern
social media presence. That's that's a
interesting list of three
and uh we can see now that it's uh it's
starting to break apart a bit like
there's this is not grammatically
correct and that's also not
grammatically correct. Uh if we ramp up
this to let's say let's say 10 and uh
let's put 200 here. So it consists a
wide variety of tokens and picks the
response randomly. This is probably
going to entirely break the model. So uh
it starts to Yeah. So it it no longer
can can even uh write grammatically
correct things. So when you increase the
randomness uh what you can do is to make
it more creative, make it more kind of
surprising what it produces. But when
you increase the randomness too much,
then the model loses all coherence. So
if you if you put the temperature to
zero then uh it means that
it all there's like not much randomness
and we we can stop responding if we put
this top case sampling to one. So that
means that it only considers the most
likely token. And if we branch the
discussion, we generate the response.
You can see that leaks, forests,
traditions, music. This is pretty
boring. So it kind of like states the
most obvious thing. And uh another
interesting thing is that if we remove
randomness uh altogether, if we branch
again and we regenerate, it will
regenerate the same response. So uh if
you think about a model that is is
completely deterministic, it's pretty
boring. Like you can think about a model
uh that is trained to do jokes. If the
model always does the same joke, then
it's not a very good joke model. Okay,
that is set up and uh we need to do do
we're going to reset all this stuff
and reset to defaults
and the next thing that we do is to go
to the developer and we we launch the
server. So this means that uh this LM
studio can now be accessed from other
programs and we leave it running and
we'll later access LM studio from
positron editor. Okay. So, so this this
is now done. So, so uh [clears throat]
next uh is installing NodeJ GS and this
is where probably need Geminina's help
and we're going to go to NodeJS
and this is like an an execution
environment that you need to uh to run
certain software. [clears throat] So,
there are three ways to install it. Uh
this is if you have Docker or some some
other um environment. We don't so we're
not going to do that. Or even if we did,
I wouldn't know if this computer has
one. Uh this the easiest. If you have
admin rights, you pick Windows
installer, but I don't have admin
rights, so I have to install it
manually. And what I do here is that I I
open the standalone binary. And this is
like just the files of NodeJS JS. And
then I will need to put them somewhere
where I can somewhere
where the computer can access them. And
then uh I will now open a new
new uh tab or new window. So let's do
new file explorer. Yes, this one. And
then I go to my install location. So I
just copy that
and then
then I create a new folder called
NodeJS. So this is you can create this
anywhere in your computer but but
because it install Adam Studio here I'm
just going to install everything
everything here. So it's uh it's going
to be NodeJS
and then this is the NodeJS files. I'll
choose them all and I copy them here.
And again, this is something if you
don't have admin rights, you need to
just copy this. Otherwise, you would
just run this installer and it installs
everything.
All right, it's here. And the next thing
is that we need to set path. And the
path is is uh a variable that the
computer stores that tells the computer
where to find programs. And um I I'm not
very good with using using Windows. So I
will now use Gemini to help me out. And
um I will tell it that I'm running
Windows 10
and then I have NodeJS in this uh this
location and how do I set the path?
And I've tried this before and Gemini
has this option of thinking and fast.
And I found that thinking is much better
for this because the fast gives me kind
of like things that might work if I have
admin rights. But uh yeah, and and the
reason why the the backslash direction
was incorrect is that I don't know how
to type the the correct direction on a
non-Mac keyboard. So my keyboard, my Mac
keyboard wouldn't wouldn't uh type it
properly. So, so we do uh
Windows key uh and
then we type env
and this requires admin rights. But we
can do that. And
okay, number one, option [clears throat]
number one didn't uh didn't work. And
let's say let's tell it that
this didn't work.
And the reason why I'm doing this uh on
camera with Gemini is that how you set
the path might depend on the Windows
version and what kind of uses us use us
uh user rights you have to the computer.
I'm just kind of like showing uh the the
process how you can you can fix this
yourself.
And uh
yeah, so this all this uh tells you how
to figure it out yourself.
We're going to use PowerShell. And uh so
so this uh script
writes the the path to to our
environment.
And um let's do PowerShell.
And this is uh typically when you work
with large science models to
troubleshoot
uh computer issues uh using the the
PowerShell or terminal in Mac is very
handy because you can just copy paste
what you see from from the from text and
then the model understands text and can
help you. So, we're going to copy it
here. And uh
Okay. And now we can do uh
you must close and reopen the command
promp from code editor. So, um we're
[snorts] going to open it. And then we
we do powers again. Not there.
and then type node v.
That will tell us the nodejs version. So
that is now installed. So we have now
nodejs installed. And the next thing
that we need to do is to install gemini
cli. And uh
it's important that you you uh close the
powershell and reopen for two reasons.
One is that the path uh only takes
effect after you relaunch the uh the
terminal or what whatever command prompt
whatever you call it. And the second one
is that you want to ensure that it works
after restarting because we want to uh
have the the the path set correctly also
in positron and if we have to fix it
here every time we start then it's not a
very usable solution. So that works.
Then we go um Gemini CLI
and there is an installation instruction
here.
So we will uh do this install globally
with npm. So this is with with NodeJS
and then we we paste it here
[clears throat]
and this is something that uh happens
because of the security policy of the
computer. So uh what we now need to do
is we tell Gemini that uh I am trying
to install Gemini
I get this error and then it'll fix it.
So again, this is like uh a Windows
Power user might remember what settings
they need to change, but I'm not one of
those. So I'll just uh
I'll just do this.
And again, this is like uh I would use
the thinking model here
so that the model gives us the best
quality responses. It's really
frustrating if the model gives us some a
lot of different things to try and and
then it fails. So we want the model to
spend a bit more time trying to figure
out what will be the best solution for
us given all the data that we have
provided and uh permanent fix try this
first. Uh,
all right. We're going to try that first
and then so that allows us to uh install
and uh we do yes but not yes always. And
then we uh [clears throat]
run that again.
And now it should work.
Yes. Now there's another security issue
or or policy issue. So as I said this is
like a worst case uh uh scenario because
this this is uh a computer class
computer. So it's it's very constrained
what you can do with this computer. Um,
but if you can get it uh get something
installed on on on this kind of
computer, then it's going to be much
easier because uh if you have your own
computer that you are running, then uh
the security policy might not be as as
strict as on this computer. [snorts]
And now it gives us another command that
uh
changes the the installation policy.
So you might want to pause the video and
read all the descriptions. So I've done
this before, so I'm not I don't stop and
read this.
Uh we're going to do this one because we
want to be able to run the Gemini
directly instead of uh
using this Gemini.
We don't want to have this this uh this
problem. So we'll just do this security
bypass.
Yes.
And then
we'll install. And now Gemini CLA is
installed. The next thing is that we we
do is that we try it. So we do Gemini.
All right. Now it's loaded and it asks
us to log in. And we're going to log in
with Google because I have the Gemini
Pro account. And um we're going to use
Microsoft Edge because that is what we
have here. And we're going to
then authenticate. And that's done.
And [clears throat]
now there is we know that it works, but
there's not a bit of a problem. And the
problem is that we are now on in our
home data folder. And uh if you uh if
you're in a folder
then Gemini CLI has access to all files
in that folder. So before we start
testing it we will create a new folder
and we'll change to that folder. But uh
before I do that I'll adjust some
settings. So, uh the
the setting first setting that you uh
you type / settings uh the first setting
that we change is uh preview features
and and this allows you to run the
latest models. So, we're going to switch
that to true. And this gives us access
to Gemini 3. And then we do model.
And uh Gemini 3 is now enabled. There
used to be a wait list. So, if you don't
have it here, then it might tell you
that you need to uh go to a wait list,
but I'm not sure if the weight list is
valid anymore. It was valid when uh
Gemini 3 was launching. So, we're going
to go for for the pro models. And this
is just for testing and showing how it
works. uh if you use this uh for for
data analysis then I would recommend
that you go for the auto because uh that
saves you saves you tokens and uh I I
pay for per month for this Gemini and
that means that there's like a a quota
that I get to use it and if I run uh
over my quota then it automatically
switches me to uh to the flashlight
model which is the cheapest model and I
don't want to spend all my ext expensive
model time for simple problems and I
would go for auto but let's go for
Gemini 3 Pro just because I want to
ensure that all these demos work that
I'm going to do with with single shot
instead of trying and fixing so we go
for that and then we we quit and now we
need to do uh another uh new folder so
so we will go to uh we have this PC and
this is my data and uh [snorts] well
There is uh there's a I'm going to
create a new folder and let's call it
test to delete me. I'm just going to
call it delete me because then I will
remember to delete it later. So this is
just for testing. And we we're going to
then change to that direct directory. So
we do cd change directory and then we
can we can copy here. There are there is
or we can just double click and then
here copy address and then we paste it
here. And now we are in the test folder
and the test folder is empty. So we know
that now it's safe to run Gemini here
because Geminina can't read anything.
And then we'll run Gemini again to see
how it works.
And now it's all set up. And then we can
ask it to do things for us.
So, let's let's make a fun game. Uh,
program a small game
for me.
It'll probably present me a plan first
and then uh after the plan, it'll just
implement the program. It's probably
going to make some kind of space shooter
or uh a warm game,
a snake game. Uh let's see
snake game
and then it tells about the
implementation details and it runs in a
browser and that's like the simplest
thing to do and let's say that go for it
and then it'll program it for us. You
can see here that it's going to start
writing u files here and it asks for our
permission to write it pretty soon. So
it'll design the game
and then ask for permission to write the
file for the game. Okay. So now it's
asking permissions and we say that
always allow and this is only for this
session because we wanted to be able to
edit the file. If you were doing
something that is uh let's say more
serious uh and and you actually knew how
to program yourself then you might want
to review the changes. So you would uh
review what it wants to do and just
allow once so that you understand the
changes that it does. This will be
important like in bigger project but
this kind of like wipe coding we just uh
always allow
and that it created the
uh three files
and then it's checking uh ls is just
checking if files exist we always allow
so it validated that it actually was
able to write the files
and then it tells that doubleclick index
html and that opens the
Okay. So, this is the game and I'm going
to reload it.
So, so this is a snake game as the snake
grows
when I eat these apples.
The snake
is too fast. Make it
make the game easier.
You could also tell it to make it
multiplayer or or make it uh and now it
says that now it uh it changes this
settings here for the game. And then
when we reload it then it's a bit slower
I think.
Yeah, it feels that it's easier to play
now.
All right. So this is Geminina CLI and
now we're going to quit it
and we close the PowerShell. We don't
need that anymore. And um then uh we'll
close this. So now we are we are test by
coding game here. And now we install the
Positron editor. And uh we take a new
tab. We take Positron
and let's install it. So this is just a
basic installer.
It tells you that we need to do things
before we install Posyetron. So uh it
tells us to install uh Python and R. We
will install Positron first because
then we can use uh Gemini CLI inside
Positron to help us [clears throat]
troubleshoot any installation issues if
they arise. So, we're going to uh
download it. And if we don't have R or
Python installed, then uh this doesn't
really do anything for us. It's just
like a text editor, but we can't run any
code because we don't have a an
environment installed. And we take the
user level install. If you have admin
rights, then you can take the system
level, but I'm I'm only have user level.
So, we're going to download it and then
run it. And now it's in it's downloaded
and we wait for it to become available
to us to open
file. Yeah.
And we accept. I've read this before.
And then it installs. Now it installs in
the same location as everything.
And we install. And uh we can we can
have a desktop icon. I like it on
Windows.
And now it installs and we have to wait.
Okay, it's installed and we launch it.
So this is the the positron main window
and we need to open a folder where we uh
we work in and I'm just going to open
the same folder that we were using
before and it it tries to start a
console probably R but we don't have R
installed so it's not going to do
anything. And we're going to open uh a
folder because you always need to work
in a folder. And the folder that we have
is going to be the test to delete me. So
we we open it. And yes, I trust because
I'm the author. And then we can just
delete delete this stuff. We don't we
don't need the game anymore. It's not
that great of a game. And
we we delete it. Delete permanently. And
there's no session running because I
don't have R installed. Uh I just wanted
to first test that I have uh Gemini CLA
working here. So uh the this the
terminal is where you run the Gemini.
And I'm going to move this terminal to
the right uh uh secondary sidebar here.
The reason why I'm moving it there is
that if I if I want to do some some
coding, I want to see the file here on
the left and then Gemini on the right.
So I discuss about the code with Gemini
and uh we can just type Gemini and hope
that it works and it doesn't. So so this
is the reason um uh we need to we need
to uh why why I want to test this first.
So there is an issue with the path and
then we we go back to Gemini uh the the
browser
and then I tell that uh I installed
Oitron
and
I'm using
terminal in
in that software
I get this error.
we copy
then we paste
and then it tells us how to fix it. So
the the the problem here is that because
we we install it manually by copying the
NodeJS files just on on the computer. Uh
we need to uh adjust it. We need to tell
both the PowerShell and Positron where
to find Gemini. If you run the installer
for NodeJS,
then you don't need to go through any of
this stuff.
Okay, so now it tells us which commands
to run. We're just going to copy paste.
Let's let's say that let's proceed step
by step
because we don't want it to uh to write
a lot of instructions if the first step
fails. So so this will be um setting the
paths is is what is makes this
complicated.
It'll probably ask us to next check with
PowerShell because it was working there
and
then where the path is and then uh to
fix it in in the terminal.
Yes, we do that and
that works. The the funny thing is that
it it wants to it says powershell here
because these are powershell commands
but we actually run them inside positron
and not in powershell. Uh then we uh we
copy paste we we copy paste here
what we see
now it's telling us to install
but we have it working in in powershell.
So so this is the powershell and it
works. So we we tell it that it works
in PowerShell
but not in Positron.
And why we want to install Gemini CLI or
get it working first is again that then
we can use Gemini CLI to troubleshoot
things inside Positron
if if any any things require
troubleshooting.
So let's let's do that.
We run it
and then we we do Gemini.
Now it finds it because it's it's taking
its time to load. And we can we can do
that. And we'll tell it that it works.
Let's close Positron
and let's open Posetron again
and make sure that Gemini works. So
Gemini
seems to work. So we we fix the path
once and that that solved the problem.
So if it didn't work then you can just
uh just move things from just just type
here and uh
type commands and then give the error
message to Gemini or whatever large
language model you use. All right the
the next thing that we do is that we we
install an extension. So there is an
extension and let's make that a bit
bigger.
So there is an extension for Gemini. So,
we do Gemini CLI. And I'm not sure if it
works on this computer, but we're going
to install it. And uh this allows you to
uh highlight code and then see Gemini
CLI can can see the highlights. And uh
[clears throat]
we pick yes.
Yeah. and
it enable. So why probably it thinks
that we are running on visual studio
code and for that reason it doesn't
install automatically. We can uh we can
enable it. So we install it manually and
then we enable it and now we can
highlight now Geminina CLA knows which
files we have which file we have open in
post which is useful like if you are
troubleshooting something then you want
to make sure that you and the AI are
both working on the same file. All
right. So that is now set up and uh we
have on our to-do list we have uh
positron test Geminina CLI in positron
terminal works then we install R and the
way we just go here is that we go uh
install and then there's R setup and
we just go to uh the R website. We go R
for Windows and uh this is what you want
to do. Uh install R for the first time.
Yes. So we install R and then we
download R for Windows
and we install it only for one user and
then we try to uh to start an R session
inside Posyron and then we'd use Gemini
CLI to do a regression analysis demo
for us.
So it goes to local folder because we
don't have admin rights. And we're going
to install everything.
We don't want to have a desktop shortcut
because I never run R directly. I run it
only through Positron. And now it's
installed. And now we test it. So we
start a new session and we pick R. It's
installed already. And that means that
we could have used it without
installing. Uh but let's let's try to
run the or let's just start start a new
session and uh we go with R. This was
Python installed. And then we can tell
pos
uh Gemini here that how would we how
would we use R if it's installed on our
own computer.
But most people who who install this
probably have admin rights. And let's uh
let's ask how do we use a custom
installation of R.
And let's let's ask Gemini
how we would use this installation
assuming that
I don't have R installed already on the
computer. So, uh, how how can I use R
located in
instead
of the systemwide version.
So, this would be something that you you
would do if you install R on your home
folder on a computer that doesn't have
R.
And I really like now this is uh this
makes troubleshooting a lot easier
because uh Gemini can access our
computer now and uh we allow it to to
read what's in that folder and it finds
that this is the things that we
installed ourselves [snorts]
and then it tells us how to do how to
use it. So these uh AI tools uh are
really nice because uh you can ask the
AI tool tool itself how it should be
used and this is like how to add it to
path and I I'm telling I need to tell it
that I want to use it in positron
and we allow it to read that file. So
that's our setting file and uh we just
allow it once because we don't want it
to be able to read arbitrary files on
our computer. But again, this is
something that if you can if R works
like it does work like here, then uh
there's you don't need to go through any
of this stuff. But this is just like to
show what I would do if I wanted to run
the R from my home folder.
Okay. Uh
add this your settings. we can ask uh
so we can ask the AI to do the change.
So it's it's going to add the R session
the R that we just installed into the
settings. And and this is the reason why
you want to have the the the AI
installed first. And we allow it to
edit. And now we restart Positron.
And I can just delete this session and
start session. Let's go that one.
Okay. And uh then I can ask uh I can do
terminal again and then Gemini.
So I have Running from my user profile,
but it was easy as I was already on this
computer. So setting it up was kind of
like just to show the worst case. So now
we we test it. So our plan was that we
uh we have
inst uh test by
doing a regression analysis. So we do uh
program a
demonstrate
regression in R.
visualize
the model
and it'll run. We'll do an R file that
loads some demo data or generate some
data, runs a regression and then
visualizes the results.
And it allows us to uh execute it. We
always allow. And this can happen if
again the path is not correct. and
it will fix it'll it wrote the file now
and we are we're okay. So we always
allow writing uh our files into our
folder and
then it asks it tells us that we install
R where we have multiple copies of R
installed. uh we can just tell it to to
run our script and uh let's let's tell
that it can find it from from here so
that it uses uh
uses the installation directory. So we
install everything here.
Run it for me using our found at
and it tries to find our script from
that folder. So, we allow it to always
find stuff.
Yes. And now it finds the the R R our R
script command that allows it to run R.
Uh let's ask are there
any workarounds?
I know that it can run it. So that
sometimes the AI kind of like is overly
cautious. So uh
or we can we can just go here also and
just click on the on run and it runs the
R file. But I want to use the AI to run
it because um it's important that the AI
can run things uh itself because then it
can uh do uh a test do an R file and
test it and then fix it. So it was able
to run it and uh then I can I can ask it
to to remember where R is located
and
it has this Gemini MD file that where it
stores what it calls memories and uh
then it remembers yeah then it remembers
where the R executive is located and now
I don't have to tell it anymore when I
start R Of
course, like if you have it installed as
an administrator, then it's available
systemwide and you would uh need to tell
Gemini where to locate it. But this is
like a worst case install. All right, so
we were able to do it and here's the the
regression plot. So that the regression
line and uh that's the R code. So it
generated some synthetic data and then
um then run a regression analysis for
us. All right. So the the next thing is
Python and uh you can install this with
install Python is to do um goes to store
and Microsoft store
and then uh we we search for Python
and let's go 3.13 the most recent one
and we get it. So we install it
and this is almost certainly already
installed on the system
and we we have this now done this
example. So we do clear so we we clear
the context window so that we can um
we can start start over.
Okay. And uh then we could ask Gemini to
locate Python. Um but it can it can
probably do it itself. But if it doesn't
if it can't find it, you can just tell
that I install it through Microsoft
Store and uh find the version that I
installed through Microsoft Store. So we
can do that as an exercise. So, so let's
say that I I I I
just installed
Python using
and then it locates where the the Python
is. And again, this is like normally
it's installed in a systemwide and and
it just knows where it is. But I want to
specifically uh uh find it
just to be use that specific version. So
we don't need these anymore. So we can
we can delete and then do the final demo
and it checks that it works.
And this is where I just install it. So
this is my my my local folder and um
then uh we can ask that to remember it.
So it writes it into memory again. So we
don't need to tell it anymore. But this
is again you don't normally need to do
this because we would just install it
systemwide and it just works.
Yes. So we have Python installed now.
And the final thing in our plan was to
uh program a connection to local LM. And
then we can we can tell it that um um
I have LM studio running
code a small script in Python
that connects to LM
Studio.
sends a test prompt
and streams
the response.
You would normally want to test that
connections work and and this would be
useful for data analys like if you have
some survey responses or some some short
text fragments to code or you can also
all like do even a like a crawler to get
for example news items uh from any news
website and then use the local lm to
classify them and uh
yeah now we can tell uh that run it for
me so I can see that it works.
We can also just just open it here
and then press this to run it. But
what I wanted to do is uh
to to test it because it uses the open
AI library which I don't have installed
on my computer and it would just produce
an error if I try to run it and uh for
this reason uh you want to have the
model code test and then fix and then
when it's fixed then you start running
it yourself. So we always allow using
pip which is a package installer for
Python and we we allow and uh then it
installs that for us
and if we open LM studio we can see here
that uh
the model is is generating now. So uh
this is the uh it's generating here. So
this comes from our own LM studio
and it's thinking because it's uh we
didn't disable thinking.
So this kind of setup would allow you to
uh
first of all
code any data that you have on your
computer uh for free and also avoid the
the privacy problems of sending resource
data to claude or uh anthropic or open
AAI or Google which typically is not
allowed by GDPR regulation.
I should have asked it to do something
uh shorter because this model is really
slow on this computer.
Okay, I I think this is enough. We can
just just kill it and uh we can see that
it stopped. All right, so that completes
um u our setup. So we installed LM
Studio a model. We tested settings. Then
we installed Node.js. We installed
Gemini CLI. Uh we tested by coding in
game. Then we installed Positron. We
test Gemini CLI in terminal. We
installed R. We told Posetron to use our
RR installation even if it was uh
present on the computer. And then we
installed Python and we told uh Posyron
to our Gemini to use our Python instead
of the one built in in the system. So
the uh what makes this uh process uh
challenging is there are like three
things. One is that there's quite a lot
of small software components to install.
The second one is that your computer
might have security policies and uh you
need you need to adjust them to be able
to run Geminina CLI. And the third one
is that you need to set the path
variable to to point to correct places
so that the uh Gemini can be found in
the terminal and Gemini can find the
tools that you have installed. Uh
fortunately the the process can be
simplified quite a lot when you use
PowerShell then uh you just you just
have Gemini or some other LLM running
and use the the maximum thinking and
then you just uh tell what you see in
terminal when you have an error and then
uh the uh the AI will tell you how to
fix it. So it's kind of like your own IT
support. So this concludes the setup and
hope uh you find it useful.