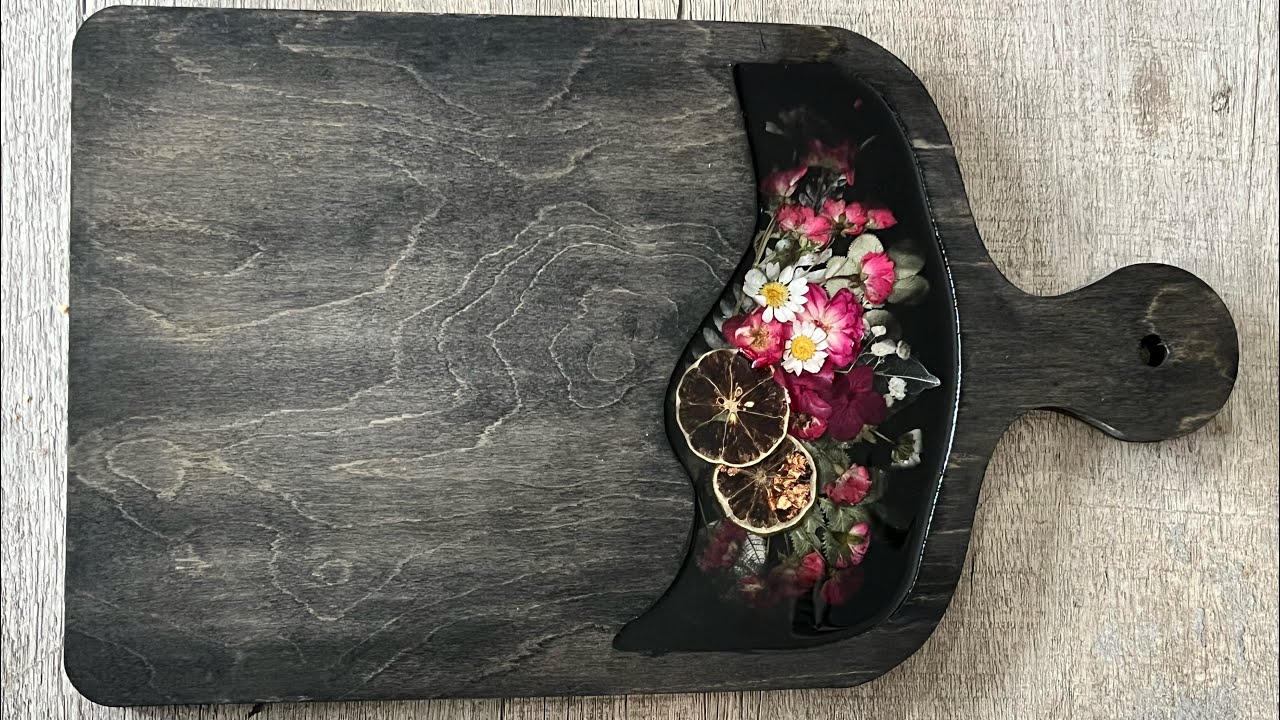
Pressed Flower Resin Charcuterie Board Tutorial | Transparent Black Resin & Copper Leaf Inlay
Watch on YouTubeVideo summary
The video features a detailed tutorial on creating an elegant charcuterie board featuring a floral inlay using transparent black resin and copper leaf accents. The creator begins by preparing a wooden board from their website, dusting it off and painting the designated inlay area with black acrylic paint to establish a dark base. To achieve a textured, artistic look rather than a flat surface, they apply black ink mixed with a small amount of water, using a heat gun to dry the mixture quickly while blending it to create depth and splatter effects without saturating the wood. This initial step sets the stage for the resin work, ensuring the background has a rich, vignette-like quality that makes the subsequent floral elements stand out dramatically.
Once the inked surface is dry, the creator addresses the challenge of making the board sticky enough to hold dried flowers in place. Instead of relying on gilding size, which did not adhere well in this instance, they recommend applying a thin skim layer of quick-curing UV resin or using hot glue as an alternative tack method. A crucial tip shared is to practice the flower arrangement on a separate piece of felt cut to the shape of the inlay before placing them directly onto the board; this prevents ruined flowers from falling apart and allows for careful planning of the layout. The creator emphasizes selecting affordable dried flowers, preferably sealing those with dye first to prevent color bleeding into the resin, and suggests starting with a specific color palette that includes black, white, copper, and red to complement the dark background.
The assembly process involves carefully placing the flowers using hot glue dots, taking care to avoid glue strings that could interfere with the final look. The creator weaves the flowers together to create an asymmetrical but full bouquet appearance, adding dimension and motion so the arrangement does not appear as merely flat layers on top of each other. During this phase, they introduce Onyx gel tint from Color Passion to add a deep, rich tone to the resin, occasionally adding clear resin in sections to push out the darkness and create a billowing effect around the flowers. This layering technique ensures that the dark resin frames the floral elements without overwhelming them, resulting in a sophisticated piece where the flowers appear to emerge from a deep void.
After curing, the finished board reveals a stunning contrast between the rippled edges of the dark resin and the vibrant pop of copper leaf embedded within the design. The creator notes that while the piece looks incredible with its deep tones and elegant finish, it is currently raw wood and requires proper sealing and oiling before sale to protect the surface and complete the aesthetic. They encourage viewers to experiment with both clear and dark resins, asking for feedback on whether they prefer the transparency of standard resin or the dramatic depth of tinted options. By following these steps, makers can create unique, high-end decorative items that offer a personalized touch while avoiding common pitfalls like trapped air bubbles or melted flower dyes.
Read the full video transcript
Hey y'all, I've missed you guys so so
much, but I'm back. I'm in the studio
doing resiny things, and this is the
first
Well, I guess this is now the second one
that I've really done and edited a video
down for by now. I wanted to show you
guys this um charcuterie board with a
floral inlay that I did. Ooh, ah. It's
got some texture to it, but it is
decorative only, so I'm not mad about
it. I think it looks amazing with this
black resin, and I want to know what you
guys think. So, leave me a comment down
below. Let me know if you like the
video, and we'll be back live soon. Till
then,
here is a close-up of what I'm about to
show you guys how to make. I hope you
enjoy. I also have a blog on my website
artisttilldeath.com that also tells the
process of making something with a flat
inlay of flowers. And I hope you guys
take a second to check it out. Anyways,
first thing I did is took one of the
charcuterie boards from our website
artisttilldeath.com,
dusted it off, and painted the inlay
area black with just an acrylic black
paint. And then I took some black ink.
I I'm pretty sure any kind of ink will
do. I know it's water-based, but we're
going to fully dry this, so it'll be
fine. So, I spritzed the surface first
just so that where I put the ink, it
wouldn't just immediately
[clears throat] soak in and leave a dark
mark there.
It allows me to blend it out a little
bit. I didn't use too much water, just a
little bit to get the flow going. I
didn't want to saturate it. That would
be bad. And then after it dried a little
bit, I went back in with the same
ink and water mixture that I had, and
added some darker areas, some splatters,
touched up areas that I wasn't pumped
with, and did the sides. And then I took
a heat gun cuz I have no patience, and I
dried the edges and the top. The main
thing I wanted to do was dry the inlay
area. So, as soon as that was dry, we
moved on to making it sticky. My
standard tack from APS Studios, I am out
of. So, I'm using a gilding
size, and it didn't stick as well as I
thought it would.
So, what you can do instead is to take
some resin. I would use a quick-curing
UV resin, and just put a little skim on
the bottom, and wait for that to tack
up. And then,
as soon as it's like cold honey tacky,
start laying um in your flowers.
However, I would also, if this is the
first time doing something like this, I
would recommend doing a layout on the
side.
Just to be sure, because once you put a
dried flower in resin and try to pick it
back up, now you have flower confetti,
and it's just not conducive. So, what I
usually do was um I'll cut a piece of
felt that's the shape of the inlay that
I'm working on, and then
put it to the side, and I'll do my
layout on it, so that I have the
parameters of what I'm going to be
filling, as well as it won't let like if
someone walks by really fast, it won't
like blow all of my flowers everywhere.
So, that is what I typically do. I
didn't have any felt, so we went just by
eyesight. And so, I'm going to tell you
guys kind of my thought process on
layout for arrangements for a flatter
floral inlay piece like this. These
flowers all came off of either
Amazon or something similar. Some
online, not very expensive place. Um if
you try flowers from Temu or something
like that, I would recommend trying to
like spray seal them first, cuz I have
used ones from there that were dyed, and
the dye did up getting kind of melted
into my resin. Sorry about all the
ruckus.
My windows are open.
So, when I do my layout, I start with
picking a color
palette and for this one, obviously, I
went with black, white,
some copper and the red. So, I also Ooh,
I really, really love doing like dried
fruit inlay with my florals. This one
happened to accidentally from the last
class I taught um on the subject have
some copper leaf stuck to it and I
thought that was a great pop of metallic
that wasn't overbearing.
So, what I'm doing is since I didn't use
a skim layer of resin as I'm just
putting a dabble of hot glue to make it
stick to where I want it to.
Um the thing about hot glue is the
strings will get in the way if you
aren't careful, so that's why you'll see
me do a little whoop, little circle um
after I put the hot glue on so that I
don't have the little strings.
And so, what I'm doing is creating kind
of an asymmetrical,
but
full
um
bouquet or
Okay. Or arrangement. But, it says hi
and it made me jump a little bit. And
what I'm doing is kind of working the
flowers up under and weaving them
through each other so it doesn't look
like flat flowers on top of flat
flowers. It has kind of some motion to
it. Sorry about my hair in the way.
And what that is going to do is give you
some depth even if you don't lay your
flowers out in
in layers. So, if you wanted to, you
could do resin flowers, resin flowers,
resin flowers if you had a thicker like
substrate. I think this is like 1/2 in
or less thick. And so, you really have
to be mindful of how thick your flowers
are that you're laying into it. The
other downside of using just a dot of
uh hot glue to stick it down is that air
bubbles can get trapped under the petals
on the sides. So, be mindful of that if
you don't use the resin skin layer
method. I added just a
squirt of the Onyx gel tint from Color
Passion.
>> [clears throat]
>> Sorry about that. I absolutely love it.
It's always transparent, but it's got a
great depth of tone. It's very rich. And
so, it can get overboard. And so, I
accidentally added just a little too
much on this one. So, I will be um
adding some clear to kind of push out
the dark.
Every time I come back into screen, I'm
adding a little bit more of the dark
resin so that it's kind of building some
depth. And I'm putting it over a little
bit of the flowers knowing that I'm
coming back in with the clear in the
center to billow and push out from the
center
um
the clear into the dark resin. I hope
that makes sense. I know it sounds
confusing, but essentially, I wanted it
to have like that vignette effect around
my flowers. And so, to do that, I'm
layering dark on the outside and clear
on the inside,
you know, in sections so that it
doesn't kind of blow the clear all the
way out to the edge, and it doesn't
bring the dark all the way in from the
edge. I hope that makes sense. If it
doesn't, leave me a comment. I'm happy
to go further into that. But,
I love this process. The dark gives it
such a a new elegant layer to it. This
is while it's in the dust-free zone
drying, curing. I think it looks so
rich.
And this is after
curing and I cannot even tell you how
many compliments I get on pieces like
this.
That transparent black resin making it
look like flowers are coming up from the
deep is just
chef's kiss, elegant, priceless. And so
before I sell this, I will oil
I will oil all the wood and make all of
this look like it should and be properly
sealed in cuz right now it is just
raw wood. It's not sealed with anything.
All it has on it is the ink mixture that
we did. So
that will have to be done before we sell
it. But as you can see, sorry, out here
I have a flash. So I'm hoping you can
see it. That is a billow of dark resin.
Then we got some billowing over here
on these edges so it looks rippled.
I I love it. I love it so much. I love
the little pop of copper to bring the
color out.
And I don't know. I just
Sorry about my smudge here.
But you can see it also
here
outside of the smudge. That like swoosh.
That swoosh of dark. I love it. I can't
get enough of it and I cannot wait to
hear what you guys think.
Do you prefer clear resin or is dark
resin okay? Let me know in the comments
down below. If you want to get the resin
I use, which is Stone Coat Art Coat,
uh you can get it from my website
artisttilldeath.com. Or you can also get
it from Stone Coat directly. Use code
y'all, y a l l, all caps, no punctuation
to get uh a discount from
stonecoatcountertops.com.
Um you can use code a t d on my website
to get a 5% off discount code.
And yeah.
This board is the rectangle charcuterie
board.
And the black gel tint is from Color
Passion. It is the color onyx.
So, anyways, I hope you guys had an
amazing time watching this. I had an
amazing time making it. Cannot wait to
hear what you guys think. And until the
next one, we'll see you guys there. Be
kind to one another cuz you never know
what someone's going through. And always
remember that we do the test so you
don't have to. See you guys. Bye.