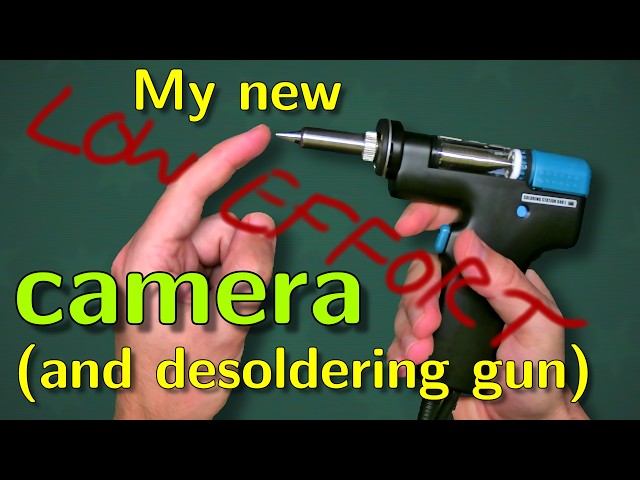
Video summary
The video begins with an unboxing of a new vacuum desoldering station, which serves as both a practical upgrade for electronics work and a test for a newly acquired camera setup. The creator explains that they are transitioning from a DSLR to a microscope-style security camera capable of recording 4K at 60 frames per second, addressing previous limitations regarding recording duration and HDMI preview capabilities. While the new camera offers superior resolution, the creator notes some initial concerns about image quality, specifically observing that the corners of the frame appear slightly fuzzy compared to the center. The unboxing reveals a device from China known as the Yua 948D1, which comes with various accessories including replacement nozzles, air filters, and cleaning tools, all housed in a compact unit powered by an external pump.
A significant portion of the demonstration focuses on the desoldering process itself, where the creator tests the device's ability to remove components from printed circuit boards (PCBs). The mechanism works by melting solder with a heated nozzle and then using suction to pull the molten metal into a reservoir, relying on a liquid seal to function effectively. The creator successfully removes several large components, such as transformers and inductors, which would have been extremely difficult or impossible to extract using their old spring-loaded plunger tool. However, they also encounter challenges with smaller connectors like forked pins and Molex headers, discovering that the standard round nozzle is too wide for these specific shapes and requiring a different approach or nozzle selection. Despite some issues with components sticking due to residual glue rather than solder bonds, the overall ease of use provides a stark contrast to previous struggles.
The video concludes with an in-depth look at the camera's software quirks and the electrical safety features of the new station. The creator discovers that the camera's firmware has bugs affecting color consistency and white balance, causing images to shift to strange hues like green or purple when settings are adjusted or the device is rebooted. To mitigate this, they manually set specific values to stabilize the color output, though they acknowledge the need for further tweaking. On the hardware side, the creator verifies that the station is properly earthed and that the power switch correctly interrupts the live wire, ensuring safety even if the lid is opened while plugged in. Ultimately, despite the camera's software imperfections and minor mechanical quirks like the reservoir needing to be shaken to release stuck components, the creator is highly satisfied with the purchase and looks forward to using the new setup for future recapping projects.
Read the full video transcript
I have a new filming setup and as this
is very much in beta test, I don't want
to risk losing a lot of footage on a
major project if something goes wrong.
Let's do a nice simple loweffort
unboxing.
So, this is a toy I have been promising
myself for a while.
So, let's open this up. It's fresh from
Amazon. I think
it's a
vacuum desoldering station. Anyone who's
watched me
on this channel
try to desolder stuff with one of these
horrible solder suckers
knows just how much I hate it. Ooh wow,
that smell.
So many vox.
Let me get this unpacked onto the
workbench and then we can take a look at
it.
So, the issue with the camera is that
I've been doing all my recording up to
now with a DSLR mounted above the
workbench, which is honestly great. The
quality is brilliant, except for tax
reasons, it will only record up to 20
minutes at a time. It won't do 4K 60,
and its ability to preview is very
limited because it won't output HDMI
while it's recording. So, I have
replaced it with the thing that's
currently being triled, which you're
looking at of now, which is actually a
microscope/security
camera that does do 4K 60 connected via
a very small C lens or possibly CS lens.
And I'm a little bit concerned that once
I start editing it, it will all turn out
to be rubbish. I have observed that the
corners of the screen are a little bit
fuzzy. It's in focus in the middle, but
I won't know whether it's actually
adequate until I finish editing
something together. Hence, this and this
is my new desoldering gun, which will
allow me to take stuff,
components rather, of PCBs with
hopefully minimal effort. And I'm rather
confused because this thing
which is supposed to suck the solder
out, there is no hole in the end.
So,
not sure how that's going to work. There
are some other nozzles. These also do
not have holes in the end. I wonder if
that's actually plugged with solder and
once I turn it on, it will melt. But
anyway, what have we got? We've got a
respectably chunky
holder.
Uh ah like that.
The actual gun itself where it's got a
trigger here. This bit heats up. These
tubes are connected to the big air pump
which is this brick here.
When I pull the trigger, it will suck
hard. Solder goes through the hole that
may or may not be in the end of this
nozzle into this holding reservoir. And
I then empty that at intervals.
Plastic bag. Here there are some
accessories.
Let's take a look at that later.
This is the guts of the machine.
And this is a Yua 948D1
desoldering station. Fresh out of China.
There's a lot of these. They're all
called 948. They're all by different
manufacturers. This one has a reputation
for being reasonably good. It cost meund
something allpurpose currency units.
I did look at getting an actual name
brand one, but that would have cost me
about 800 allpurpose currency units. So,
I decided not to. So, we got a little
screen which
tilts so that you can see it. It's got a
plastic thing on it which I can peel
off.
It seems to be covered in spots.
Yeah, my fingers are covered in grease.
Uh, some controls. this thing.
Um,
presume that's the air intake, I think.
Ah, no, it's not. That's the suction
port. This is the power lead for the
actual desoldering gun itself, which
goes in here.
And the ring does up, and this thing
just pushes on here.
Super high-tech.
Over on this side, we have the power
cable, which has a Euro plug on it,
which I'll need to cut off and replace
with the Swiss one, a packet of
accessories.
What have we got? Some plastic bags, a
wire, banana plug on one end, and a
crocodile clip on the other.
I assume it's for grounding. Oh, yeah.
The back of this has got the earth port
for the crocodile clip.
Never seen one of those on a soldering
station. We've got a replacement one of
them. Some replacement ones of them.
These are the bits that go inside the
solder capture thing.
Some replacement air filters.
a
tube.
I don't think this is a replacement tube
for this because this is or really
should be made out of glass cuz it's
going to have molten metal on the inside
of it.
So, I'm not sure what this is for.
We'll find out later.
And we got these. These are for cleaning
the nozzle. You push them up and clear
the solder out of the various
tubes that the thing is made of.
[snorts] And
more cleaning things.
Oh, yes. And we've got one of these.
I do not know what this is. This looks
like this is supposed to go through here
and clip.
Okay. Oh, yeah. And of course,
we've got the packet of nozzles. So,
let's take a look at the documentation.
We've got
two.
We've got this one, which is in English,
German, Italian, French, and Spanish.
We've got this one which is in English,
German, French, Italian, and Spanish.
How are these different
important safeguards? Oh, right. This is
just the warnings,
which I'm going to guess can be boiled
down to this thing makes molten metal in
your lap. Don't burn yourself or set
fire to anything. So, this would be the
actual instructions, which I am going to
look at because I think I'm going to
need to I've never used one of these.
Have I mentioned that,
right? These last two pages contain the
bulk of it. Okay, so this is
instructions on how to desolder things.
You put the hot tip of the nozzle over
the joint. You wait for all the solder
to melt. You pull the trigger and it
will suck the solder off the joint and
through the hole. That's important into
the catch reservoir. One interesting
thing about these is if it doesn't work
the first time, you have to add more
solder and do it again because it relies
on the liquid solder forming a vacuum
seal around the nozzle. Otherwise, it
just sucks air and doesn't suck solder.
says there's a little indicator on the
side.
That will be this that tells you when
the thing is full.
And the cleaning chamber, filtered
chamber, can only be removed after the
desoldering has fully cooled.
Apparently, I need snow or ice to make
that work.
So, to open it, we do this.
We do this
and then this thing comes out and this
reveals
in super microscope vision
the rubber seal
nipple thing that holds it to the
front of the desoldering
thing. I have run out of words because
this thing won't come off.
Uh, we've got a filter
and we've got the metal spring
and a little metal cross that holds the
spring in place. Yeah. Okay. I'll try
not disassembling that at this point.
That goes back in there.
So, this thing sticks on here more or
less. No, it doesn't. This thing goes on
here.
Does it matter that there's a little
notch out of it? Hopefully not.
This goes on here.
Clips into place and all clicks
together. Okay.
And this thing opens up to reveal
the nozzle and the heating element. And
in very out of focus blurry vision, you
can see the little hole that it sucks
through.
Okay.
Well, there's one more thing left to do
and then let's try firing it up and see
if it actually works.
And that thing is, of course, to replace
the plug because this plug
does me no good here.
Here we go.
This is a European plug. Two pins and
earth there. It goes into a round
receptacle with a single pin sticking
out that goes into the earth hole or
a thing that rubs against this strip
here. And these two pins are almost but
not quite compatible with many other
forms of two pin plug. However, I'm in
Switzerland and Switzerland uses these.
And this has your two uh pins for the
actual current which is live and neutral
and a single earth. And those two pins
are very nearly but not quite the same
form factor as the two pins on this. So
there is a thing called the Euro plug
which has got two pins on it which are
bendy which you can push approximately
into a wide variety of different sockets
in different countries
and it is about as sketchy as you think
it is.
But I have seen worse plugs in some
countries in the world. I of course come
from Britain, which means I am very
snobbish about
British plugs and sockets.
Swiss plugs are not fused,
which British ones are,
but apart from that, they're actually
pretty decent.
So, we finally peel the outer insulation
back. Three wires over here in neuroland
live earth neutral.
Okay, this bit comes out.
I said there we go. It comes out giving
me access to the screw terminals.
The terminals are actually labeled but
not here. They're labeled here. And it
does actually matter which way up this
is.
So this this is the wrong way round. Has
to be this way round. In fact, it won't
let you reassemble the thing if it's
backwards. But that means that this one
is neutral. So let's do that first.
Okay. So, this now
clips back into the plug
like so.
And fold it back like this. And the wire
goes in like this. And I will actually
It's got twisted. And we need to untwist
it so that this screw post isn't in the
way.
And then we do it up again.
And then this thing goes back on.
And And let's take this off again.
And just double check to make sure I did
everything right.
L Brown Live.
So, all I need to do now is to plug it
in and then we'll find out if I can work
it.
Okay, it's all plugged in and ready to
go.
Is my hand unusually pink.
Wonder if a camera settings changed.
I've got this old PCB which came off a
power supply. Let's try removing some
stuff from it. So, switch on
Okay, now I've got the manual here and
it says that these buttons do something.
Ah, it is now heating up. What does this
do?
Nothing. Apparently, this one
I have no idea what I'm doing.
This looks like temperature.
There we go. Has anything happened? The
end's smoking.
Right. It's still preheating. I need to
wait.
There's something here about
temperature conversion. No, that's up
and down.
Hold for two seconds.
Uh, no. Let's not do that.
Yeah, these instructions are
incomprehensible.
Ah, it's doing something. And yes, look,
there's a hole there. Okay, so pick a
component.
There's a diode there. So, we should be
able to simply do this.
And I think that's actually worked.
That is miraculous.
Using the manual solder sucker is so
much pain. That's incredible. Well, that
was so easy.
Wow.
Let's
try
I want to try this transformer,
which I think are these
eight holes.
So,
I think that idea is actually working.
Oops.
My thought was that maybe the wire was
too thick for the nozzle and need to
switch to the other nozzle. But it does
look like this all fits.
I think I Yeah, these are actually
pretty thick wires.
It's not happy.
It's working,
but it wants the next nozzle.
Yeah, that one has not. There we go.
Melted properly.
Okay.
It's wobbling, but it's not coming off.
Here's the problem.
It's stuck on with glue. So, the
desoldering gun has actually managed to
desolder it properly. It's just
this gummy stuff is holding it on.
That's incredible. I should have got one
of these years ago.
So, you've got this chunky transistor
here.
So, so easy.
As I said, this is all power supply
stuff. So, it's all big coily things.
Speaking of which, here is a big coily
thing.
There you go.
So, that should be one side of it. And
the other side is
this row here.
So, this is not coming off.
Why is it not coming off?
And there we have it. A coily thing.
I'm not quite sure what this is. Some
kind of inductive component.
Inductance is a bit of a
black art for me. It's really heavy.
But yeah, this is miraculous.
I am going to throw away that old solder
sucker.
And this is it. This is the thing I was
previously using. It's a spring-loaded
plunger. You push this down. You apply
your soldering iron to the component.
You jam the thing on. And then quickly
before the solder melt, you push the
button and it's supposed to suck the
solder up into this thing. It doesn't
work. This thing is complete junk.
This This is great.
Now,
don't want to take too much stuff of
this cuz then I've got to put it
somewhere.
Here is a smaller, much more delicate
board. This is actually the control
board from the printer, which I dripped
apart in my last video. Let's try and
get this USB socket off. So there's
these four connections that actually
hold it to the board and then these four
connections which are the electrical
contacts. So,
let's do these first
cuz these are much smaller.
Okay, now these
uh if I can actually make this work.
If I zoom in, you can see that these are
forked pins.
So, I don't think
this thing with its round nozzle is
actually going to work.
There are some more nozzles. This is the
biggest one,
but even so, I don't think that's big
enough to go over the forked pin here.
So, I think that one is a non-starter.
So, that is good to know. What else have
we got? Ethernet socket.
Some telephone sockets. They do the same
thing.
We've got these Molex connectors. Molex
header connectors that are made out of
very thin plastic.
So, let's have a go at these and see if
I can do it without melting them.
>> [music]
>> Some of the pins
still have solder around them.
[music]
And out it comes.
So, it's a little bit melty. This pin
has moved slightly. It just pushes back
into place.
I think that is actually perfectly
adequate to put back on a board.
I would never have dared tried to
desolder one of these with the plunger.
So, things I'm not brilliantly pleased
with is it's got a bit of a tendency to
jam
in the holder.
Needing a bit of a shake to get it off.
I suspect that's possibly just me put
putting it back incorrectly. That seems
to be happy. Also,
it does make a noise.
which is of course the vacuum pump in
the box itself.
And that capacitor is not coming out.
Yeah.
Let's try
putting some more solder on cuz as I
said, it needs to make a liquid seal
around the pin.
Yes, that's much better. Anyway, I was
talking about the noise.
It's not loud,
but it's definitely there. I think I can
Oh, the cap just fell straight out.
Wow, that's so different from using the
plunger. That's brilliant.
So, yes, I think I can use this thing
without annoying the neighbors
downstairs, which is nice.
I've turned it off. It is now coolish.
Cool enough to touch. Let's open it up
and see where the solder went.
The answer is through this hole. So,
let's
hook out this filter again.
manual seems to suggest that this bit
comes out.
Interesting. It seems to be stuck onto
the glass. I hope I haven't broken
something.
And there is the solder inside the
spring.
Not a great deal of solder. Oh, right.
It is actually There you go.
And it's sort of glued down here.
I am not sure the springs are
particularly cleanable to be honest.
It seem to suggest that I might need to
get a new one. I assume it's stainless
steel which the solder won't stick to.
Oh yeah, it's stuck
down there.
And
yeah, I think this will fill up with
solder and then I expect I could
probably take a blowtorrch to it to melt
the solder and cause it to fall out. But
there you are.
So that is interesting. Anyway, let's
reassemble
like that
and like that
and like
that. Easy.
And in fact, there is one other thing
that I need to do, which is to take the
lid off this thing and look to see
whether stuff like earth wires are
correctly, you know, earthed.
Okay.
And this
metal thing slides off revealing
the works.
So, we have
Wow. Strong electronic smell,
the power supply,
the computer,
the vacuum pump,
and that is basically it.
Okay, what have we got in the way of
dodgginess? Well, there is the vacuum
outlet
and that silicone tube connects it to
the pump.
The earth is
here,
which is that banana plug thing,
which goes to the case. That good. The
earth from the mains is
that yellow spade connector which goes
to the same screw terminal. Excellent.
So, the case is properly earthed.
On the front side, we've got
the silicone tube that goes to the
external port. Nothing of great interest
there.
the power switch which is in line with
the
live wire.
I can't remember which one is live to be
honest.
Ah,
this actually tells me it is labeled L.
Yes, that is the live wire. So, that is
good. You do have to be careful with
devices where they put the switch by
mistake in with the neutral
because it means that if there's some
kind of short or you take the lid off
and it's still plugged in, the live is
still connected to all the circuitry
which means you can get a shock off it.
Build quality seems decent. It's pretty
robust.
Things are fastened down. Nothing is
wobbly.
Yeah, I'm reasonably pleased with that.
So, first impressions of this thing, I
am well pleased. This is going to make
desoldering stuff so much easier. Like
nitrivial compared to the horrible
nightmare it's been in the past. So,
yes, I wish I got one of these much much
sooner and I'm very much looking forward
to using this. So, that is great. And
for anyone else out there, if you're
thinking of desoldering things, they're
not that expensive.
Get one.
Anyway, I'm also trying to test the
camera.
Yeah. So, postedit me here, you might
have noticed that the color went all
weird during the second half of the
video. That's because I split the
filming over two days. It turns out that
if you turn this camera off and then
turn it on again, the settings are all
just a bit weird.
I don't think it's very good at
remembering what all the various image
settings like hue and gamma and so on
are supposed to be set to. I also found
that the automatic white balance feature
is broken in a really interesting way,
which is that if you turn it off, all
the colors go anyhow. The setting which
you can control does change the color of
the image to all kinds of weird bright
hues except if you set it to 75 at which
point it looks like this. Let me
demonstrate.
Okay. So, if I turn the automatic white
balance off now,
it goes green. Now, I can change the
level. So, it's currently set to 75. If
I set it to 74,
it goes like this. If I set it back to
75,
back to normal.
And the hue setting is equally strange.
The default is 60, which looks like
this.
So now I've gone all
unsavory purple. The number varies from
N to 120. N looks like this. So even
more purple. 120 looks like this.
Which I would consider to be like
representative of real life. And this is
what I think the first half of the video
was recorded as. So that's all deeply
weird. I suspect the firmware in this
thing has definite bugs.
That said, I can't really complain too
much about the image quality, which is
honestly
fine. It zooms in. It records 60 frames
per second 4K. I think it looks all
right. It would be nice if I could, you
know, actually turn the automatic white
balance off because otherwise things
change color depending.
Uh,
interesting. In my fiddling, I seem to
have actually turned the automatic white
balance off.
Okay. Yes, I don't know what's going on
here. I think the firmware's got bugs.
It will require some fiddling to work
around these. I think I can beat it into
shape that I can actually use this for
filming. My DSLR didn't have these
problems, but then again, my DSLR would
only record 20 minutes at a time and I
didn't get a proper preview.
So, yeah, I think I am honestly
reasonably satisfied with this and I am
going to continue trying to use it for
projects as I will this thing. I'm very
much looking forward to using this. I
have some recapping projects that have
been on hold because I simply couldn't
face desoldering a lot of caps with
this.
Now I look at this, I notice that the
color of the blue plastic here is
completely different on the screen as it
is in real life. Yeah, I have some work
to do here, but I'll do that off camera.
Anyway, I hope somebody out there
enjoyed this ramble through some of my
new toys. They will be back.
As always, I hope you all enjoyed this
video. Please let me know what you think
in the comments and I will see you all
next time in hopefully better color
rendition.