Video summary
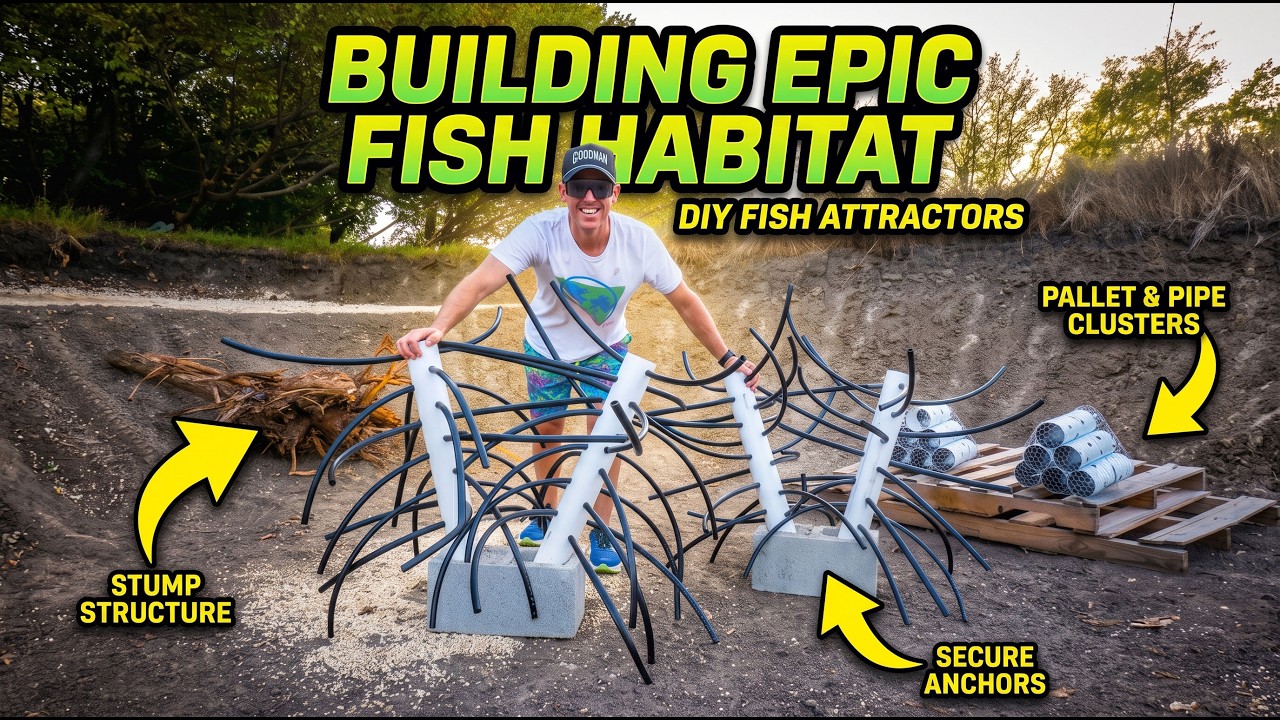
In this episode of the pond restoration series, the creator transforms an old, silted catfish hole into a thriving habitat for sunfish and bass by focusing on adding essential cover. Following recent rainfall that revealed a muddy but holding water level, the host addresses concerns about soil erosion and turbidity caused by fine clay particles suspended in the water column. To mitigate these issues, he conducts a soil sample test which confirms a high clay content capable of retaining water, boosting his confidence despite previous struggles with clarity due to catfish and carp activity. The primary goal for this phase is to create hiding spots for bait fish like bluegills and fathead minnows, allowing them to spawn and reproduce safely while providing structure for predatory bass to hunt around.
The video details the construction of various artificial structures using recycled materials found on-site, such as wooden pallets, tree stumps, and irrigation hoses. The creator builds several "fake trees" by cutting heavy-duty drip hose into cactus-like shapes and anchoring them in cinder blocks to provide overhead cover for fish. He also constructs "minnow motels" and a "tadpole temple" using French drain pipe bundled together and wrapped in galvanized chicken wire, creating protected spaces where minnows can lay their adhesive eggs away from larger predators. While he acknowledges that some materials like pallets and chicken wire are not ideal for fishing due to snagging lures, he prioritizes immediate habitat creation for the ecosystem's foundation species, planning to replace or adjust these temporary structures as the water level rises.
Beyond building artificial cover, the host improves the pond's physical banks by using a tractor with weighted tires to press down loose soil and prevent erosion, ensuring the shoreline can hold water effectively during rainstorms. He adds sand and gravel mixtures to specific areas to create spawning beaches for bluegills and plans to install a professional-grade dock foundation soon, aiming to eventually add a pump system for summer heat management. The project remains budget-conscious, with the creator managing most of the labor himself while hiring professionals only for critical tasks like the dock foundation, keeping the total renovation cost around three thousand dollars so far. With the artificial structures in place and the soil stability confirmed, the pond is now ready to fill up, promising a future underwater paradise once vegetation takes hold and water clarity improves.
Read the full video transcript
Danglers, welcome back to the pond
restoration series. And this is where we
are taking our old catfish silted in mud
hole and we're turning it into a sunfish
paradise. And so far, we've made a lot
of progress. And in the last video, we
actually got a fully formed pond. So, it
feels good to come out here, look at the
shape, look at some of the structures
that we've put in, that being, you know,
the ledges and uh the points and the
drop offs and things like that. But in
today's video, we are going to be adding
cover for these fish. So, the goal
ultimately is to provide lots of places
for our bait fish species like our small
bluegills and our fathead minnows to
hide, get away, spawn, and keep
reproducing to feed our bass. And we did
actually get a little bit of rain last
week, y'all. And we were able to see for
the first time a small bit of water in
the pond. It was kind of just the the
runoff from all the loose dirt. So, it
looked kind of kind of muddy and gross,
but the pond did appear to hold that
water just a couple inches for at least
3 days. Then the Texas heat of course
evaporated everything and we were left
with a dry crusty top. That actually got
me a little bit concerned and utilizing
some of that that fresh rain getting the
the surface disturbed. I took the John
Deere tractor, took the front tires, and
basically pressed in a lot of the bank
areas that I was a little worried about
eroding. And that top layer of crust
that's just crumbling has got me a
little worried. So, the first thing that
we're going to do today is take a soil
sample and check it out. So, I've got
some things laying around the Dangle
Dome and in the woods that we can use
for cover options. And then we're also
going to make our own artificial cover
options for these fish. So, let's go
take a look at our dirt composition, and
then let's get to work on building some
cover for these fish. Let's do a little
soil sampling, shall we? And while we're
in here, I want to give you guys a
little tour of the new section of the
Dangle Dome. So, I've had this metal
grid wall just sitting around in the
attic collecting dust for years. It's
from my days as a sales rep and this
would be something that you could go to
shows and display your products on and
I've had them just sitting around and so
I decided to use them in the dangle dome
and turn them into something cool. The
workbench takes up a lot of room so I
wanted to add some cabinet space and I
added these metal cabinets. I've got
archery stuff set in here. And then over
here is honestly kind of empty. That's
how I like it. Room to expand. Little
bit of metal metal shelv shelving here.
3/4in plywood. I had some of the paint
left over from the painted spray foam.
So, I use that. Just come over here,
keep stuff charged, access to all the
nuts and bolts, puts things together,
which is what we're going to be doing in
today's video. I'll show you the arrow
flinging station in another video. I've
got a bow to set up, so might as well do
it in that one. Let's test some soils.
When I took the shovel and I dug out
these pieces, you know, this is where we
eventually,
future video to come, are going to build
a dock. This is where we would put the
uh the peers essentially. I'd like to
add a little more sand and gravel in
that area and had have some artificial
structures in there as well. And when I
took these chunks out, it looked like
chocolate fudge. Just hardened like
you'd go up to Cabelas and ask for
fudge. I don't even know if they still
do that anymore. Give me a chunk of
fudge. This looks just like that. you
know, if it had been sitting out for
like 3 days and and a little crusty.
What we're going to do here is dilute
it. We're going to add the universal
solvent, which is water. And we'll also
add uh just a little bit of Dawn. What
I'm trying to do here is see how much
clay content we have, which I think it's
over 50%. And I I think ideally you want
30 or 40%. To build upon like that's the
minimum. That's what you want to be able
as a top layer to hold water. And I I
think we definitely got that. So, this
will separate from, you know, silt,
sand, clay, and the clay particles are
so fine, they're going to land on top
last. So, it takes a while. And what
we're going to end up seeing is that top
layer hopefully being pretty thick. So,
let's add some water, shake it up, and
give it a little bit of time. The old
pub over here is a mess.
There's a new box. I hope this is what I
think it is.
That is
That's the bee's knees. That's pretty
slick looking right there. I can deal
with that. Googens.com. The reserve
worm. It Okay, it is in here. It's just
at the bottom. Happened to have its
hats. Tomato. Rotten tomato. If you guys
are worm fisherman, die hard like me.
Even if you're not die hard, 10-in
worms, catch them in the summertime. and
purples and reds. I don't know what it
is about them, but bass love them. We
got a new reserve color and it's rotten
tomato. Really cool color. It's got like
a a a black with green fleck. Kind of
looks like red shad a little bit, but um
the red is more translucent. It's like a
more of a plummyy type color. Anyway,
looks like Rotten Tomato. It's going to
be available shortly if it's not
already.
Now, all that chocolate yohoo in there,
that stuff is great when you're talking
about compacting clay soils to hold
water. But the one of the big problems
with my old pond was it was always
turbid. So, because of those clay
particles are so fine, they'll suspend
in the water column, especially when
you've got soft water like I do. And
then we had just hundreds of catfish. We
had, you know, dozens of carp in there.
And those those little critters are just
on the bottom stirring stuff up all the
time. And it would just stay suspended.
I I don't have erosion issues. Um, you
know, there wasn't like bad runoff
issues or anything like that. It was
just nasty little bugger fish in there
and then shallow water with all this
clay. So, it's one of my concerns going
into the pond not having a liner, but I
want to try to combat that with some
vegetation and not putting any carp and
very little catfish, if any, in this
pond.
Well,
good morning. Uh, it's time to take a
look at our jar of dirt.
Yeah, it doesn't look like that. This is
exciting. What I'm looking at right here
without adding any gypsum or anything is
we have a clear separation between the
water and it's clear. Yes. But very very
fine clay at the top. It looks to me
like it's probably 40 or 50% of that. It
could just be all clay, but it's micro
awesome fine particle clay at the top
and looks like 40 50% which gives me
high confidence that water is not going
to be leaking out of our pond. So, let's
start making our cover for our future
fish.
I really want to try to do four
different cover options and mainly use
what I have here at the house. So, I
have these pallets. I was gonna throw
them away. I think the pallets are
hideous in the water. However, they are
good fathead minnow spawning areas and I
might as well use them. I'm not going to
leave them in there forever. But for the
first year, 6 months, have some cover
just so they can go somewhere
immediately. Those things are great. And
fathead minnows like to spawn underneath
that type stuff. I just don't want a
bunch of junky pallets sitting in the
pond. The other thing that I have here
that's really cool is stumps. So, while
we were doing some of the woods
restoration, I had uh some boat arc
stumps and some hackberry stumps that I
pushed over using the skid steer. Was
able to get them out of the round ground
with the roots intact. That's already
here. That's natural. It's been sitting
in a brush pile. Might as well use that.
These structures will be cool. We're
going to put some irrigation uh line
hose through these. And you know, it's
pretty typical what you see people
putting in in ponds, but it is nice cuz
you don't catch lures on it and that
they last, they don't rot and the fish
do like them. So, first piece of cover
we're going to build are our little fake
trees.
And since this is 10 feet,
I'm gonna I'm gonna do two of these in
the cinder blocks that have basically
two big branches and all the little
plastic branches coming off those. But
this will give the fish something to
suspend over
or get right on in. Since this doesn't
have to be exact,
just going to be using the the saws all
optic nerve
protection. Well, bam. GooGansquad.com.
You use that promo code LFG. Save on
your sunglasses and your rotten tomato
worms that are now available.
>> Let's make SOME FAKE TREES.
SO, THE NEXT THING we're going to do is
take this
and I don't know how long this is. It's
probably about 3 ft. So, the way this
stuff is coiled up in its memory, I'm
just going to cut it basically in half
of what that hose reel size was and just
make it like that, like a little cactus
tree. And we're going to see if we can
pump this old 11/16 in here and see how
that does. The only thing I need to
measure is how far into the cinder block
this is going to be before I start
drilling holes. Okay. So, really at 9 in
we can start
our holes.
One, two, three, four, five. That's
going to be six branch sections.
Okay, that's one hole. See if it's big
enough. It's going to be the right fit.
appears to be proper.
Oh yeah, baby.
There we go.
I like it.
I just so happen to have some
I call them big ass scissors.
Works great for cutting this stuff.
So, I'm going to keep going on that same
length cuz it appeared to be just right.
For anyone curious on the materials, if
you're going to do these at your home
pond or or whatever, put these in a
lake. Honestly, be pretty good little
crappie brush files. This is the
Rainbird
1/2 in heavy duty drip hose. I believe
it was $16.99 for 50 foot. There's much
more expensive hoses out there. Don't
get those. Get the cheapest thing. Just
make sure it's it's stiff like that.
Don't be using PEX. That's ultra
expensive. And the other nice thing
about the 3-in over the 4 in, I didn't
even really anticipate this. I got this
cuz it's cheaper. Figured that wouldn't
really matter on the diameter, but
my drill bits
are able to get all the way through
there. So, I don't have to kind of
measure the other side, look, you know,
kind of guesstimate. I can just go right
through on the same hole. And I'm
drilling the main holes. These are 4 in
apart. And then I'm just going in
between eyeballing
these other ones going different
direction. We're almost done with the
first one. We'll get it set up. See what
it looks like.
Try to get as much of that plastic out
as I could.
Don't want any microlastics in the pond.
I don't know how many of these hose
tubes
we're going to need. We're about to find
out. I'm going to say 12.
Yeah, 12 should be. The hole is a little
bigger than I wanted,
but I think they'll still stay in there.
Mhm.
Oh yeah, baby. Making a fake tree. It
would be fun if it wasn't 102
in my garage here. Boys, that's looking
like something.
If you dig the looks of these and you
have a pond, you just don't want to go
through all this effort, you can
definitely go buy these.
There's probably somebody on Facebook
Marketplace that builds them around you.
Might be me. lfgfish structures.com.
It's really fish cover if we're getting
down to the technicals. Structure is
more of your main components.
You know, a ledge, any kind of drop
point. We just did something in about 10
minutes.
Looks halfway decent. Well, bam.
10-minute fish cover. You know, this is
when these are don't have gravity. when
it's just in the water. I don't think
it's really going to matter on the hole
size being a tad big. Straight up cactus
looking. I like that a lot. You know, 4
in apart seems to be pretty pretty dag
on good. Um, you know, technically 2 in
if you go in between there. I like this.
Let's keep this production going.
We got our four fake trees now.
Let's put them in a cinder block. See
what this is going to appear like.
Double them up.
Like an interwoven situation.
I'm not mad at it.
It's not as uh spaced as I was
imagining, but it's kind of cool. It
makes a weave. But you run a damn
spinner bait in between there. Whoop.
It's happening. Up next, we're going to
make some minnow motels. I love that
name. I don't know if that's actually
out there, but Minnow Motel. So, I've
got a 10ft. This is uh, you know, French
drain pipe. It looks like it's a little
bit cheaper than the the PVC. This is
124 in long. So, I'm going to measure 10
in. I'd like for it to be a little
longer, but I'm going to make groups of
six, and I'm going to bundle them
together.
So, these actually already have
1/2 in holes it looks like in them. I'm
going to put a few more. I'll probably
go with a three 3/4. Kind of cool if I
did like a pyramid.
That might actually be
That might actually be dope. 1 2 3 4.
So, y'all are going to get to watch me
do this, figure this out in real time,
cuz to be honest, I really didn't have a
plan.
But what I'm liking
is this little triangle situation.
And I've got some galvanized
chicken wire. Unbelievable how much this
stuff is.
We have enough to make two. So, one is
going to be the minnow motel. The other
one is going to be the tadpole temple.
Tell me you don't like that. Grabbed a
little malleable wire.
And I think to make it easier on
ourselves, we're going to
use that to wire them together. And then
we'll bring in the chicken stuff. I
don't like the chicken wire, but it is
going to do the job.
Okay, we bring it together. We bring it
together like that. It's going to work,
dudes.
That's going to work. That's going to be
our our temple, our our minnow motel.
I'll put some more holes in here where
they can come in from the sides. Um,
this will allow them access to get in
there, get in there, you know, a solid 5
in. So, each side they might have fish
looking in there like, "Woo, what's
going on?" on, but they'll they'll have
the safety. Yeah, not in love with the
chicken wire. That's definitely a lure
getter, lure snagger. But I'm not going
to be fishing the minnow huts. These are
wired together. It makes our life a
little easier.
I think we're going to have enough room.
If I think back to my my Christmas
wrapping
experience here, we're looking good.
Confidence in anything is the key.
Big skizzer is definitely handy in the
shop.
Tie it on itself. Stuff so gnarly.
I think the funnest thing about doing
all this is
just thinking about the reward
of, you know, going out there and I
actually see minnows in here. You know,
I I see bluegill hanging around it. You
see reproduction happening.
See life. Know that you're you're
helping out your little ecosystem that
you are in charge of. Now, we have the
Minnow Motel, we'll call this one,
wrapped with the chicken wire. And what
I was hoping for here is to just take
these ends and just close them up. I'm
trying to make this less hideous
than what it is, but it's at the end of
the day, it's just going to end up being
pretty ugly.
Yeah, it's just how I that's how I like
to wrap my presents right there. Just
kind of do a unif.
That's gnarly. I mean, that's that's
like a prison.
Do some sort of uniformity here. The
triangle fold. Oh, that looks good.
Okay. Yeah, the first one's never the
best. The second fold
pretty dang good.
I might tie it up a little bit right
there where it's loose. Oh, shoot.
Microphone just caught.
But that's not too bad, y'all. That's
pretty
futuristic prison looking. Oh, forgot to
drill the holes. Does already have some
holes, but we we still have room where
we can drill some.
All right. What do you think these
things are, Ben?
>> What?
>> Sprinklers.
>> Sprinklers. Good guess. It is made out
of sprinkler material, but this is
actually little fish houses.
So, I'm going to put these in the pond.
The fish like to live in stuff like
this. And this is going to be the last
of our fakes. Well, we got the the
pallet pallets.
Nobody's really interested in those.
Those are just kind of We're just going
to throw them in there. But we are going
to add
uh some sand as well to our gravel.
We're going to have a mixture of the
sand and gravel because Ben got a
sandbox for his birthday which daddy had
had to build and it required a lot of
sand.
>> Last time
I I didn't even tell him to do this. He
just watches so much Mark Robber and
Dude Perfect that he goes you can read
it at.com. Let's go. I was like I don't
know how to take that being an
influencer. I don't know if I can put my
stamp of approval on that.
>> You can dig in and do com anytime.
>> You can dig in and do anytime. Is that
right?
>> Mhm.
>> Okay. It's free all day at at where?
>> At guganquad.
>> At guggen quad. All right. Dig away at
googquad.com.
We are done with our artificial
structures. No, we need to add a little
weight. So, we got some quick mix here
and I got some cinder blocks and we're
going to set these. Now, one thing that
I did do, I didn't show it on camera
when I was doing it, but I just set a
couple of wood screws in the bottom of
our tree, their artificial tree, just to
kind of hold it.
Oh, well. Bam.
I think these look pretty good.
Put our concrete in.
Okay, I'm kind of thinking halfway.
Not much of a concrete guy, but I think
we'll go halfway here.
Set them in
and then go for it. I need a stick.
Gandalf stick.
says you don't have to mix it, but just
giving it a slight slurry.
All right, now we'll pour the rest.
We'll spray it down.
I'll be honest with you, I didn't.
That was without measure at all.
>> You might want to wash off those hoes.
>> Holy cow. I didn't even realize that. Oh
man.
>> Wash those off.
>> My old man shoes are ruined. Might be
enough room
where I can possibly pour it down the
pipe.
Yeah.
And then
on top.
That's not messy or anything.
Okay, I think half of it made it in.
The other half is in Oklahoma by now.
Don't hire me to do your concrete.
>> I actually I haven't told you this yet,
but I actually talked to a concrete guy
today.
>> Oh.
>> About what we're trying to do over here
with with a dock. I was like, "Yeah, you
know what? I can I can I can do a dock.
I want to do a dock. Let's make it
happen. It'll be cool. Cool video."
And then I got to thinking about it. I
was like, I'm really unqualified to do
this.
Uh, this would be a fun like video
project, but it's also something I'm
going to enjoy every day and I want it
to be awesome. So, I want to put some
more effort into it. So, I got a
professional and uh we're going to be
building the dock ourselves, but I want
the foundation to be set up by a pro.
So, got some uh some good neighbors,
know a bunch of people, and we're going
to line that up, baby.
>> We're going to have a dock that you can
you can go out there, you can suntan.
>> Now, your your feet are probably going
to be hanging off. It's not going to be
very long, but you can get out there and
suntan on the dock with the bluegills.
Well, bam. So, we will let that uh
let that eat as they say. And the minnow
the minnow traps are or the minnow
houses are ready to go. So, we can go
ahead and put those in there. The
tadpole temple and the minnow motel.
I'm thinking we definitely put these on
our shelves rather than on the drops.
You know, just a couple of feet of
water.
Um,
I'm thinking one over here.
The gravel area.
One over here in the sun.
Looks pretty lonely. Probably need about
five of those cuz I' I've I think I've
built more bass habitat at this point
than I have really for the minnows. It's
kind of like how the girl decorates so
she gets one item has to fill in her
bookcase.
>> Yeah,
>> I need about five more.
>> Well, good news is I've got extra
materials. So, just another trip to Home
Depot. Spending spending money, but I
got the chicken wire and I got, you
know, we got the tool shop set up
>> this. So, the little ones go in there.
>> Correct. Mundo, honey. So, think of
fathead minnows kind of like betta fish.
They like they like their own little
broom to get into. So, they're gonna
they're going to go in here. They're
protected from bluegill bass, obviously.
And they'll able to they're able to swim
in and out and they can mate in here. Uh
they actually like to lay their heads
lay their eggs. They have a adhesive
type egg, kind of like a a shad. They
like to stick it to things up underneath
preferably. Um wood is is probably much
better. Um, you know, a good foam dock
is is primo when you're talking shad and
minnows for spawning, but this will
suffice. I haven't told you this yet,
but we are going to throw those pallets
in here as well. Yeah, that's temporary
>> while we're trying to raise our minnows.
And come to think of it, you know, the
the water's probably not going to be up
here for like another year.
>> So, probably need to move these down.
But ultimately, this is where they'll
end up. So, what if you like hook into
it with a fishing lure?
>> Yeah, you're getting stuck definitely.
But these these are not going to be
something we're going to fish around.
The other structures I made, those are
lure friendly. So, those are for like
the bass and the sunfish to be around.
>> Don't cast over here.
>> Definitely not you. You're That's a lure
magnet.
>> I just noticed that everything looks
very smooth. Did you use a tractor to
regrade everything or is this from the
water like coming in? Okay. She was just
asking me. She was just asking me off
camera. I said, "Turn that camera on."
>> It's a serious question.
>> He's not paying me to ask this question.
>> You notice my work.
>> So, yeah. What I did was I took I took
the tractor tires and I took a a load of
dirt in the front to make them heavy.
And I pushed the tractor tires up to the
edge. And I just went around and I'm
just I'm just trying to push that bank
because the the bank has not been
pressed in. It has not been tracked. Um,
so really the only way to do that would
be like with an excavator, taking the
taking the bucket and like pressing it
in.
>> The tractor bucket does not do a good
job. But the great thing about the
tractor is there's a lot more pressure
on like per tire than on the whole track
system of the skid steer. That's why we
sank so terribly in here. But it it
actually helps with uh with pressing in.
So every every time it rains and things
look a little loose, I'll probably come
in here and I'll I'll track over it. But
yeah, you like it, don't you?
>> Little extra ecological stuff we got
going on here. We're going to add some
sand before I put my forks on the bucket
here. We move some stumps.
This is uh not very safe,
but I'm going to do it anyway. This is
some skills right here. Okay.
The old fashioned way.
Okay. Rest of the sand will go right
here. It's going to be a scrumptious
spawning area. Scrumptious spawning
area.
There you go, honey. I made you a beach.
Get out your Get out your chair. Come on
in.
>> Oh, yeah.
Bluegie is going to like that.
Got
to get some of these branches out of the
way.
There we go. That's fun.
kind of feeling
out here maybe.
Yeah,
that looks pretty good. We got another
one and like crisscross them. That'll be
pretty nice.
This will be the first place to hold
water right here by one
right there.
All right, let's check and see if our
little huts are dry. I think they are.
Think we can pick him up?
Heck yeah. That's looking good.
Basically just putting all this in in
the deep spots for now and we'll adjust
it as as the water comes up. I'm going
to put a float or two on on some of this
cover. That way I can identify it, pull
it up and move it if the water just
drastically comes up. But I think what's
going to end up happening is it'll
slowly come up and I'll be able to come
in here on foot and just move these uh
exactly where I want. Um I'm really
happy with these. I I didn't have a plan
for this when I started the video. I
know I wanted to do something with the
pipe and the irrigation hose, but
putting them in the cinder blocks facing
opposite directions. Uh, I really like
it. The only thing I'm disappointed with
is just the the staying. You know, my my
holes were a little too big, but I think
in the water they'll float it. If
they're facing down, it it's kind of
cool. It's like a cedar tree where
there's there's uh there's cover on the
bottom as well. So, I'm not super mad at
it. uh the middle motel in the tadpole
temple. They turned out really good. I'm
happy with these. The pallets are
hideous, but they're going to do their
job sitting right here while the water
comes up. And we're going to weight
these stumps down. And I've got more I
got I've got more trees that need to
come down out here. The trees that are
already dead. So, I will try to save the
root systems cuz it just makes really
awesome cover. And my dream is to be
able to film underwater here. I don't
know if we'll have that kind of water
clarity, but taking our soil sample
beginning of the video, I think really
just boosted my confidence and being
able to get the water clarity up here,
maybe adding some native vegetation to
to help with that. But I'm excited about
what we saw in that jar. And as it says
on a pack of Googan baits, just add
water, right? But we are not done here.
We are going to add a dock. Probably
will end up doing some sort of pump
irration system out here for these
sticky hot summer days. Again, you know,
150 bucks to do the artificial
structures and the other stuff we just
had on site. So, this is one project
thankfully that did not break the bank.
And so far, if you guys are curious on
the total budget to to renovate this
entire pond so far, uh doing most of the
work myself,
um renting the equipment and getting the
supplies, you know, the sand, the
gravel,
we are about three grand deep right now,
which isn't terrible when you're talking
about moving dirt. And any you talk
about moving dirt, it gets expensive
quick. uh when you're when you're paying
people that that know what they're
doing. But I was able to uh manipulate
the machines just good enough. Just be
savvy enough to move it around. And I'm
actually pretty proud of it. I'm just
excited for it to to grow. We got cover,
boys. Next thing we need is a juicy
dock. So stay tuned for more pond
renovations and outdoor adventures, and
I'll see you guys on the next one.