Video summary
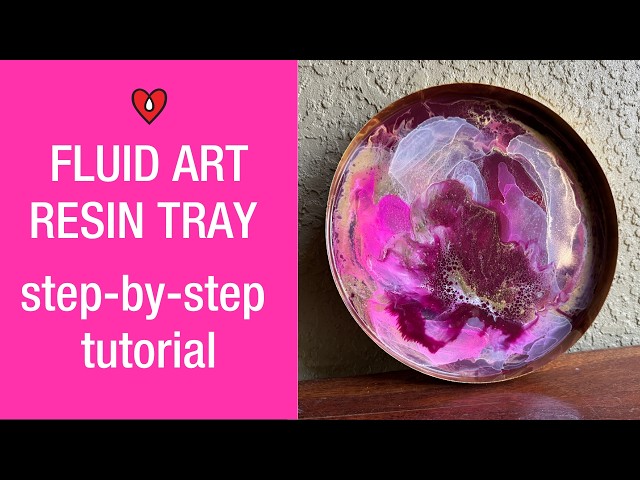
This video tutorial by fluid artist Rocky demonstrates a creative process for creating an epoxy resin tray using art resin and paste pigments. The project begins with mixing the resin and distributing it into cups where various colors, including black, cardinal pink, plum purple, light pink, white, and gold mica powder, are prepared. Rocky selects the plum purple as the base color to cover the entire surface of the metal tray, tilting it to ensure even distribution before popping any remaining bubbles with a torch. This foundational layer sets the stage for the intricate design work that follows, establishing a rich, deep tone that will interact beautifully with the subsequent layers.
The core technique involves layering different colors in a wave-like pattern across the surface, starting with a touch of black for contrast and finishing with additional pink to encourage the colors to blend organically. All pigments used are paste-based except for the gold, which is applied as mica powder on top. To activate the fluid art effect, Rocky uses a hair dryer on low speed to blow out the design, causing the resin to flow and form cells that grow and expand over time with gentle heat. This process allows the artist to manipulate the patterns into curves and details, creating a dynamic visual texture that evolves as the piece cures and is observed over the next day.
Once the initial design has developed its full beauty, Rocky enhances the artwork by applying alcohol inks in gold and white to add magical accents before sealing the work with a layer of clear resin. As a final artistic touch, another thin layer of colored resin is poured on top using just three colors—the plum purple, white, and gold again—to tie the entire composition together. By blowing out this top layer once more, the distinct sections merge seamlessly, making the piece appear as a single, cohesive design rather than a collection of separate layers. The result is a stunning, multi-dimensional surface where the pearl-like effects from earlier layers remain visible beneath the unified top coat.
The finished tray is presented as a versatile decorative item that can serve various purposes, such as wall art or a functional coffee table accessory for coasters and candles. Rocky emphasizes the importance of applying a final clear coat over pigmented resin, noting that since the specific resin used is food safe, it is suitable for items that might come into contact with food or drink. The video concludes by showcasing the drying process and the final glossy appearance of the masterpiece, highlighting how the combination of layered colors, blown-out cells, and alcohol inks creates a unique piece that looks seamless despite its complex construction.
Read the full video transcript
[music]
>> Hi guys, [music] this is Rocky.
I am a fluid artist who works a lot with
resin
and um I have been using art resin to do
a lot of my works.
I am today going to do a tray and uh do
something different
>> [music]
>> um like blow out a design with a hair
dryer uh using [music] art resin and
coloring it with some paste pigments
that I have over here.
And I am just going to layer the colors
[music] in this beautiful golden tray.
Uh it's a metal tray and [music] I then
will blow the design after layering the
colors [music]
with my hair dryer.
So let's get started.
So after mixing the resin for 3 minutes
I have [music] distributed them in these
cups and added colors, these paste
pigments to it and this gold mica
powder. There is black. [music]
There's a cardinal pink.
There is this beautiful beautiful plum
purple.
Um
a very light pink and white.
And I'm going to use the plum purple as
my base color.
So first I am just going to cover the
entire [music] surface
of this tray
with this beautiful color.
I'm just going to tilt tray
so that the color
>> [music]
>> spreads evenly everywhere.
Just torch the bubbles.
Not that many.
Now, I'm just going to layer the colors
in a line
or almost like a wave.
One on top [music] of the other.
Just a tinge of black for [music]
contrast.
Not too much.
And lastly,
I might just [music] layer a little bit
more pink
so that the colors interact well
together. [music]
And top it with some
gold.
All of it is paste pigments [music]
except for the gold, which is mica
powder.
Now, you could heat [music] it up a
little bit
so that when you blow the design, it all
flows well.
And now I'm going to use the hair dryer
in low speed.
Just blowing the pattern.
>> That's it. And now you have to wait a
little bit.
And you can already see the little cells
[music] and details
forming and they grow a little bit more
as you give it heat
and as it expands
with
a little bit of time.
See it growing.
And if you [music] just wait a little
bit more,
it'll grow a little bit more.
It's already looking so beautiful.
If you want to be tricky with the design
a little bit
at this point, just making a few
curves.
Not too much.
And you can see the cells.
Beautiful.
And it does [music] make the design look
even better.
So, this is the next day and it's
looking quite beautiful.
And the idea now is to enhance it a
little [music] bit with alcohol inks and
I have a couple of inks here from
Art Resin
with some gold and some white and let's
do some magic here.
>> Wow.
>> [music]
[music]
>> Wow.
>> [music]
[music]
>> Maybe a last [music] bit
over here.
>> [music]
>> Just gorgeous.
>> [music]
>> Now, before we put a final coat of resin
on this,
we are going to seal the ink work with
some varnish.
I'm just going to pour clear resin
over the entire surface.
And now, as a final step, I am going to
layer
um a little bit of a design here
and blow out that resin again
just so that the entire
uh, the three layers that we did [music]
sort of looks like
it is one design [music] and you'll see
what I mean when I do that.
Just going to layer some colors.
Just three [music] colors I'm using this
time.
The plum
purple
the white
those two [music] are paste pigments
and lastly the gold.
A tinge of the
plum purple again on the top.
So that that base color
>> [music]
>> gets picked up here again.
Now I'm just going to use the hair
dryer.
And blow out the design
on top of it.
Still having all those layers
with the pearl underneath.
Just going to torch this.
And look how gorgeous
this looks. You can't even tell that
[music] you've done it in layers.
Although you can see each layer, but
they all blend so well [music] together.
And that's our
>> [laughter]
>> little masterpiece.
I'm going to show [music] you how it
dries.
And we are pretty much done here. If you
want, you can put another [music]
coat of clear resin on top of this.
Uh it's always advisable
>> [music]
>> to do um a clear coat over a pigmented
coat, uh especially [music] since our
resin is food safe,
um in case someone wants to put
something, uh even though this can be
used
>> [music]
>> uh for just decoration. You can put it
on your coffee table. You can use it as
wall art. Um [music] put your coasters
and a piece of candle on it. It is just
absolutely gorgeous.
Thank you for being with me.
And uh make sure you follow my Instagram
and my YouTube as well. [music]
And um see you in the next one. Thank
you for the support.