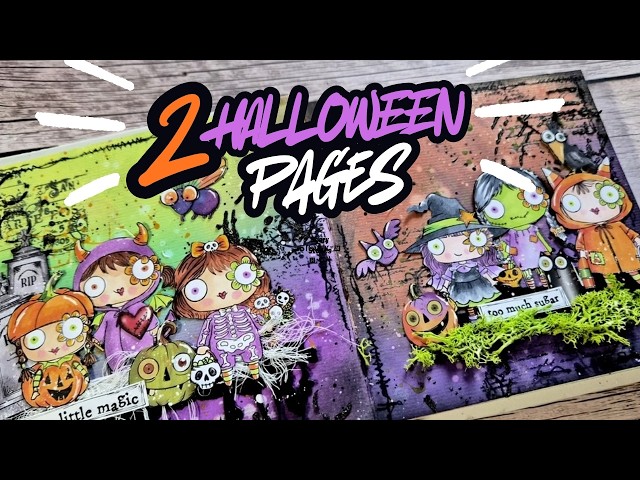
Video summary
Bu videoda yazar, Olen Creat markasının yeni koleksiyonundan esinlenerek iki farklı Halloween temalı sanat dergisi sayfası oluşturmayı ve bu süreçte kullanılan teknikleri paylaşmaktadır. İlk olarak, su bazlı kağıtlar üzerinde çalışarak iki farklı arka plan yöntemi denemektedir; biri oksit spreylerini, diğeri ise oksit mürekkep yastıklarını kullanmayı içerir. Sprey yönteminde, marulade ve wilted violet renklerinin birleştirilmesiyle sayfanın tamamına uygulanmasıyla anında güzel bir geçiş elde edilirken, mürekkep yönteminde ise twisted citron ve peacock feathers gibi renkler birleştirme fırçası ile yumuşakça karıştırılır. Bu aşamada su bazlı kağıdın oksit mürekkeplerle nasıl mükemmel bir uyum sağladığı ve renklerin birbirine geçerek doğal bir akış oluşturduğu vurgulanır.
İkinci adımda ise her iki sayfada da su eklenerek mürekkep reaksiyonu tetiklenir ve bu sayede daha canlı, lekelenmiş bir görünüm elde edilir. Daha sonra siyah mürekkeple damlama efekti oluşturulur ve farklı arka plan damgaları kullanılarak Halloween atmosferi güçlendirilir. Yazarın tercih ettiği yöntemlerden biri, karakterlerin üzerine siyah mürekkep ile damlatma yaparken diğerinde ise stensillerle daha fazla detay eklemektir. Bu aşamada yazarın siyah mürekkeple oluşturduğu dokunun sayfaya derinlik kattığını ve her iki sayfanın da benzer bir Halloween havasına sahip olduğunu belirtir.
Son aşamada ise yazar, Olen Creat'in kostümlü karakterlerini damgalayıp alkol bazlı markerlerle renklendirir ve bu renkleri tutarlı bir palet içinde kullanır. Kesim hatalarını gizlemek için siyah marker ile kenarları vurgularken, sayfalara ekstra dokuyu eklemek için peçete veya yosun gibi malzemelerle çalışır. Ayrıca ephemera paketlerinden kesilmiş ay, kuş ve kabuk gibi öğeleri kullanarak kompozisyonu zenginleştirir ve son olarak beyaz jel kalem ile ışık efektleri ekleyerek sayfaları daha canlı hale getirir. Bu sayede hem hızlı hem de estetik bir Halloween sanat dergisi sayfası oluşturulmuş olur.
Read the full video transcript
Hi everyone and welcome back to another
mixed media Tuesday and today I'm going
to share two art journal pages. The
inspiration comes from the new
collection by Olen Creat and I have some
of those cuties here. I also have some
of their ephemera packs. So I am going
for Halloween backgrounds today. I'm
going to show you two different ways to
create easy Halloween backgrounds that
um they are going to work for you every
time. Uh on one of the pages I will be
working with oxide inks. On the other
one I will be working with oxide sprays.
So let's start with the sprays. A
combination that never disappoints is if
you use spasted marmalade with wilted
violet.
I'm going to spray all my page. The page
is completely dry. I didn't wet with
water at all. And uh you see how those
two colors blend beautifully together.
By the way, I'm working on an art
journal that has watercolor pages. They
are 300 gsm. I'm letting those two
colors blend into one another by lifting
the page. And you can see how the oils
drips into the wilted violet. Absolutely
gorgeous result.
And of course, you can have this
background instantly. Just two sprays
and you are done. I am going to use my
heat gun to make sure that this is
completely dry. or you can just leave it
to air dry and I will proceed to make
the other background. I will be working
uh next to each other so you can compare
and see the different looks. So for this
page I'm going with distress oxide ink
pads. I started with twisted citron.
Then I am applying it with a blending
brush. I'm using this jumbo blending
brush but you can use whatever you have.
I even go uh over it with um my ink pad
just to make sure that um I oversaturate
the page. And then I will move on to the
second color. For that I went with
peacock feathers. And uh I want to have
kind of a transition in between the
green and the purple that I will be
using later on. So that's why I decided
to go with peacock feathers. And you
will see that the end result is going to
look really Halloweenish
and um those three colors really blend
beautifully together. You can see how it
transition from one color to the other.
Now I oversaturate the color in this
page and just because I'm working on
watercolor paper with oxide inks. It is
super super easy to blend them. You see
I go with the ink pad directly on the
page and then I'm even able to blend out
all those smudges. So I am even using
the brushes with the previous color to
make sure that I have a smooth
transition.
And then once I'm happy I am going to
move on to the second step
and that is to add some splattering with
water. Both the oxide sprays and the
oxide inks are uh reactive to water. So
I'm adding some water. I'm going to let
it react with the ink that is
underneath. I'm going to place a paper
towel on top of both my pages. And look
at the result. Just gorgeous. Again,
just because I'm working on watercolor
paper, it allows for this effect to be
super visible. So, it really lifts color
from the page. Also, wherever you have
darker color, it is going to be more
visible. Of course, now I'm inking up
the edges on both my pages very lightly.
um where I have darker colors. I'm going
to go a little bit um more with black.
But notice that here I'm using distress
ink from uh not from the oxide uh line,
but from the normal one. I find that
this goes darker over oxides, and I just
love the effect. So, I'm going to do
that on both my pages. And let's move on
to the next step.
Now I'm going to do some stamping with
black ink. And uh you really don't need
to have any Halloween background stamps.
If you do, even better. If you don't,
just use any background stamps that you
have in your stash. And um just by
creating this visual texture with black,
it is going to bring that Halloween look
and feel even more into our pages. Plus,
it makes it look more interesting. You
see, I like to use some background
stamps that they even have butterflies.
I'm just not going to use that part of
the stamp. And I'm switching in between
a couple of background stamps that I
have. By the way, everything I'm using
uh you will be able to find it linked
down below. And uh I'm uh repeating the
same exact steps on both my pages. Uh
however, I'm using a different stamp. I
used different uh uh methods for
creating my background. But really, it
doesn't matter. No matter what you have,
you see, you can pretty much come up
with a background that looks really
beautiful. And if you have watercolors,
you can create similar effects by using
your watercolors with brass and similar
colors. Now, for the next step, I'm
going to do some splattering. This time
with black ink. I do have this uh black
calligraphy ink. And uh I'm going to
just splatter with a fine brush. A good
idea is to tap a couple of times outside
of your paper uh of your page just to
make sure that you don't end up with
bigger blobs unless you that's the look
that you are going for. So now I'm going
to tap a few uh times on both my pages.
Again, beautiful visual texture.
And for the next step, I'm going to play
with stencils. Again, this is not a
specifically Halloween stencil, but just
by using black base, I'm going to bring
even more black uh real texture on my
page, which is going to add those extra
elements that are going to turn my page
into more Halloween looking. So, you
see, I'm just um applying this texture
in different areas. And I'm going to use
the same stencil on both my pages. Just
because this stencil has so many
different areas, it allows me to use
different designs here and there without
them being identical.
Now I have a orange and green acrylic
paints. I'm going to dilute them with
water. And with the green, I'm going to
add splatters on the page that that
doesn't have green already on the
background. And with the orange, I'm
going to go and add splatters on the
other page that doesn't have orange at
the back. So, just adding a splash of
color. This is not going to be to be
super visible, but um at the same time,
just because I use acrylic paint, it is
going to stay on top of uh the oxides
and it's not going to blend in with what
is underneath.
And now, let's take a look at the cuties
with the costumes. I am trying to decide
which ones I want to use. You know, I
love them. I collect them. Uh but in any
case, you can go ahead and check them
out. You will find something definitely
for you. I chose six of them for my
pages because I decided to use three of
them in uh each page.
I'm going to stamp all six of my
characters so that I can color them. And
uh the fun part about the packaging is
that it gives you two suggestions of
coloring. So, if you don't want to think
at all, you can just follow one of these
two suggestions and you know it's going
to look just great.
I am going to stamp uh my characters by
using dye black ink because I'm planning
to use alcohol markers to color them.
So, it really depends on u the medium
that you decide to use to color
everything. If you go for example with
watercolors then I would suggest to use
um archival ink permanent ink for that
uh dye ink black dye ink is um perfect
for alcohol markers. So that's just what
I'm using. And because I like to stamp
many characters at once, I did use my
Misti stamping platform for that. And
they all look absolutely adorable. Let
me know in the comments which one of
those costumes is your favorite. So, I'm
going to proceed and color everything.
Mainly, I'm just following the example.
I don't want to think too much. I
usually uh stay with a very small
palette of uh colors since uh I don't
like to make my life uh difficult. So
for all those images, I'm going to go
mainly with the same greens, the same
purples and the same oranges which I'm
going to repeat again and again for all
the images. This is going to make all
the characters coherent as if they are
part of the same project and they will
help me to uh bring together their
composition later on. So I'm going to
switch into having everything colored
and cut out for fuzzy cutting. Trust me,
I didn't do the perfect job
for coloring. Uh, not the perfect job
either. But when you look at them all
together finished, they look perfect.
Trust me, they are not. So anyway, there
are areas where I didn't cut out uh the
uh details. You can always color them
with black or um just uh will be a
little bit um uh creative and try to
cover up what I haven't cut out
perfectly. I also like to use a black
marker, a black alcohol marker, and go
all around the edges, which uh really
makes a difference. And also for some of
the gaps I just cut out directly through
the image to go on that white space to
cut it out. No one will ever know if you
don't tell them. So anyway, I always try
to make my life easy. If I find
something that I cannot cut it out, just
chop it off. Nobody knows how this image
looked before I cut it out. Really, when
it comes to art journaling, I want to
have fun. I don't want to make my life
difficult. And now along with my
characters to build my composition. So
I'm going to bring in the frame packs
that I have. These are all for Halloween
and they are just adorable. Plus the
color combinations that I used for my
characters match perfectly with those
ephmera packs because actually it has
oranges, greens, and purples. So, they
are perfect and I don't have to do any
fuzzy cutting for the little details.
I'm just going to h put them inside
those uh plastic boxes that I get from
Amazon. And this way, I can easily uh go
through them and you can see how some of
the adorable images from this pack. In
any case, just because I do have them,
I'm going to show them all to you. So,
uh you can choose maybe your favorite.
So, here is the second pack that I have.
And um they are all adorable. I think
that they are great if you want to
create a really uh quick uh mini art
journal pages. Look at them. Just
adorable. And they are not shiny at all.
Uh if you want, you can definitely go
over them with um your blending tools or
your markers. It's not shiny, so it is
easy to color on top or tint. So, here
is the third pack that I have. And um
just keep in mind that down below in the
description, I will have not only links
to everything I use, but you'll also
find coupon codes. On some of the shops,
I do have exclusive coupon codes like
10% for you. There are other shops that
do have everything on discount right
now. So, you can get these new Halloween
products in great prices.
So, now let's put the composition
together for uh my pages. I'm going to
start with the first page. And I just um
uh teared off some black cards stockck
just to have something uh as a ground
where I can uh place on top all my
characters. Now, in order to introduce
some extra texture, I like to use
cheesecloth. Um you can use cheese
tissloth or medical go. uh that uh this
actually is medical go I believe that I
got from my local pharmacy and um I can
easily manipulate it and have it um with
lots of threads coming out here and
there. It sticks very nicely with white
glue and it gives that extra texture
perfect for Halloween because it reminds
me of a spiderweb.
So, I like to use that as an extra
element and it doesn't add a bulk into
my page at all.
So, now I'm just using my glue and I'm
sticking down my characters after
auditioning them. And uh I made sure
that I place them cleverly so that I
cover up any mistakes that I did while
fuzzy cutting. And I'm going to bring in
one of the ephemera packs and just try
and decide how I can build the
composition and add even more elements.
You see, by not adding glue all over the
back of my characters, I'm able to tuck
things behind.
So, you see, I used a pumpkin, I used a
bat, [laughter] and other bits and
pieces here and there. I even added a
little heart on one of my characters.
So, uh the difficult part here is uh
knowing when to stop and uh really I'm
just having fun so I don't put any
pressure into myself. Now, I did have
this dye with those drippings at the
bottom. So, I thought um let's cut out
this part of the dye only and I can uh
just stick it underneath my composition
just for some extra detail. Absolutely
love the result. and I placed that in a
couple of areas at the bottom.
I'm also going to glue down the heart in
one of my characters. And then I want to
create kind of a border. You can
definitely do some sketchy lines with
your marker. I decided to use one of my
stamps that give that lovely stitching
effect. And I'm just going to use black
and stamp around the border. not
everywhere, just in a few places here
and there.
And since I had that stamp out, I
decided to go ahead and repeat the same
process on the other page as well, just
to have my border ready.
And now, let's build the second page
with similar techniques. I'm using uh
again black cards stockck to ground my
character somehow. But this time instead
of using uh the go, I'm going to show
you another way to add texture. I'm just
using this moss. This is mo for craft
for crafts. It's not real moss
obviously, but uh it adds that pop of
color. uh lots of texture and plus it is
vibrant green which um is perfect for
Halloween. Absolutely love the effect
and it's not bulky at all. Once you
close the book, it's going to lay
completely flat. So again, I'm going to
place my characters on top, try to
decide where everyone is going to live,
and then I'm going to use my glue and
stick it down.
So, I grabbed again some of uh the
ephmera from the packs. I decided to
give those a little cut just because it
is adorable. I'm also going to give them
a moon because why not? Plus, the colors
are matching perfectly with the coloring
I did. So, uh you can't really tell
which ones I colored and which ones are
already made. I am also going to give
them a crow and a butt of course because
you cannot have a Halloween without
butts.
Now I'm going to do the finishing
touches. I always like to add phrases on
my art journal pages and on all those uh
stamps with the characters. There are
many uh phrases that you can use. So I
stamped a couple a couple of them with
black ink. I'm just going to use my
scissors and cut them into thin strips.
And then I'm just going to try and
decide where I want to stick them. I
went with black ink on white just
because this is going to stand out
against all those colorful uh images
that I have. And I'm going to use a fine
black marker to outline my phrases.
I am also going to bring in a white gel
pen and add some highlights. I don't pay
too much attention on where the light is
coming from. After all, this is just a
fun art journal page, and I don't have
to think at all about that. But all
those highlights kind of bring all the
characters more into life and somehow
makes it look more whimsical.
I'm going to finish it off by adding
some white splattering. I'm using white
calligraphy ink. This is going to blend
in a little bit with the oxide. is not
going to stand out uh as much. But you
can see here some close-up photos on
both the projects. I had so much fun
today. Let me know in the comments down
below what you think. Links and coupons
can be found down below in the
description. Thank you all so much for
joining me today and I'll see you all
next time.