Video summary
The video explores the challenge of engaging in high-power rocketry without breaking the bank, a significant concern given the rising costs of hobbies today. The speaker explains that while rockets are often perceived as expensive endeavors, they can be pursued on a shoestring budget by leveraging open-source designs and clever construction techniques. The presentation outlines the entire flight profile, starting from the initial boost phase powered by solid rocket motors, moving through the coasting stage where aerodynamic forces become critical, reaching apogee for altitude measurement, and finally executing a safe recovery via parachute deployment. A key theme throughout is balancing cost-effectiveness with safety, emphasizing that while some components like high-impulse motors are pricey, other aspects of the hobby can be optimized to save money without compromising on performance or enjoyment.
To achieve affordability and reusability, the speaker details specific strategies such as using cardboard postal tubes for rocket bodies, laser-cutting plywood fins, and employing basic 3D printing for nose cones. However, the talk also addresses the limitations of these cheap materials when facing the immense forces generated by high-power motors, particularly during the transonic region where shock waves can destabilize the vehicle. To survive these extreme conditions, the presenter advocates for the use of composite materials like fiberglass and epoxy, which provide necessary strength in tension and compression. While working with hazardous chemicals requires proper safety gear, the cost of professional-grade composite kits is surprisingly low, often equivalent to just a few motor launches, making it a viable investment for building multiple reusable rockets rather than disposable ones.
The discussion extends to the critical role of avionics and recovery systems, distinguishing between passive data loggers that can be safely built DIY and active safety systems like deployment computers which should ideally remain commercial off-the-shelf to ensure reliability. The speaker shares their journey from etching simple PCBs at a hackerspace to creating compact, feature-rich data loggers that rival expensive market options. Furthermore, the video highlights innovations in recovery mechanisms, specifically moving away from hazardous black powder charges for secondary parachute deployment toward safer electronic release systems that can be tested on the ground. The presentation concludes with a candid admission of failure, showing a rocket lost due to a motor ejection system malfunction, which underscores the importance of robust engineering and perhaps GPS tracking to recover valuable equipment after a mishap.
Read the full video transcript
[applause]
Hello. So, this is my first time doing
something anywhere near this big. So,
um,
>> thank you very much.
[applause] But I couldn't think of a
better audience to do it for. So, high
power rocketry on the cheap. How do you
do one of the most expensive hobbies you
could possibly think of, especially in
today's climate, and not absolutely
destroy your bank account?
So, rockets, do you do you do you send
stuff to space? Well, not not quite.
Rocketry refers to hobby level builds
and launches. So, I mean stuff like you
can see on the table here like we have,
you know, tiny kits and scratch builds
like this which fly on a motor like this
big to things that can go up to Mac one
potentially Mac 2 like this thing.
[panting]
Now, the the hobby appeals to to all
sorts of people, to kids, to families
and adults alike. You get a really good
mix kind of a similar demographic to
EMF, I would say, rocketry launches. Um
but recently in the UK there's been a
lot more sort of outreach and
competitions targeting university
students and for example there's so
there's UK rock which is for late stage
secondary school students and then
there's uh NRC the national rocketry
competition and MAC which is a yearly
competition as well that are for
university students or recent grads and
that's kind of where I come into this.
So, I started doing rocketry via two of
those competitions, uh, UK Rock and MAC.
And for both of those, I was operating
on almost no budget. That's not that
unusual for UK Rock, but for MAC,
there's teams that come into that with
thousands of pounds of funding, tens of
thousands of pounds of funding. We had
just about a,000 to run our society for
the entire year. And yeah, it was it was
kind of rough getting there. So, so we
we we ended up coming up with some some
good ways to save saving on some cash,
but yeah, I'm I'm now graduated, so I'm
just doing this for fun. And I am still
kind of broke, so I'm still trying to
save money.
So, this talk is laid out as one big
high power flight, and I'm going to take
you through all of those phases really
quickly right now. So, we'll cover our
initial takeoff and boost phase where
our motor burns, gets us off the pad,
and gets us going real fast. Then we'll
talk about um during that stage we'll
talk about what motors you use in these
rockets, how they're classified uh the
the classification grading. Then as we
continue we'll coast upwards where most
of the flight upwards actually happens.
Your motor burns generally quite short.
Then you spend a long time going up with
that that speed that you've gathered.
And during that phase we'll cover the
aerodynamic forces on the rocket. Um at
apogee we want to check our altitude,
see how high we got, mostly so we can
brag to our friends. And for that we
need some electronics. Then we need to
safely recover the rocket by deploying
our parachute or multiple parachutes and
gently drifting down to the ground so we
can not damage our pride and joy.
Then hopefully we can walk out, collect
our rocket, and it'll be ready to fly
again in minutes.
So boost, how are we getting off the
pad? What are we looking at? So we use
uh solid rocket motors largely. There
are some hybrids in use in the hobby
right now, but they're a little bit
rarer, a little bit more more edge case.
The vast majority of people use these
solid rocket motors and they come in a
few different sizes. They come in these
tiny ones that are literally wrapped in
cardboard, like paper that you get from
SDS. You can buy those on Amazon. You
can, depending on how big of a garden
you have, you can potentially fly them
in in a back garden or a field. um to
stuff that's sort of mid-range that you
can see on the right there. That's uh
some some mid-range uh what are those?
F27s.
Yeah, these are these are sort of
mid-range rockets that you might fly on
like something sort of middle size like
this. This would take some of the the SD
stuff. This would take the mid-range
stuff. And then after that, you get on
to the to the much higher higher end
stuff where you're getting aluminium
casings like precision machined and
you're putting you're putting that in
bigger stuff like this and you're going
up to sort of kilome high Mac one
potentially even higher than Mac one and
getting up to Mac 2.
But yeah, these are single use. They are
solid rocket boosters. So you you just
slot them in the bottom of your rocket,
set them off, and then you can unscrew
the tap, take them out and slot the one
back in. So these rockets are entirely
reusable.
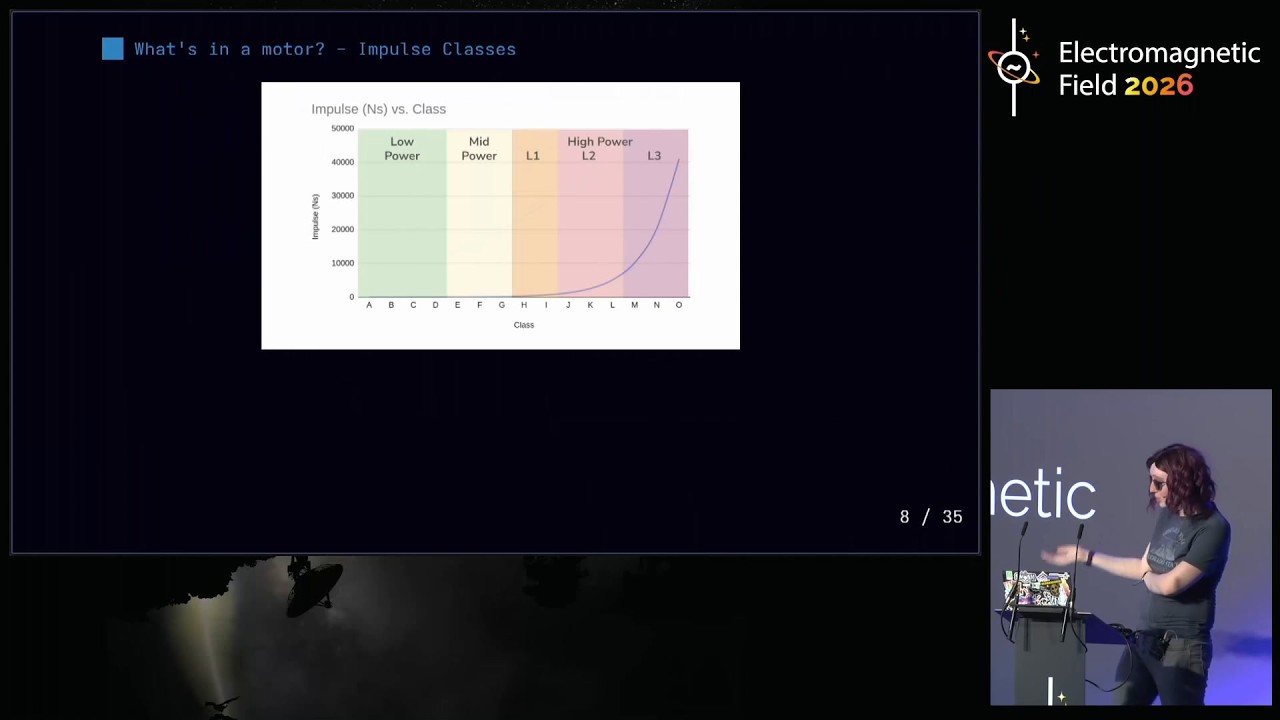
Now we tend to categorize these motors
by impulse which is the total amount of
momentum that the motor imparts to the
rocket as it burns. So each each letter
of of classification we have uh doubles
the impulse we're dealing with. So stage
directions lovely. Uh, so we have a
motors, those tiny little ones that we
saw. Those are about 2.5 Newton seconds,
which maybe a little bit deceiving that
they actually have the similar amount of
impulse to them as a 9 mm handgun bullet
in that in that tiny little cardboard
package. And then every letter you go
up, you double it. So a B is 5 Newton
seconds, a C is 10, D is 20, E is 40.
And depending on how high you want to go
with these uh with these rocket motors,
you can get up to some pretty scary
numbers pretty fast. So if I remove the
log scale off the chart there, you can
see how crazy it gets how quickly. I
assume a lot of us are familiar with how
how mad exponentials get. Um so the high
power class quite fittingly starts at
Hclass which is covers 160 newtons up to
320 newtons for a H motor and then
beyond that for the other classes. Uh
high power obviously extends way beyond
H motors. But for now, we're just going
to look at H and I because those are uh
rel you can get your L1 certification to
do those high power rocket motors
relatively easily and also they're not
so insanely expensive that you've priced
yourself out of everything else.
Um but yeah, that yeah, so they're
significantly more affordable than
something like a J motor which is going
to run you like £100 a flight, maybe
more.
And yeah, remember that we are doubling
in impulse every class, which means
we're also doubling our propellant mass
and doubling the size of the motor. So
either you're getting bigger rockets or
those rockets are going much much
faster.
But before we even think about what kind
of speeds we're getting up to, we need
to build something that survives this
initial kick. So on the on the uh on the
slide right now, I've got a thrust curve
for a typical high power motor, the
H169.
Now this thrust curve is a plot of force
that is exerted by the motor over time.
So if we look at the start of that
curve, we can see a punch of of two 200
to 225 newtons which you know in earth
gravity rolls out to about 20 22 kg.
Now, that's an important thing to
realize because if you if you have
spent, you know, hours and hours
building your beautiful rocket that
you're very proud of and the thought of
putting 20 kilograms on it terrifies
you. Maybe don't put that motor in it.
It's very easy to look at all these
numbers and go, "Ooh, yeah, the the
engineering calculations survive that.
That's fine." But if I look at that and
go, then then maybe you got something
else to think about.
But yeah, now we've got some background
on how these motor classifications work
and what what it means to say high power
rocketry. So let's get back to our
story. How how do we actually get off
the pad? So picture our brand new
society. Um we formed in so I'm going
back to about 2022 2023 here. Uh we have
basically no money and half of it
vanishes the moment we actually had to
get to a launch site because there are
very few launch sites in the UK. None of
us had our own cars. So we're having to
hire that from the uni. So our our
budget is magically disappearing before
we've even started.
And of course within that society, we
want everybody to be able to do
something like building one rocket for
the whole society. All well and good.
That's quite common for competitions.
But we were more interested in okay, how
can we get all of our members to do a
bit of everything? How can we give
everybody a grounding in hobby rocketry
so they can continue this hobby on their
own?
So this is Nordri. This is an excerpt
from a poster I made a while ago. Um,
apologies, it's a little bit small on
that screen, but it's mostly there for
the images of the rocket itself. Um, so
at its core, Nordri is a cardboard tube.
It is a postal tube that you can get
from the post office for £1.
In fact, you can get three of them for
£1.
So, which I think makes them cheaper
than a Fredo. Uh,
uh, the fins are plywood, which we laser
cut, but you can absolutely cut by hand.
Uh the nose cones 3D printed. So that's
like, you know, very basic 3D printed
PLA. Like literally just bog standard
filaments here. And yeah, there's a
whole bunch of epoxy slathered on there,
which is a little expensive, but you can
use, you know, one big bucket of epoxy
can do you 20 rockets. So as a society,
that was like a really great model for
us.
Yeah. And we we use some like clever
tech clever construction techniques to
make sure that these designs are strong
enough to survive the forces they're
going through. So in Nordri, we had
through the wall fins, which means that
you cut a slot in the outside of the
fin, put the fin through, and then you
have an epoxy filler usually both on the
inside and on the outside of the rocket,
which means you've got multiple bonding
points. You've got this whole reinforced
structure at the bottom where the motor
is putting all of this force. So that's
that's getting you a lot of that's
buying you a lot of strength despite
your simple materials.
And yeah, this this this design was um
we focused on using entirely open source
tooling that anybody could use on like
their you know we had a lot of Linux
users, we had a Mac user, we had some
one or two Windows users. Um so you know
Fusion was kind of out of the question
unless you wanted to use the terrible
web UI. Uh open scared we used a little
bit for this rocket. We've we've now CAD
software is a whole thing, but
the idea of this rocket was for it to be
sort of free, open source, very easy for
anybody to make and very easy for
anybody to pick up the basics of
rocketry with.
But yeah, we there were there were
plenty of problems with it, which have
kind of been interesting to watch as
more and more people have like built
this this archetype of rocket. They've
had to go through and solve these
problems on their own. And that's been
really interesting to see because a lot
of them have solved these problems in
different ways. They've incorporated uh
different types of machining. They've
used like uh lathe work to build delrin
or aluminium anchor points and they've
they've they've redesigned how the shock
cods are attached. There's been some
really interesting innovation
and yeah there's there's like a pricing
up on the whole thing. Uh it and yeah
that that rocket it was so it was
originally made for sort of student
outreach but we we we tweaked it so we
could enter it into a competition and it
it did exactly what it was supposed to
do in the test flight [laughter] not at
the competition
but we know it's capable of doing what
it's supposed to and that's what matters
in our hearts
but yeah so that rocket costs about a
tenner to build the entire chassis to
build to even put a parachute in it uh
if you cut out some of the reusable
components then it comes down to a fiver
even. So like this this incredibly cheap
rocket unfortunately requires motors
that cost 30 40 50 quid to fly on. So
little bit overoptimized. Would I
recommend building this? No. Don't build
that. It was a fun exercise but I think
if you're going to build a rocket
there's no point spending less than it
costs to fly it once. you can put a
little bit more pride and a little bit
more joy and a teensy bit more money
into that rocket just to get it,
you know, something you can be really
proud of and you want to refly multiple
times as opposed to throwing something
together, flying it once, and then what
if I built another one cuz it's so
cheap. Good way to learn. But if you
want to get into the hobby, I think you
want to build something that you can
reuse over and over again because that's
really how you're going to save money.
So, we've made it off the pad. We've hit
sort of close to mag one and we're we're
going very fast and the air is trying to
hold us down
as our motor's burning out. We're at the
fastest point of the flight. We've
stopped accelerating and now we're
suddenly decelerating and depending on
exactly what we're flying, we might be
over the speed of sound. This so the the
so-called transonic region between about
Mac.8 and Mac 1.2 too. Uh, this
absolutely wres havoc on our rocket and
on any like aerodynamic sims we want to
do cuz they they suddenly all get very
very messed up. Uh, transic speeds sort
of cause different parts of the air flow
around the rocket to become unstable
because you have pockets of air that are
moving uh faster than they can. You can
sort of think of the speed of sound as
the speed of information through air,
but air can't tell air in front of it to
get out the way. So you end up with
these shock waves that you're pushing
through and that causes real bad
disruptions.
But yeah, this also causes really really
bad forces on on the rocket itself, on
the nose cone, and on the fins. Uh so
you got to like reinforce the heck out
of those to make sure that you can
survive these speeds.
And yeah, some of you may have seen BPS
Spac's video where he um he cooked meat.
He cooked a piece of steak on a rocket
nose cone that was going at Mac 2.
That's that's the sort of energy we're
talking about here. So our our little
PLA nose cone isn't quite going to
survive anymore.
So what's our answer to this? Tends to
be composites. Composites are a
combination of two or more materials
chosen for their complimentary
properties. Take fiberglass for example.
That's something we use all the time in
rocketry and it's something we've used
from the start on this rocket here,
Valkyrie. Uh fiberglass is made of a so
there's glass fibers themselves which
are very very strong in tension. You
cannot like break them by pulling them
but they are kind of pathetic when you
try and push them or shear them or
whatever. So what you do is you bind
them together with epoxy and that that
gives you the the the compression
strength. that gives you the share
strength and suddenly you have this
material that's really strong in all of
these axes
and you can you can build something that
survives Mac 2.
[snorts] So neither is much use alone
but yeah in combination very strong. Now
most hobby rocketry sort of retailers
offer standalone parts or or even full
kits made of fiberglass that have been
you know a precision machined. They've
used all their um all their very fancy
techniques. Um and they're usually quite
priced relatively reasonably considering
like how good they are, how much
effort's gone into them. But we're here
to do the hobby ourselves, not pay
someone else to do it. So, surprisingly
to me at least, the basics you need to
get started with professional grade
composites are really quite affordable.
We're talking about the equivalent of
two or three high power motor launchers
to get you all the kit you need for
making a good half a dozen rockets in
terms of epoxy like all the brushes and
parts you need, all the any other PPE
you need even. And you can see on the
slide here, uh it's again a little bit
small, but uh here are some of the
pitfalls of trying to make your own
tube. Uh that message on on the right
there says is a a friend of mine in
Discord that says uh I think the 38 mm
coupler is going to come out as a 37 mm
coupler which anybody who does know
anything about rockets knows that's
actually kind of catastrophic.
And yeah um we ourselves have have
attempted some some fiberglass tubes as
well. Um this one was for small mic and
again this one on Valkyrie uh actually
doesn't have the cardboard tube inside.
That one's pure fiberglass. And if
anyone wants to come see these rockets
at the end, you can feel that one.
Victory is incredibly light because of
like how little fiberglass you need to
reach that level of strength.
Now, more recently, uh I've been doing
full-on layups for all of my recent
rockets. So, like Nova, for example,
this one here. Um you may not be able to
tell compared to this one, which is
very, very textured, but uh there is a
fiberglass layup under these fins. So,
they're still plywood fins, but a layer
of fiberglass on top of them and epoxy
impregnated into those uh wooden fins uh
really gives you the the strength you
need to, you know, not worry about
smacking those fins and and you know, I
wouldn't want to do it on a plywood one,
put it that way. [laughter]
Now, there is the downside of epoxy is
that you are working with hazardous
materials. Um fiberglass and epoxy are
both hazardous in their own ways and you
do need to use suitable PPE. So, I don't
want to just send people out to to buy
all these things without mentioning that
you do need to look into how to stay
safe with them with them.
Okay, so we're reaching Apogee. We're at
the top of the flight now. And let's do
a quick rocket electronics primer so you
know what's going on in in in our
avionics bay here before we
decide what we're going to put it in.
So, two quick distinctions is that you
can have passive avionics and active
avionics. Passive avionics are something
simple like a data logger. All it does
is tell you what altitude you reached.
Maybe like, you know, how fast you got
up there, how fast you came down. Uh it
doesn't actually control the rocket in
any way. Active avionics uh would be
something that can detonate a black
powder charge to separate the rocket or
potentially even to control fins uh
which is again a very difficult uh area
that's classes experimental rocketry. So
tread with caution, but
active avionics are safety critical in
almost like every scenario. Um, and not
only are they safety critical, they can
be very, very dangerous if used wrong.
They're not just required to make things
go right.
Then there's also the distinction
between commercial offtheshelf and DIY.
And um the policies for this are
actually kind of been written right now
internally by Ukra. But uh so commercial
offtheshelf is anything from a fully
assembled kit flashed with firmware that
you can just plug and play to maybe a
kit that comes but disassembled and you
have to solder the parts to it. Uh then
there's like partially DIY where you've
maybe modified one of those kits. And
then there's fully DIY where you've
designed a board from scratch like the
one I'm going to talk about later.
Now, what we tend not to want to do is
mix the active and DIY components
because as soon as you're just trying
something out that could set off a black
powder charge, steer a rocket into
something, you're obviously poking the
bear. You do not want your safety
critical systems to be controlled by
some random student in a field where
there's, you know, 40, 50, 60 spectators
that cannot easily move out the way of a
rocket that's going, again, possibly the
speed of sound.
Now, commercial deployment computers can
be pretty cheap, like those kit ones
that you get disassembled. Uh they also
can get to be pretty expensive even for
the for the relatively simple ones, but
they are rigorously tested and trusted
and often times they're just worth it.
In fact, there's usually not another
option. You have to use one of these
off-the-shelf dual deploy computers.
This is something that we're trying to
improve. And by we, I mean myself and a
group of friends that are, you know,
interested in making these devices
ourselves.
But for now, what we can do without any
approval, without any any sort of safety
concerns, is make our DIY data logger
because all it does is collect
information. So you can just stick it on
your rocket and you get information out
of it. And what's better is that you can
get exactly the information out of it
you want. And if you're ordering these
in a small amount of bulk, say you're
doing a group boy with some with some
friends on the hobby, then suddenly it
actually comes down to 15 to 20 per unit
if you're getting it preassembled even.
Um, so that's really quite affordable.
Um, it takes a lot of time. It takes a
lot of skill, but those, you know, that
time and and skill is time you're
spending doing the hobby. And, you know,
skill that you may already have from
your job, you can build as part of the
hobby. And again, this is not required
for everyone doing the hobby. All each
of these like sort of four sections I'm
talking about, you don't need to engage
in all of them. You can just pick and
choose one or two.
Now this is my sort of avionics journey.
Um we started with
uh home homemade DIY PCBs that we edged
at our our hackspace uh using uh a laser
and feric chloride. So again hazardous
chemicals kind of scary but it lets you
rapidly prototype at a stage that you
cannot reach ordering stuff from from
JLC or whatever. And especially if
you're using simple modules that just
need plugging together in a really like
sort of resilient way then that's that's
not a bad way to do it. Um, but yeah, so
that's that's Titania version one on the
left and then on the right we have
Titania version 3. Titania 2 never left
my laptop. Um, Titania 3 is a uh like a
fully featured data logger. It's got um
a barometer, an accelerometer. It's uh
the size of a UB key. So it it you know
it is literally the size of your thumb
and it is weighs almost nothing
and it will collect as much or more data
compared to like any other commercial
data logger on the market.
Okay so recovery one of the scary things
I mentioned earlier was black powder.
Black powder is something that you until
recently have kind of been forced to
deal with a model rocketry. Either it's
integrated into the motors you're
already flying in which case you don't
need a separate license but you're
obviously still dealing with some some
dangerous material or uh you're making a
separate uh black powder charge that
you're then wiring into avionics
manually and that's got a whole other
set of risk associated with it.
Now, when we're doing recovery, we want
to separate at apogee because this is
the point in the flight the rocket is
moving the slowest. Apogee being the the
top of the flight, the the highest point
you get to because obviously you're kind
of you're at the top of your imagine
throwing an apple in the air. You're at
the top of your throw. You're you're
you're kind of hanging in the air. This
is when you want to be be popping some
critical mechanism, not when you're
under a huge amount of force.
Uh but if we if we're beginning to go
like 1 kilometer, 2 km high and we we
pop our main chute that lets us come
down slowly enough to not get damaged,
we're going to be drifting for miles and
miles and miles. And that is not
practical, especially in the UK where
you know the biggest kind of empty area
you can get is maybe 2 mi wide.
So to combat this, for many high power
launches, again apologies for the tiny
image, um but uh for many high power
launches, we only release a small
shooter at Apogee called a Drogue. And
what this does is brings the rocket down
at a a much faster rate. Not not a rate
that you'd want it to hit the ground at,
but it lets it get down to a low enough
level that you can then pop the main
shoot without it drifting too far. Now,
what this means is that we need a second
deployment event somewhere near the
ground. And this is where that manual
put together black powder charge comes
in. And that's been like the way it's
done in the industry, well, in the
industry, in the hobby for many, many,
many years now. There are and yeah, as I
mentioned, black powder is very
hazardous and you do not want to be
dealing with it if you can avoid it.
Like as careful as you may be, accidents
are going to happen and like they
luckily I've never seen anything too bad
happen myself, but I you there's always
potential and anywhere you can remove
risk from a hobby, that's that's a good
thing. So there are devices called shoot
releases. Now this pops out. This is a a
a parachute wrapped in a bag that is
held together by this little computer
called a Jolly Logic. And that um so
this pops out on the line at Apogee like
alongside your tiny chute. Then this
little board um releases that shoot at a
certain predetermined point uh in your
descent.
Now this is all well and good, but it's
quite difficult to test because you
can't, you know, it's getting literally
fired out of a cannon by your motor
ejection.
um which makes it quite difficult to
test in realistic conditions.
So I've tried to take this concept and
make it a little more sturdy by
integrating it into the shoulder of the
nose cone. So if I come over here and
pull out Nova's nose cone,
it's a little bit of a tight fit. Uh but
you can see that this parachute is
totally wrapped up in here and then
there's still a bulkhead behind that. So
when this ejects, um, all this force is
going into this bulkhead here. None of
it's touching the parachute, which means
you don't need like an extra like bit of
fireproof, uh, fabric to protect the
chute. And it also means that you can
reliably test this system as it would be
deployed like in the air just on the
ground. And all this does is pull a pin
out of an elastic hair band right here.
Simple as that. The innovation is not
the system. It's very simple. Anybody
could build this. The point is that you
can test this inside like wherever you
want. If you need to do black powder
testing, you have to do that on the
launch site supervised by you know
somebody qualified. And that means that
you're rushing your testing on a launch
day which is again just adding to the
danger.
So our shoe release has popped. We've
touched down and everything so far gone
gone pretty great in our flight. But not
every flight works out so well. I I I
couldn't come up here and pretend that
everything I've ever done has gone
perfectly. So I wanted to show you one
of my one of my horrible horrible
failures. So this is Nasia. Um this uses
a a concept called rear rejection where
instead of separating above the motor,
it actually sort of spits the motor tube
out the back. Uh I thought this had
totally failed. Turns out it had landed
nose down in the field, then ejected
late because somebody found the ejected
rear 20, 30, 40 meters away from the
main rocket. I never recovered the main
rocket. I just had the the sort of spat
out motor tube.
And that meant uh bye-bye beautiful
rocket. Such a lovely paint job. Um
bye-bye 150 of electronics stuck in the
front of it. Um and yeah, maybe um I
learned a lot. No, I need to use
stronger Kevlar because otherwise that
um yeah, the the Kevlar snapped when
that thing popped out. So I I don't need
to do that. And I also learned that GPS
trackers might just be worth it.
Okay, so that's that's that's kind of
everything I have. Um I have left some
time for questions on purpose. If people
want to come up and chat to me about
anything that's on this table as well,
then you're very welcome to. Otherwise,
that's me. Thank you. [applause]