Video summary
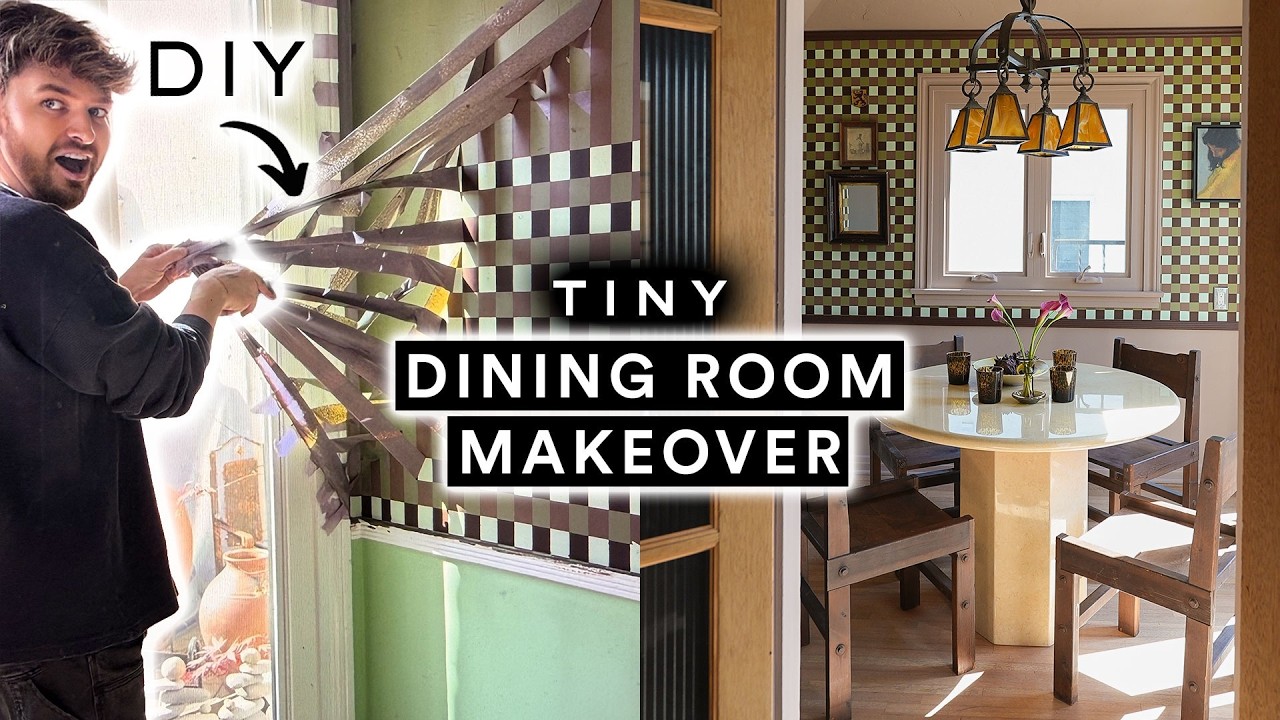
Drew from Lone Fox returns to his channel with a heartwarming update on the challenges of balancing content creation with opening a new retail store, before diving into an exciting makeover project right outside his window. The video focuses on transforming a small breakfast nook in his 1920s duplex kitchen that features floor-to-ceiling windows overlooking a courtyard. Drew explains how he utilized leftover paint from various projects around the house to create a cohesive color palette for this specific room, ensuring it connected visually with other spaces like his movie theater and Marie's bedroom while maintaining a unique identity within its own small footprint.
The centerpiece of the renovation is an intricate wall treatment achieved through a clever DIY technique using painter's tape as a spacer to draw perfectly straight vertical lines without needing additional tools. Drew applied multiple layers of different colors—including olive green, mint green, pinky brown, and chocolate brown—over one another in specific patterns before removing the tape to reveal crisp stripes that mimic a gingham style but with unique shades he already owned. He further enhanced this look by painting the top and bottom trim pieces in his darkest shade, Rojo Marron, effectively "sandwiching" the wallpaper pattern between dark borders to give it weight and intentionality, while also repainting interior cabinet doors and china cabinets to match the new scheme for a unified aesthetic.
To complete the transformation of this compact dining space, Drew introduced heavy vintage elements that grounded the room and added character. He sourced a stunning Spanish Revival stained glass light fixture from an antique store in Pasadena, which he felt perfectly bridged the gap between his love for feminine design and edgier craftsman styles. The furniture selection included a cream marble pedestal table with a hexagon base to contrast against his cherished vintage wooden chairs that feature a pivot back mechanism. Additionally, Drew styled the room by layering large canvas prints in shadow box frames over the bold wallpaper to break up the pattern and added new golden hardware knobs from his own shop to replace outdated crystal fixtures on the cabinetry.
The final reveal showcases a space that successfully balances bold patterns with soft tones, creating an inviting atmosphere despite its small size. Drew expresses particular satisfaction with how the yellow accents in the light fixture tie back into the neighboring kitchen's tile work and how the pink wall color complements the original pink tiles found elsewhere in his home. Although he admits to feeling a bit scared when applying certain colors like the Dead Salmon paint next to the greens, stepping back allowed him to appreciate the unique juxtaposition that defines this project. The video concludes with Drew inviting viewers to share their thoughts on how they toned down such a bold wallpaper pattern and expressing excitement for future styling updates in the room.
Read the full video transcript
[music]
>> Hello everyone and welcome back to my
channel. This is Drew here from Lone Fox
and I just got to start off by saying it
feels so good to be back on the channel
and be making a video for you guys
today. I have been a little MIA which is
crazy because if you guys didn't know
I've been on YouTube for 14 years. I've
consistently made videos for 14 years on
YouTube every single week I have
uploaded a video till about this past
year. So I'd say when I kind of started
taking on the endeavor of opening a
retail store absolutely the biggest
project I've ever done in such a time
crunch. As you are working on your
retail space you're also paying rent in
a shop that you are not selling things
in. So it's kind of crunch time when you
open a store like that. And with opening
a store you also have to figure out your
POS system, your customer experience,
your employee, your staffing, everything
that comes with a business was such a
new learning experience for me. It has
been a lot a lot behind the scenes. I do
everything myself when it comes to my
YouTube channel social media. Talking
about filming, editing, concepting, all
that sort of stuff. All my projects have
come straight from me and that's what I
love. That's what I've always done here
on the channel. Um but when I started
doing the store a lot of my time
diverted to that and I just didn't have
as much time to do the projects here.
I've still been of course trying to
upload as you guys have seen and I also
shared a lot of the store content but
I'm ready to get back into the flow and
the groove of the normal Lone Fox
content you guys know and love. It might
be coming out a little slower than
normal but we are going to ramp it back
up slowly and I just want to thank you
guys so much for all the grace and kind
comments and support and even messages
wondering where I've been lately. I
really don't even want to plug the store
in this video either because I want to
just get into the projects that you guys
know and love. You've seen the shop
content but the shop is open and it's
been so much fun. And we are now at a
point with all of our employees and
staffing. Like the store's open right
now and I'm at home filming. But
anyways, we are working on a makeover
today and the makeover we're doing is
right in front of me actually. You have
all seen this kitchen that we
transformed, which is my original 1920s
kitchen. I live in a duplex, so I have
two
kitchens essentially. One upstairs
directly above and one right here. This
one has all the original tile work in
it. And right in front of me is our
breakfast nook. And I actually have
already painted it because I worked on a
fun painting project for this space with
Scotch. I did a cool wallpaper
technique, which I'm going to share with
you guys. But I did film it for short
form, so I'm going to edit it in a way
that feels really great for YouTube. But
I want you guys to see the process
because it really turned out so cool. I
love how it looks and I actually think
Justin just got here with some paint
because we're going to add to this, but
let's dive in to sharing with you guys
the before of this space. Breakfast nook
it has lots of windows. We need to get a
table in here, chairs. We need to make
it interesting. And yeah, I'm excited.
Let's get started. So here is a good
look at the before of the space. Now, as
you can see, it is pretty small. It is
simple. It has some floor-to-ceiling
windows, which actually look out into
the courtyard, which is really pretty
and it also appears into the kitchen and
our little movie theater room. Because
it's so small, I always love creating an
impact in small spaces. So I thought a
fun wallpaper pattern with some tape
would just be a fun project to work on
and I did that. So I started off with
some vertical lines. I just used the
tape itself as a spacer for all the
lines throughout this. People always ask
me how I get them so straight, but
honestly it is a lot easier than you
think. I promise you you could do it as
well. Now the thing I love about this
project is that I'm actually just using
remaining paint from leftover projects.
So these are all projects from my home.
So in the end, this pattern that I'm
creating on the wall is going to
actually just reference colors
throughout my house and kind of create a
cohesive look in this room. This is the
color in my movie theater room, which
you can actually [music] see right on
the edge of the doorway there. If you
kind of like look next to the wood,
that's the same as that color in the
movie room. so I used that on the
vertical stripes that we just added on
the wall, and I painted that on two
coats of it, and then I pulled all the
tape off to reveal our vertical stripes.
That's going to be your step one. You
can leave it like this if you want to,
but I'm going in with a horizontal tape
just the same exact way that I did the
vertical. I use the tape itself as a
spacer, which makes it super easy to get
your lines nice and straight, and I did
this all the way around and just
sandwiched it in between that top and
bottom border of the trim. That was
already here. My house is from 1929, so
it has a lot of these really quirky
little fun trim details and accents, and
this paint color here is actually just
remaining from Marie's bedroom. If you
guys recall, I did that fun plaster
technique in her room, so this was the
color we used on the baseboards and the
doors, so I painted this on. And the key
here is to not remove the tape. You're
actually going to let that dry down and
then go in with one more row of a
vertical tape over top. And I'm applying
this over anywhere that the mint green
was original or your base color showing,
you're going to apply this over the top.
The other sections that you're not
applying it over is essentially going to
be the chocolate brown that's living
[music] underneath the paint. It's kind
of hard to explain, but once I pull this
layer back, you're sort of going to see,
but I'm adding on a final layer of
paint, which was the olive green from my
office makeover upstairs, if you recall.
So, I love that I was able to utilize a
lot of colors in my home and just the
paint cans I already had on hand, and
then it was time for the reveal, which I
was so excited for, but also a little
scared. The lines are actually so
crispy.
It doesn't read as much like a gingham
to me as striped stripes, and I love
that.
I was so excited once I started pulling
back this tape and seeing what was
underneath because the color
combination, like the olive green with
the mint green with that sort of pinky
brown with the chocolate, it is just a
fun combo. It reminds me of a mint chip
ice cream. And the tape pattern I
followed for this would create a
traditional gingham style, so if you
wanted to give more of a gingham look to
a space, you would just do four shades
of blue or four shades of green and just
do them kind of similar to each other
and then you would paint them all on in
a similar fashion and when you remove
it, all the four varying shades would
create a really beautiful gingham on the
wall, but I just chose some unique
shades and just colors I already had on
hand and I didn't know what it was going
to look like in the end, but I loved it
once I removed the tape and it was time
to figure out what color we were going
to be painting the rest of the space
because because I wanted to cover up
everything else that we essentially
didn't paint in phase one and I decided
on a pink shade. This is Farrow & Ball's
Dead Salmon and there was a color in the
wallpaper, the one that I said we used
in Marie's bedroom, that sort of has
this pinky orangey tone to it and I just
felt like this color would really
complement it well. As I was painting it
on, I was scared because seeing it next
to a lot of the mint green and the
white, it was feeling very springtime.
You guys know me and I love
juxtaposition, so I was kind of leaning
into this more feminine [music] springy
feel and I thought with the styling I'd
be able to go in and maybe edge it up a
little bit, make it feel a little bit
more 1920s Spanish. I do have all the
original pink tiled bathrooms in this
[music] downstairs area, if you recall,
so this was also kind of a reference
back to the pink bathroom. And once I
took a step back and [music] saw the
full space, I was loving it. It's
definitely different for me. It's fun.
It's unique and I still do need to paint
some areas in here, but I just think
it's fun and we're going to be styling
this up, so just you wait.
>> [music]
>> Now that you guys have seen the
breakfast nook in its current state, we
have some more painting to do in here
and I also want to share with you
something that I think's going to make
it come together even more. My projects
are the kind that you need to trust
until the very end, but I was thinking
in here what we can do is actually go
through and paint this little border
down here and then also this top trim up
here. The chocolate brown that's in
here, I think it's going to really kind
of sandwich it and make the wallpaper
feel a little bit more intentional. I
didn't get around to painting the inside
of these yet, so those are going to be
painted our dead salmon color. And then
we're also going to paint these doors
because they're just not really that
nice. They kind of have water damage on
them. They're just an orangey tone and I
actually painted the backside to match
our movie theater room, which is in
here. So I decided after stepping back
and looking at the wallpaper I realized
the little trim piece on the top and the
bottom of the wallpaper in the pink tone
just was doing nothing for the
wallpaper. I felt like we can accentuate
it and add in either a full new accent
color here or just pull a color from the
wallpaper and add it in. So I opted for
the darkest shade, which was that Rojo
Marron color and I just went in and
painted the trim on the top and bottom
of our wallpaper panels. And this is
just kind of to add a little bit of top
weight to the room. It was feeling a
little bit like the wallpaper was
starting and stopping at an odd point
and I feel like this just sandwiches it
and finishes it off a little better.
I mean, look at that border. I feel like
that just totally changed the look and
feel of it and I just love how this room
already had those little trim accents
because it gave me a lot to work with
and I didn't have to add [music] them.
I finished off the painting by just
painting the inside of our little China
cabinets the same exact color, so it
felt cohesive and when we style this
it's just going to blend into the wall.
All right, guys, painting is pretty much
done. Justin's doing just the second
coat on our cabinets over here, that way
we can let those cure before we put some
items in them. I like to let like the
paint cure for a couple days before
placing decor on shelves at least. And I
want to share with you guys the light
that I'm actually going to be using in
this space. I actually bought it kind of
in honor of purchasing my home. I knew I
was going to need some new light
fixtures. I went out to a Spanish
Revival antique store called Revival
Antiques in Pasadena and I found this
really great light fixture there and I
was obsessed with it and had to just buy
it at the time and I never found the
right spot for it. This is the light
fixture. It is a stained glass like
Spanish {slash} craftsman almost style
iron fixture that has four little
stained glass like shades. It's so
heavy. It's all hand hammered metal and
I think it's really really going to add
a little edginess to the space because
as you guys see it has more of a
feminine feel which I love but I want to
incorporate this and I also love the
yellow here because it ties back to the
kitchen. All the tile in the kitchen is
yellow, a ton of yellow accents in the
neighboring room and the movie room
right here is burgundy and I just feel
like this tone being seen kind of just
blending a little of the yellow into
there. This is so heavy. I love the
style of this light fixture and I've
been looking for the right spot for it
and I think this room is it.
>> [music]
[music]
>> I was scouring Facebook Marketplace for
a potential table for this space and I
came across this cream marble option
that was just perfect. I wanted
something heavy that just kind of
grounded this room and I felt like this
pedestal was nice. It had a hexagon base
and just kind of like a rounded top to
it and it was in a really great cream
tone which contrasted beautifully with
the wooden chairs that I've had forever.
If you guys recall these were in the
first ever breakfast nook makeover I did
in the upstairs breakfast nook when I
first bought my house and I've since
changed those chairs but I've always
loved these cuz they have a really fun
pivot back to them and so I wanted to
keep them and I added a little bit of
styling. We needed to break up the
wallpaper a little too. That's another
thing is like when you first wallpaper a
space, sometimes you could step back and
be like, "Wow, this is a lot." But you
can add large pieces of art. You can
layer over the top of your wallpaper to
really break up that pattern and let
your eye kind of bounce around a little
more. And then I also styled all the
little shelves throughout and I just
hate the way that my camera makes the
light look in the kitchen, how it makes
those like cabinets like almost
chartreuse. I promise you they're not.
They're like a buttery yellow, [music]
which is gorgeous, but Sony camera, I
don't know how obsessed I am with her.
I'm trying to find a new one at the
moment. If you guys have any
recommendations, please leave them in
the comments below. But as many of you
guys know, I use a majority vintage in
my projects, so a lot of these are just
things that I found styling or just out
at the flea market and of course I sell
it online. So if you want some similar
looking pieces, check out my shop.
>> [music]
>> This here is actually a canvas print. As
you can see, I had this printed from
Shutterfly. I actually got this quite a
while back and I just had it sort of in
my stash of stuff and I love these
because they're printed inside of like a
shadow box frame, which which I think
instantly sort of gives a modern gallery
edge to a piece of artwork. But what I'm
actually going to do is give it a layer
of varnish to almost make it look more
realistic. And I'm putting this close to
a window and so I think that's really
going to also reflect some of the light
and just overall give it the appearance
of a real oil painting. shared a few
times on my channel in the past. I'm
just going to be using Mod Podge in the
gloss finish. I'm just going to start
with like a generous
coat. This is going to dry fully clear,
so just go in,
give a coat. Take a little of that.
What I'm going to do is kind of like on
her hair here, I'm going to go back and
add some brush strokes that start to
make it look like it could have actually
been painted into the piece. You're
going to sort of want to follow the
outline underneath. Add
a little blending there.
Maybe in this I'll do the brush strokes
in the opposite direction, sort of going
this way. Now, we're going to wait for
this to fully dry, and I'll share it
with you once it's dry.
I popped by the shop. We are closed
today. It is a Monday, but in our little
den area, we have this lovely section of
hardware, which has a ton of different
knob hardware, hooks, handles, towel
bars, whatever you might need
hardware-wise. And we have these great
little golden knobs, which I think are
going to be perfect just to finish off
the cabinetry inside of our breakfast
nook. So, I'm going to grab two of the
longer handle, and then two of the oval
knobs, and maybe even a hook, as well,
just to have in there. Secured the
hardware. Let's head back to the house.
I went through and added on the new
hardware to our cabinets. I just wanted
something a little more simple. The
former hardware was crystallized, which
was just not the vibe, and it is [music]
time for me to share with you guys the
reveal of the space. I only have these
little before clips, so I wanted to add
them in, [music] and I'm so happy with
how this space turned out.
>> [music]
[music]
>> All right, guys. So, that finishes off
this miniature breakfast nook / small
dining room. You can totally use this as
inspo for a dining space as well. And I
love love love the transformations we
did in here. The wallpaper is so bold,
but I feel like we were able to kind of
tone it down and really offset it with
like our pink tone that's on the walls
and the ceiling. And I also love
introducing the yellow in the light
fixture. So happy I finally got around
to using that light fixture as well
because I've had it in my house for like
2 years. And I love how it looks in this
room. Arch shape kind of inside of the
archway as well is so nice. I think it
just fits perfectly. So, I'm very happy.
I hope you guys like this one. It's
definitely a little bit of a different
makeover. So, let me know what you guys
think in the comments section below.
Justin's over there. You might be able
to see him. He's just chilling back
there. Thank you guys so much for
watching and I'll catch you in my next
one. Bye.