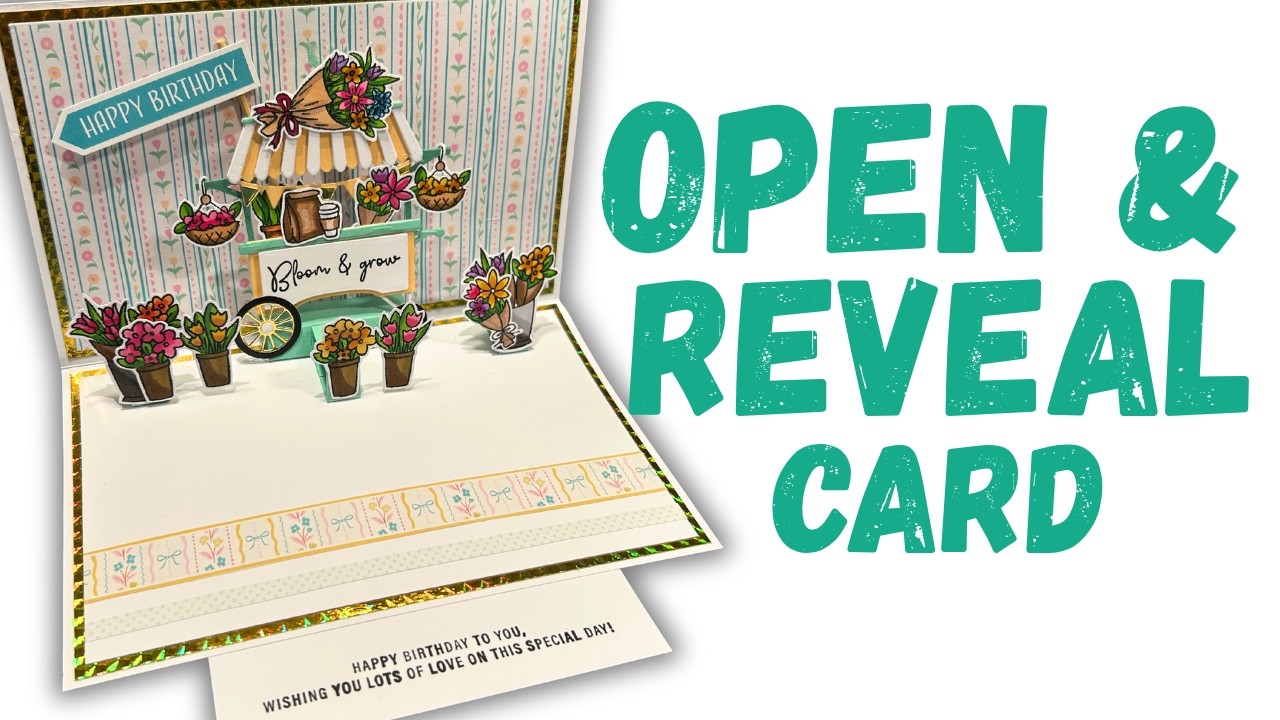
Ever made an Open & Reveal Card? TRY ONE TODAY! No Dies Needed!
Watch on YouTubeVideo summary
In this tutorial, Sam demonstrates how to create a unique 6 by 8 inch open-and-reveal card that features a sliding message section and optional pop-up elements without requiring any dies. The project utilizes the "Made to Make" kit, specifically Issue Three, along with a birthday verse from an all-verses set to reveal a heartfelt message inside. Sam emphasizes that the pop-up mechanism is entirely customizable; viewers can choose to include just the opening slide or decorate the interior differently, offering flexibility for various design preferences. The construction begins with a 10 by 8 inch base card scored down the middle to allow it to stand upright when opened, layered with gold holographic mats and patterned paper that resembles cute wallpaper.
The core mechanism involves creating a hidden message tab at the bottom of the card using a specific scoring technique on a 6.5 by 5 inch piece of cardstock. Sam scores this piece along one side and folds it to create a stand that allows the card to display its contents vertically. To attach this pop-up element, she trims small sections from the end tabs to ensure they fold flat and do not push the mechanism out of shape. This process is repeated for additional decorative pop-ups, such as floral bouquets, where the length of the scoring can be adjusted to control how far the elements extend when the card is opened.
Once the structural components are assembled and glued securely, Sam adds a sliding flap on the back of the card that holds the revealed message. She carefully stamps the sentiment "Happy Birthday to you" onto this hidden panel, ensuring it fits perfectly within the designated space before closing the card. The final design features a clean front with a large sentiment and a single floral element, while the interior reveals a charming display of flowers in pots and the sliding birthday message. Sam notes that while she used a wooden stick for one extra pop-up to avoid adding too much weight, the card is sturdy enough to support its own structure without toppling over.
The video concludes with Sam showcasing the finished product, highlighting how the card stands elegantly on a table or desk when opened. She encourages viewers to explore the versatility of the design by adjusting the size of the pop-ups or choosing to omit them entirely for a simpler look. For those interested in replicating the project, she mentions that links to the "Made to Make" kit will be available in the video description, though availability may vary depending on when the viewer watches. Overall, the tutorial provides a clear, step-by-step guide to making a functional and decorative card that combines sliding mechanics with optional 3D elements for a special touch.
Read the full video transcript
Hey everyone, it's Sam here and today
I'm going to show you how to make this 6
by8 version of the popup slide card.
I've shared a couple on the channel now,
but I haven't done this size and I
wanted to use my new kit made to make
kit to decorate this one with a very
cute little card there that I've used,
but it reveals this message. There a
little slide section there. Happy
birthday to you. Wishing you lots of
love on this special day. You don't need
any dyes to make this one. I've done the
pop-ups a little bit different to the
other way. All of the pop-up is
completely optional as well. you might
just want to have this piece opening and
then just decorate it differently
inside. So there's quite a few ways to
change it as well. But it's really easy
to make. So let me show you how. So I'm
using my made to make. This is issue
three. And I'm also going to use one of
the verses from my all the verses set.
And it's the top one, the happy birthday
to you, but everything else is using
what's in the kit there. So I've already
stuck some of the pieces down. So you
want a piece of 10 by eight. And along
the 10in side, you're going to score it
five right down through the middle. And
then you want to add your mats and
layers. So I've got the gold holographic
which is 4 and 3/4 by 7 and 3/4.
You want two of that size. And then this
is going to be the background. This is
what will be upright when you open the
card. And then the pattern paper is 4
1/2 by 7 and 1/2. I love the design of
this. It looks like a wallpaper, but
it's just such a cute style. And then
I've gone for plain on the bottom
because this is where I will have
probably my handwritten message when I
send the card. So get all of those stuck
down. Fold it in half. Give it a good
burnish. Then for the front of the card.
So this is what they will see when they
take out the envelope. This is a piece
of 8 by six. So it's that full card
size.
And then I've got the mats and layers on
top. So you've got the gold holographic
is 7 and 3/4 x 5 and 3/4 and then 7 and
1/2 by 5 and 1/2. and get those all
stuck down. And then you'll want this
piece, which is what's going to pop out
the bottom. So, you can have a hidden
message on here. This will be added to
the playlist once it eventually goes
live because this is first going out to
the subscribers of the kit. And then
once the next kit comes out, then it
will be live. So, depending on when
you're looking at this, there may not be
everything in the playlist just yet. So,
this is a piece of 6 and 1/2 x five.
Along the 6 and 1/2 side, you're going
to score it half an inch and then just
fold and burnish. Then for the little
pop-ups, which are all optional, you
don't need to have as many as me, but
I've got three of
this size, which is half by 3 and 1/2.
And along the long side, you're going to
score, do it that way, actually at half,
at one,
two, and two and 1/2.
And just fold and burnish all those
score lines. We'll stick those together
in a minute. And then for the card to
pop up, I've got this piece of 2 and 1/2
by 2 and a/4. To be honest, the length
can be anything you want really cuz
that's what's it could be as long as the
whole card. So it could be 8 in. This is
just a bit of scrap, which is why it's
two and a quarter, but two will be fine.
Two and a half, it's up to you. As long
as you do the 2 and 1/2 width, okay?
Because along that you're going to score
at half an inch, 1 in, 1 and 1/2, and
two. And you just want to fold and
burnish all those pieces. So, taking
your main one here, if it's directional
paper, make sure it's the right way up
with this one. Fold it over again with
the with it in this orientation. Fold it
down. This piece is going to stick with
this end flush with the open end here.
So, can you see it's this is set back
and that's how it's going to be. This
actually ends up being like the stand
for it. That's how it will stand up like
this. So, if you add your glue
all on this piece. So, I've got the fold
at the top. And again, with it facing
the right way, you're just going to sit
that over the top. Making sure it's nice
and flush with this end. Just give that
a minute to dry. Open it up as well.
Make sure it's nice and neat that way
cuz that's how it's going to be
displayed.
And you can just lay it that way if you
want just to dry. Just whilst that's
grabbing, I'm going to stick these
pieces together. So with this one,
because you'll have five half inch
pieces on the right hand end on this
side, just take a little bit off. Okay?
And that's the one you're now going to
add your glue to. And this is going to
fold back in. Just means it won't push
it out of shape. So with the glue on
that one that you've just trimmed, if
you fold that one over with one of the
plain sides, and then fold the end over,
and you'll see it will fold nice and
flat. And then open it up and fold it
back the other way. Give that a good
burnish. And then with these ones,
you'll have an end that's got a 1 in
section and then an end that's got two
half inch sections. That's the one you
want to add your glue to. So that very
end little tab. And the same thing, just
going to fold it over. So you've got the
glue and one of the plain ones. And then
fold over one inch section. When you
bring it up, you've got that rectangle
shape. These are going to pop out. I
just wanted them a bit longer. If you
want to have yours popping out even
further, then extend the one inch
section. Keep your half inches. So if
you want to do, so if you want to have
it, you know, two inches, then you do
half an inch at one and then score at
three and then three and a half and then
it would be a 5 in piece. So you can
play around with the length of that.
Okay. So once you're happy that that's
stuck down, you then want to take this
piece. You're going to run your glue
along the front along that tab. There's
the fold facing the top. This one is
going to go in the middle. It's going to
go flush with this one. You just want to
make sure it's in the middle. So, you
could looking at one and a half from
each side.
So, I just bring it up to the side for
you. You can see how it should all look.
And you can see straight away how that's
going to pop out. You then need another
bit of card. I forgot there is another
bit of scoring you want to do. This is a
piece of 10 by 2 and 1/2. And along the
10 in side, you're going to score and
nine inches.
So, make sure these are folded in and
they're going to stick over the top
here. You want to bring it up about one
inch from the bottom here, but you're
sticking the you're going to add your
glue here. You're sticking it onto the
back of the card. So, there's that flap.
You could stick it down, but if that's
lifted if you want, but you're going to
have to slide it under anyway, so you
might as well do it whilst it's over the
top. My glue is all on the back there.
Then we're just going to stick this one
down like so. So give everything a good
burnish. Make sure it's all secure.
And now when you open it, your tab will
pop out the bottom and it will stand up.
So I can see how much room now I've got
to stamp my message. So I'm just going
to put a little pencil mark there. Very
light. I'm going to open it right up.
Now you can still put this in your
stamping platforms, whatever it might be
that you so it's easy to stamp on. Yeah.
The happy birthday to you. Wishing you
lots of love on this special day, which
will fit perfectly. Okay, now just rub
out that little pencil mark. Just going
to give that a minute to dry cuz I don't
want it to smudge when it goes back
under. But you can see now how that
looks. Next, we can attach these pieces
here. So, this is my beautiful little
floral cart. And I want this one to pop
out just a little bit. However far this
comes out, you have to then take into
account it's got to fold flat and it
might poke out the top. So that's why
I've just gone for this little um half
inch platform that's going to stick
right up into that corner and it can
just attach the wheels. And then when
that folds flat, it just fits inside,
which is perfect. I've then got these
ones because I want to have
some of the flowers, some of the flower
pots are going to pop up like so. So,
I'm going to stick this one down first.
So, if you just fold it in half and you
just want to add your glue
to one section that's facing you and
then flip it over and the same piece on
the back. Okay. So, you see it's both
covering those same sections. I'm going
to just pop that in the middle.
Push it right up into the fold and close
the card. Just let that glue kind of
grab. There we go. and carefully lift it
up and just make sure that that's
definitely secure. You might want to go
in with some tweezers or something just
to make sure that's completely stuck
down. Just add in a little glue behind
the wheel so I can see how much is going
to attach there.
I'll put it this way so you can see it a
bit better. Stick them down. You need to
lift them up just a little bit from the
bottom because you don't want them to
make a bit of a scratching sound. See,
it's just a couple of mil off the bottom
there. Just going to pop that underneath
just to stop that dipping whilst that's
just drying a sec. And then I can also
stick these in. So with these ones, they
work exactly the same way. You want to
fold it flat, but this time because you
got two different sizes. The bottom one
is that whole one in section. And then
the little half inch on the top is
what's going to attach to the back. So
this will attach to the bottom. This
will attach to this piece here. And it's
up to you where you're going to position
these. You might want to stick one on
this one and have the florals in front,
but I think I'm going to have like my
space for my message. So, I'm going to
pop one here. So, I'm just going to drop
that half inch section. You can stick
them down opened up a little bit if you
want just to kind of help plan out.
You see that one? How that would look?
Then that can stick on top. But now
[snorts] I think that that's that glue's
doing its thing. Just going to close the
card now just so I can stick that one
down better. I'm going to stick this one
on the other side. I might end up using
this one actually on the front. So
that's the card all finished. I've just
kept the front quite basic just with a
large sentiment there and then one of
the little bouques from the stamp set.
And then when you open it up, you have
this wonderful display and there's
little pop-ups. I've added this the
happy birthday as one of the um pieces
that you can cut out from the paper pad.
I put it on a little wooden stick. I
didn't put it onto this because I just
didn't want to add more weight onto it
because it is holding up okay. But yeah,
if I add any more, it might topple. And
then you can see I've added the extra
popup onto that one. So just stick it
down the same way that I showed you to
do those. And then I've just layered up
on on top of them with some foam. But
everything is just ever so slightly
lifted from the bottom just to stop it
catching. And then I've got my space for
my message. But I think it looks quite
nice plain. But you've also got all your
space on the back. You could write your
message, you know, there if you wanted
to along this piece to maybe do a mat
and a layer on there. But there you have
it. It displays really nicely. So, I
hope you've enjoyed this card from me
today using the May to Make issue three.
So, depending on when you're watching
this, if you're one of the subscribers,
I hope you've enjoyed this one. And if
you're someone catching this a few
months later, now it's live on my
YouTube channel. I hope you like this
one, too. As I'm filming this before
it's gone out to subscribers, I don't
know if there's any availability. So, if
it is available, there'll be links
shared in the description box below. But
if you're interested in finding out more
about my made toake kit, then I'll have
that link below as well. Take care and
I'll see you in the next one.