Video summary
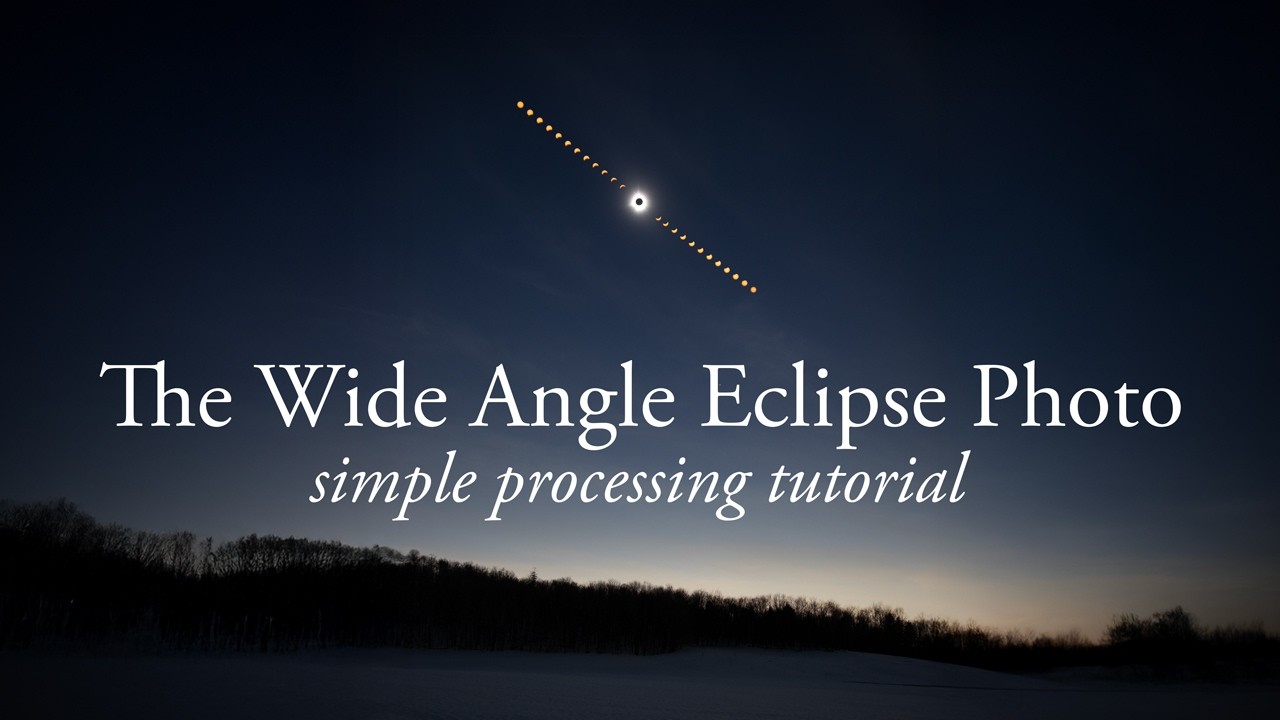
This video serves as a practical tutorial on capturing and assembling wide-angle images of solar eclipses using digital photography techniques that mimic traditional film multiple exposures. The presenter explains the process by referencing data captured during the 2024 total solar eclipse in Vermont, where recent snowfall provided an ideal backdrop for observing shadow bands. Instead of relying on complex star trackers or moving cameras, the recommended approach involves setting up a camera with a wide-angle lens and a homemade solar filter on a stationary tripod. By taking photos at regular intervals—such as every five to ten minutes—the photographer records the sun's path across the sky without needing any post-processing alignment, ensuring that all images remain perfectly registered relative to one another.
The core of the technique involves capturing two distinct phases: the partial eclipse and the brief moment of totality. During the partial phase, with a solar filter in place, the camera captures a series of frames showing the moon progressively covering the sun until it reaches maximum coverage at C2 or C3. At this peak moment, the photographer must remove the filter to capture an exposure without one for the total eclipse itself before replacing it and continuing to photograph the partial phase as the moon moves away from the center. This results in a stack of images where most frames show small crescents of sunlight against blackness, while the central frame displays the full corona during totality.
To combine these separate exposures into a single composite image, the tutorial demonstrates using Photoshop's "Load Files Into Stack" feature to import all photos as individual layers. The key step in this workflow is arranging the layer stack so that the unfiltered totality shot sits at the very bottom and setting every other partial phase layer above it to the "Lighten" blend mode. This specific blending option automatically makes any pixels darker than those below them transparent, effectively revealing only the bright crescent shapes of the sun from each frame while allowing the central corona image to remain fully visible. The result is a seamless wide-angle panorama that illustrates the entire duration and path of the eclipse in one cohesive shot.
The video concludes by encouraging photographers to share their results on personal websites or social media, with a sponsorship segment highlighting Squarespace as an easy platform for creating professional portfolios to display such imagery. The presenter expresses hope that viewers will experience clear skies during upcoming eclipses, particularly noting the event scheduled for August 12th, 2026, which is set to pass through Iceland and Spain. By following this straightforward method of stationary shooting and digital compositing, enthusiasts can create stunning visual records of celestial events without requiring advanced equipment or complex tracking systems.
Read the full video transcript
This video is sponsored by Squarespace.
Happy eclipse day everyone. It's August
12th, 2026, which means that there is a
total solar eclipse happening that's
going to go through Iceland and Spain
today, and I'm wishing clear skies to
everyone who's chasing this eclipse.
I'll be out there chasing it myself. So,
this video is pre-recorded.
This data that you're seeing here, I
captured from Vermont in 2024
for the last total solar eclipse that
went through America and Mexico. And
this was a really special one for me
because I did a lot I led to a lot of
chasing. I was planning to go down to
Texas, but ended up much closer to home
in Vermont, and was just it was a really
beautiful eclipse. And it had snowed
recently, which you can see in the
foreground there. So, it was a really
cool opportunity to see the shadow bands
on the snow.
Anyways, this video is just going to be
a pretty simple kind of tutorial showing
how to put together a wide-angle
eclipse shot like you're seeing here.
And back in the day when people were
still using film,
you could do this entire kind of shot in
camera just by rewinding the film and
exposing
doing a multiple exposure shot on one
piece of film. So, we're basically going
to recreate that process you could do on
film, but with digital. So, in digital
worlds, there are some cameras that
actually allow you to do multiple
exposure in camera, but that's not how I
did it here. Instead, I took many
exposures, and then we're going to
composite them on the computer. But, the
end result looks about the same. And so,
this shows the full path of the eclipse,
right? So, at the top is C1 where the
the moon is is making first contact with
the sun, where it's it's just starting
to cover it up. And then in the middle,
we have totality,
C2, C3, that's sort of the beginning and
end of totality, and then at the end of
this row of little mini suns, we have
C4, the end of the partial phase.
And
the way to capture this kind of thing,
the easiest way to capture this is just
actually not to use a star tracker. Just
using a lens wide enough to capture the
whole event, setting setting up your
camera and the wide-angle lens on a
stationary tripod,
and not moving it. Just just capturing a
shot, you know, every 5-6 minutes, maybe
even every 10 minutes is fine,
just to capture the the path of the
eclipse as it moves through the sky. And
then it's going to be much easier to
bring everything back together if you
just have a stationary tripod,
because
yeah, you don't have to do any kind of
alignment. It's just what the sun
actually did, the path of the sun. And
so that's what I did here. I was just on
a stationary tripod with a Canon T7
stock
crop sensor DSLR, a 14-mm
wide-angle lens,
and homemade solar filter on a
stationary tripod and an intervalometer,
or you could use the interval timer in
your camera if it has one. So, let me
first start the tutorial by showing you
what the data looks like. These are
straight from camera. I don't know why I
resaved them as TIFFs at some point. Uh
probably just some archiving thing I
wanted to do. Um but anyways, this is
the first frame, and then I'll go into
the the second frame, and you can see
the sun moves.
And it looks like the sun is just
moving, but we're also actually getting
little bites out of the sun as the moon
starts to cover it. Let me zoom in so I
can show you that. So, see, there's a
little bite out of the sun now, or the
the moon is starting to cover it up, and
it just continues like that.
And the more that you the more photos
that you took during this partial phase,
the closer together these little suns
will be. So, you'll see different styles
here. Um I actually think I was shooting
every minute or two, and so I actually
took some out cuz I didn't want them to
be so spaced so closely together. But,
if I were doing this again, I would
probably just capture the partial phase
every 6 minutes. I think is about what I
would prefer for the final shot. But,
you can see as it gets closer to
totality, more the sun is turning into
more and more of a little crescent
there.
And the rest of the frame is just black
because we're using, of course, the
solar filter, which blocks out all light
except for the sun, which is so bright.
Um and eventually, in the middle of this
sequence,
we get to this shot. And so, this is
just a single exposure of totality, um
taken right at max eclipse, so right in
the in the center of totality. Um and of
course, you do you would have to take
off the solar filter and change your
exposure settings to get this shot cuz
your exposure settings with the
uh eclipse filter on, it's probably
going to be a shorter exposure than this
one would be. After the totality shot,
then
it it continues with the partial phase
on the other side. Um so, this is after
C3, after the moon has passed over the
sun. Okay, so now we're going to put all
of this together into one shot. This is
called compositing, and you can do this
in really many different programs. Um
I'm going to be showing it in Photoshop
here, but it works really almost exactly
the same way in or Affinity or any
layers-based program uh to what I'm
showing here. And it's really going to
be pretty simple, so I think you can
figure it out in any layers-based
program that you use. Okay, so here's
Photoshop. I'm going to go to file,
scripts, and load files into stack. This
is just an easy way to grab all of your
pictures and put them all into layers.
So, right here it says use files, that's
what we want. We'll click browse, and on
my desktop there is this folder of those
captures that I was just showing you,
and we want all of them. So, I'm just
going to select all,
control A on Windows, command A on Mac.
They're now all selected. I'll click
open.
Okay, and then you can see them here in
this list.
We do not want to turn on either of
these options, attempt to automatically
align source images or create smart
object. So, if either of these are
checked, go ahead and uncheck them.
And then we'll click okay.
Okay, and after a few seconds, it's
loaded all of my
pictures into the layers panel here.
And it it
loaded them in the order that they were
taken because they have these, you know,
file numbers from the camera. So, we're
at the top here we have the first
picture,
you know, the C1 basically, and at the
bottom
down here,
we have C4 when the
the the last little bit, when the moon
the moon is leaving the sun. And in the
middle of this stack, we should have the
totality shot. Yep, there it is, right
there.
And so, the first thing that I want to
do is actually take this totality shot
and move it to the bottom of the layers
panel. So, I'm just going to click on
this layer, and then click and hold and
drag it down
until it's down here at the bottom. And
I didn't quite get it to the bottom, so
I'm just going to
move this one on top. There we go.
So, now this totality shot is all the
way at the bottom of the layers panel,
okay?
And I want to show you something, which
is sort of cool.
I'm just going to turn um
on only the visibility of this totality
shot.
And then I'm going to turn on the
visibility of just the next layer on
top, which is this
final one of the sun from the partial
phase.
And I'm going to go up here to where it
says normal. See there on the layers
panel where it says normal. I'll zoom in
on that so you can see it.
This is what we call the layer blend
mode. And when it's set to normal, that
means that this layer, because it's on
top of this layer, is completely
covering it up. But a blend mode makes
certain pixels transparent. And the
blend mode we want to use in this
tutorial is called the lighten blend
mode. What that does is it takes any
pixels that are brighter in this image
than
in any of the layers below, and it makes
those fully opaque, but any of the
pixels that are darker than the images
below, it makes those fully transparent.
So, let me show you what that means in
practice. We'll change it from normal to
lighten,
and voila! This that little sun appears,
but all the parts that were black
are now made transparent, so we see down
to the totality shot.
And we actually want to do this for all
of the layers. So, you can do it, you
know, one by one like this.
Just moving up and clicking on each one
and choosing lighten, but it can be
easier just to select all of these
layers and change them all to lighten at
once. So, I've turned on the visibility
back on for all these layers. I'm going
to click on this bottom one,
hold down shift and click on the top
one, and you can see now all these
partial phase layers are selected, and
I'll change them all to lighten.
And so, that's
it. It's that simple to make a full
wide-field composite image, right? I
just again, just to review, put the the
totality shot, which was taken at max
eclipse, at the bottom,
taken all of my partial phase shots,
didn't have to do any movement of them
because this was on a stationary tripod,
uh and just changed all of them to
lighten blend mode.
And that's it. That's the whole
>> [laughter]
>> uh
to get to this final image. And after
you have that perfect solar eclipse
shot, what do you do with it? Well, what
I do with mine is I put my best images
on my own personal website at
nicocarver.com,
and if you want to create your own
website, today's sponsor Squarespace
makes that super easy. You can purchase
your own domain name and hosting for
your website all in one place, and
Squarespace includes professional
templates for your website that are
intuitive and easy to customize due to
Squarespace blueprint, which is their
design system.
Everything you need is included from a
spam-free contact form to selling tools
built in. And if you do want to sell a
service or product through your website,
customers can pay however is convenient
for them, from credit card to PayPal to
Afterpay. So, if you need a professional
website, check out
squarespace.com/nebulaphotos
for your free trial. And if you like it,
you'll get 10% off your first purchase
of hosting or domain with code
nebulaphotos at checkout. Well, that's
it for this one. I hope everyone gets
clear skies for this 2026 eclipse. I'm
looking forward to seeing all your
photos.