Video summary
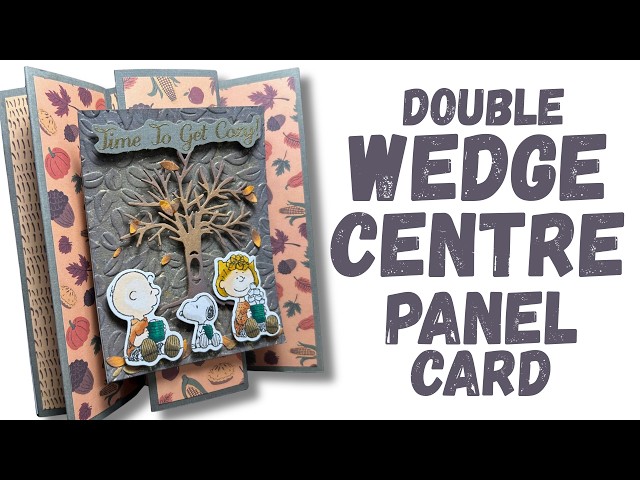
In this crafting tutorial, Sam demonstrates how to create a delightful "Double Wedge Centre Panel Card," a design originally inspired by her friend Louisa Einstein Designs. This project is particularly appealing because it requires no dies, making it an accessible and fun way to make cards that fold flat for mailing in standard envelopes. Sam has decorated the example using the autumn-themed Snoopy collection, though she notes that any stamp set can be paired with the provided paper pads to achieve a similar look. The card features a top fold design that maximizes space for messages while maintaining a compact profile once closed.
The core of the project lies in the precise cutting and scoring of three specific panels: two side wedges and one central spring panel. Sam recommends starting with a 6x6 inch card blank or cutting down a larger sheet to ensure the final assembly fits perfectly within standard envelope dimensions. The side pieces are cut to 6.5 inches by 6 inches, while the center piece is slightly wider at 8.5 inches by 6 inches. Each panel is scored at specific intervals—2, 3, 4, and 6 inches for the sides, and 2, 3, 4, 6, 7, and 8 inches for the center—to create a series of mountain and valley folds. A crucial tip shared is to avoid burnishing these score lines; instead, simply fold them gently to preserve the necessary springiness that allows the card to pop up when opened.
Once the individual panels are folded into their characteristic "M" or double-"M" shapes, they are glued together in a specific sequence to form the final structure. Sam advises using a repositionable glue to allow for slight adjustments before the adhesive sets, ensuring all three sections align flush with the bottom edge and corners of the card base. The assembly is designed so that the internal join lines face upward when closed, keeping them hidden from view when the card is displayed or mailed. This method allows crafters to batch-make multiple cards quickly, as the structural preparation is fast and can be done before adding any decorative elements.
The final step involves decorating the assembled card with various embellishments, such as stamped images, paper strips, and foam mounts for a 3D effect. Sam uses ephemera from her stash and an embossing folder to create a lovely autumnal scene, but she emphasizes that the decoration process is highly customizable to suit any theme or personal style. The entire project, from preparation to filming, took less than twenty minutes, highlighting its efficiency as a quick craft solution. By following these simple steps, anyone can replicate this charming pop-up card that combines structural ingenuity with creative freedom for endless design possibilities.
Read the full video transcript
Hey everyone, it's Sam here. And today,
I'm going to show you how to make this a
very fun card. And this is called a
double wedged pop-up panel card. It's by
my crafty YouTube friend Louisa Einstein
Designs. So, I will drop a link to hers
below. But, I thought, I really like
that. I want to give it a go. So, I've
decorated it with the gorgeous Snoopy
collection. This is a past autumn one,
but I'll show you the products in a
moment. It's a top fold, so you've got
all your space there to write your
message. You can see how it displays.
And the great thing is, it all folds
flat and it fits in a standard 6 by 6
envelope. So, I decorated my envelope
there. So, that is all ready to be
posted off to someone. So, I'm going to
make the same again, but I'm going to
simplify the decoration. So, let's get
started. So, I know there's lots of
Snoopy fans out there. If you are
interested, this is the collection I've
used. Now, when I was making this, this
is all that's still available on the
website. The infomercial did sell last
year.
But, that's the stamp set that I used on
this one here. The tree is actually from
a May to Surprise, one of my own die
sets.
But, the papers are great. So, if you've
already got some autumnal themed stamps,
then the papers will compliment them
quite nicely.
Again, like I said, I'll share the links
below.
Okay, so I prepared some of it. It is a
very, very easy. So, you want a 6 by 6
card blank. You do want an exact 6 by 6
because the three bits we stick on top
are 2 in wide. So, you do want that to
be 6 by 6. So, I actually cut down a 7
by 7 card blank. But, if you've got a
piece of 12-in card stock, you want a
piece of 12 by 6 and along the 12-in
side, you score at 6. Okay? So, I'm
having mine as a top fold, but you could
put this as a side fold as well if you
want. Okay, so I've already prepared one
of the wedge side pieces. So, you'll
want two pieces of 6 and 1/2 by 6. And
along the 6 and 1/2 side, you're going
to score at 2,
3,
4, and 6.
And then for the center spring, let's
say, you want a piece of 8 and 1/2 by 6.
And along the 8 and 1/2 side, you're
going to score at 2, 3,
4,
6, 7, and 8.
So, to fold your wedge piece, so this
one's going on the left side. So, with
your 1/2 in tab here, I've got mine on
the right, you want to create a mountain
fold,
then a valley,
and then another mountain,
and another mountain.
Now, my top tip with this card is don't
burnish the score lines, just fold them.
We want that really nice spring. So,
even so it can go flat, but can you see
I haven't really burnished them. And I
think that's the key for this to all
lift up nicely. So, that is the shape
you want. It's like an M shape with your
little 1/2 in tab. You're now going to
run your glue down that tab, and then
you're just going to stick that one
underneath.
You can fold it all down flat. Like I
said, don't really put a lot of
pressure. Just going to do it on that
corner which folds in, but these outer
sides I'm just going to make sure they
stay nice and bouncy. And I'm happy with
that. And then I always have the join
facing up. So, as you're looking down,
you don't see it. Now, I have a little
bit of it overhanging there, so I'm just
remove that.
It's only a minor thing. I wouldn't
worry too much, but when it's displayed,
see, as you're looking down, you don't
see the tab. Whereas, if I flip it that
way, you can see the join. So, just a
little detail there if you want. And
then with this one here, you've got your
1/2 in tab again on the right hand side.
You're going to create a mountain fold,
then a valley, then a mountain,
and another mountain, valley,
mountain. This is a 220 GSM cardstock.
Just an old one from my stash. I believe
it's either Tonic Studio or
it's one from my local craft shop.
So, this one here,
you want that shape.
It's like a double M again. You've got
your M shape here, and you've got your M
shape there. But, that's the effect you
want. It's like a little spring. I've
made these a lot.
And again, you're going to add your glue
all the way down your tab, and then just
close that one up. And again, just kind
of push it down, but you don't really
want to heavily burnish. And again, I'm
going to have it so that the join is at
the top. And my join is there, just so
again, when you're looking at it, you
don't see that. Now, if you want, you
can decorate these when they are like
this, or when you stuck them down. I'm
going to stick everything down and then
decorate it. I just had that one ready
just for speed really in the video. So,
what you want to do first, take your
left side, and you're going to add your
glue all onto the back, and then you're
just going to sit this one again. I want
mine to be a top fold, so it's going to
go right to this left side. And I'd
recommend using a glue that you can kind
of position,
cuz you might want a bit of wiggle room
once you all three are down.
Then I'm going to take the other
side. You could put the middle one down
if you want. It's It really doesn't
matter. And now this one's going to go
right over on that right side, right up
into the corners.
Make sure it's flush with the bottom,
and then this one
you're going to add your glue all onto
the back panel,
and then that one should just fit
perfectly in the middle. You want them
pushed together. If you just carefully
fold it all down, then you can move it
around.
It's quite easy.
I said, it's good to have a little bit
of wiggle with your glue.
But now you have that cool design. Comes
together very quickly. I said when I
made this one during my YouTube live,
cuz I do have another crafting channel
where I just do live tutorials. If you
enjoy live interactive tutorials, I'll
link that below.
But I did say it's a good one if you
need a fun style card. It's very quick
to put together, and it's easy to kind
of batch make as well.
So, now it's ready to decorate. So, I've
got all of my pieces here from the paper
pad, and I've got my topper already
there. So, I'm using the ephemera
for this one, just cuz I've got them
left over, but you can again bring in
this one. And you can see that lovely
scene. Oh, and the embossing folder
is my leaves 3D embossing folder. I'm
not sure if this one's still available,
but it is beautiful. I think I'm going
to be using it quite a lot for my autumn
cards this season. Okay, so you're going
to want What was it? One, two,
three strips for the two sides and the
middle and these are 1 and 3/4 by 5 and
3/4.
I think I'm going to have that pumpkin
one there and then that one.
And then you want eight strips that are
3/4 of an inch
by 5 and 3/4 and they're for the two
little sides here, then your two sides
there, two sides there and two sides
there. You can see how they look. You
can see on that one.
And then your topper. So, I've cut mine
so it's 3 and 1/2 by 4 and 1/2 but this
could be an oval shape. It could be
bigger, smaller. You might want to have
two. You might want to actually have
this as a white strip. You might have a
nice slimline kind of stamp that you
could stamp in the middle. So, there's
lots of ways to decorate it but I'm
going to pop it up on some foam and then
just position it there in the middle.
And there's the finished card. Lovely.
Quick and easy. Honestly, that took me
less than probably 20 minutes to prepare
and then I'll just film the tutorial.
It's a very quick one to put together
and again just bring this one up. You do
want to get your stamped images out. I
think it looks very sweet. I just need
to make an envelope for this one. But I
love it. So, thanks for the inspiration,
Louise. Again, like I said, I'll drop
her link to her tutorial as well below.
I think I'm going to do a few more. So,
make sure you subscribe so you get to
check out my future videos. Like I said,
products I've used if they're still
available, they will be linked in the
description box below. Coming up now be
some more fun folds if you want to go
and check those out and I will see you
again in the next one. Bye.